WITH sample AS (
    SELECT text, label AS human_label,
           ai_analyze_sentiment(text) AS ai_sentiment
    FROM lakehouse.finance.financial_news TABLESAMPLE BERNOULLI (0.05)
    LIMIT 5
)
SELECT substr(text, 1, 80) AS snippet,
       human_label, ai_sentiment,
       CASE WHEN human_label != ai_sentiment THEN 'DISAGREE' ELSE 'AGREE' END AS verdict,
       ai_gen('In one sentence, explain why this financial news might be seen as '
              || ai_sentiment || ': ' || substr(text, 1, 500)) AS reasoning
FROM sample;
Tag: openshift
When SQL Meets GenAI: Building an Intelligent Lakehouse on OpenShift
17 May 2026
Tags : trino, ai, genai, iceberg, openshift, openshiftai, lakehouse, minio, nessie, sql
Connecting data to LLMs using Trino AI Functions, Apache Iceberg, and Red Hat OpenShift AI
Cloud data platforms like Databricks and Snowflake are racing to embed AI directly into SQL. With Trino’s AI Functions, the open-source ecosystem now has the same capability — and on Red Hat OpenShift AI, you can bring your own models, your own data, and your own infrastructure.
This post walks through an architecture that connects a modern Iceberg lakehouse to LLM-hosted models using nothing but SQL. No Python notebooks. No ETL pipelines. No ML frameworks. Just SQL queries that think.
The Architecture
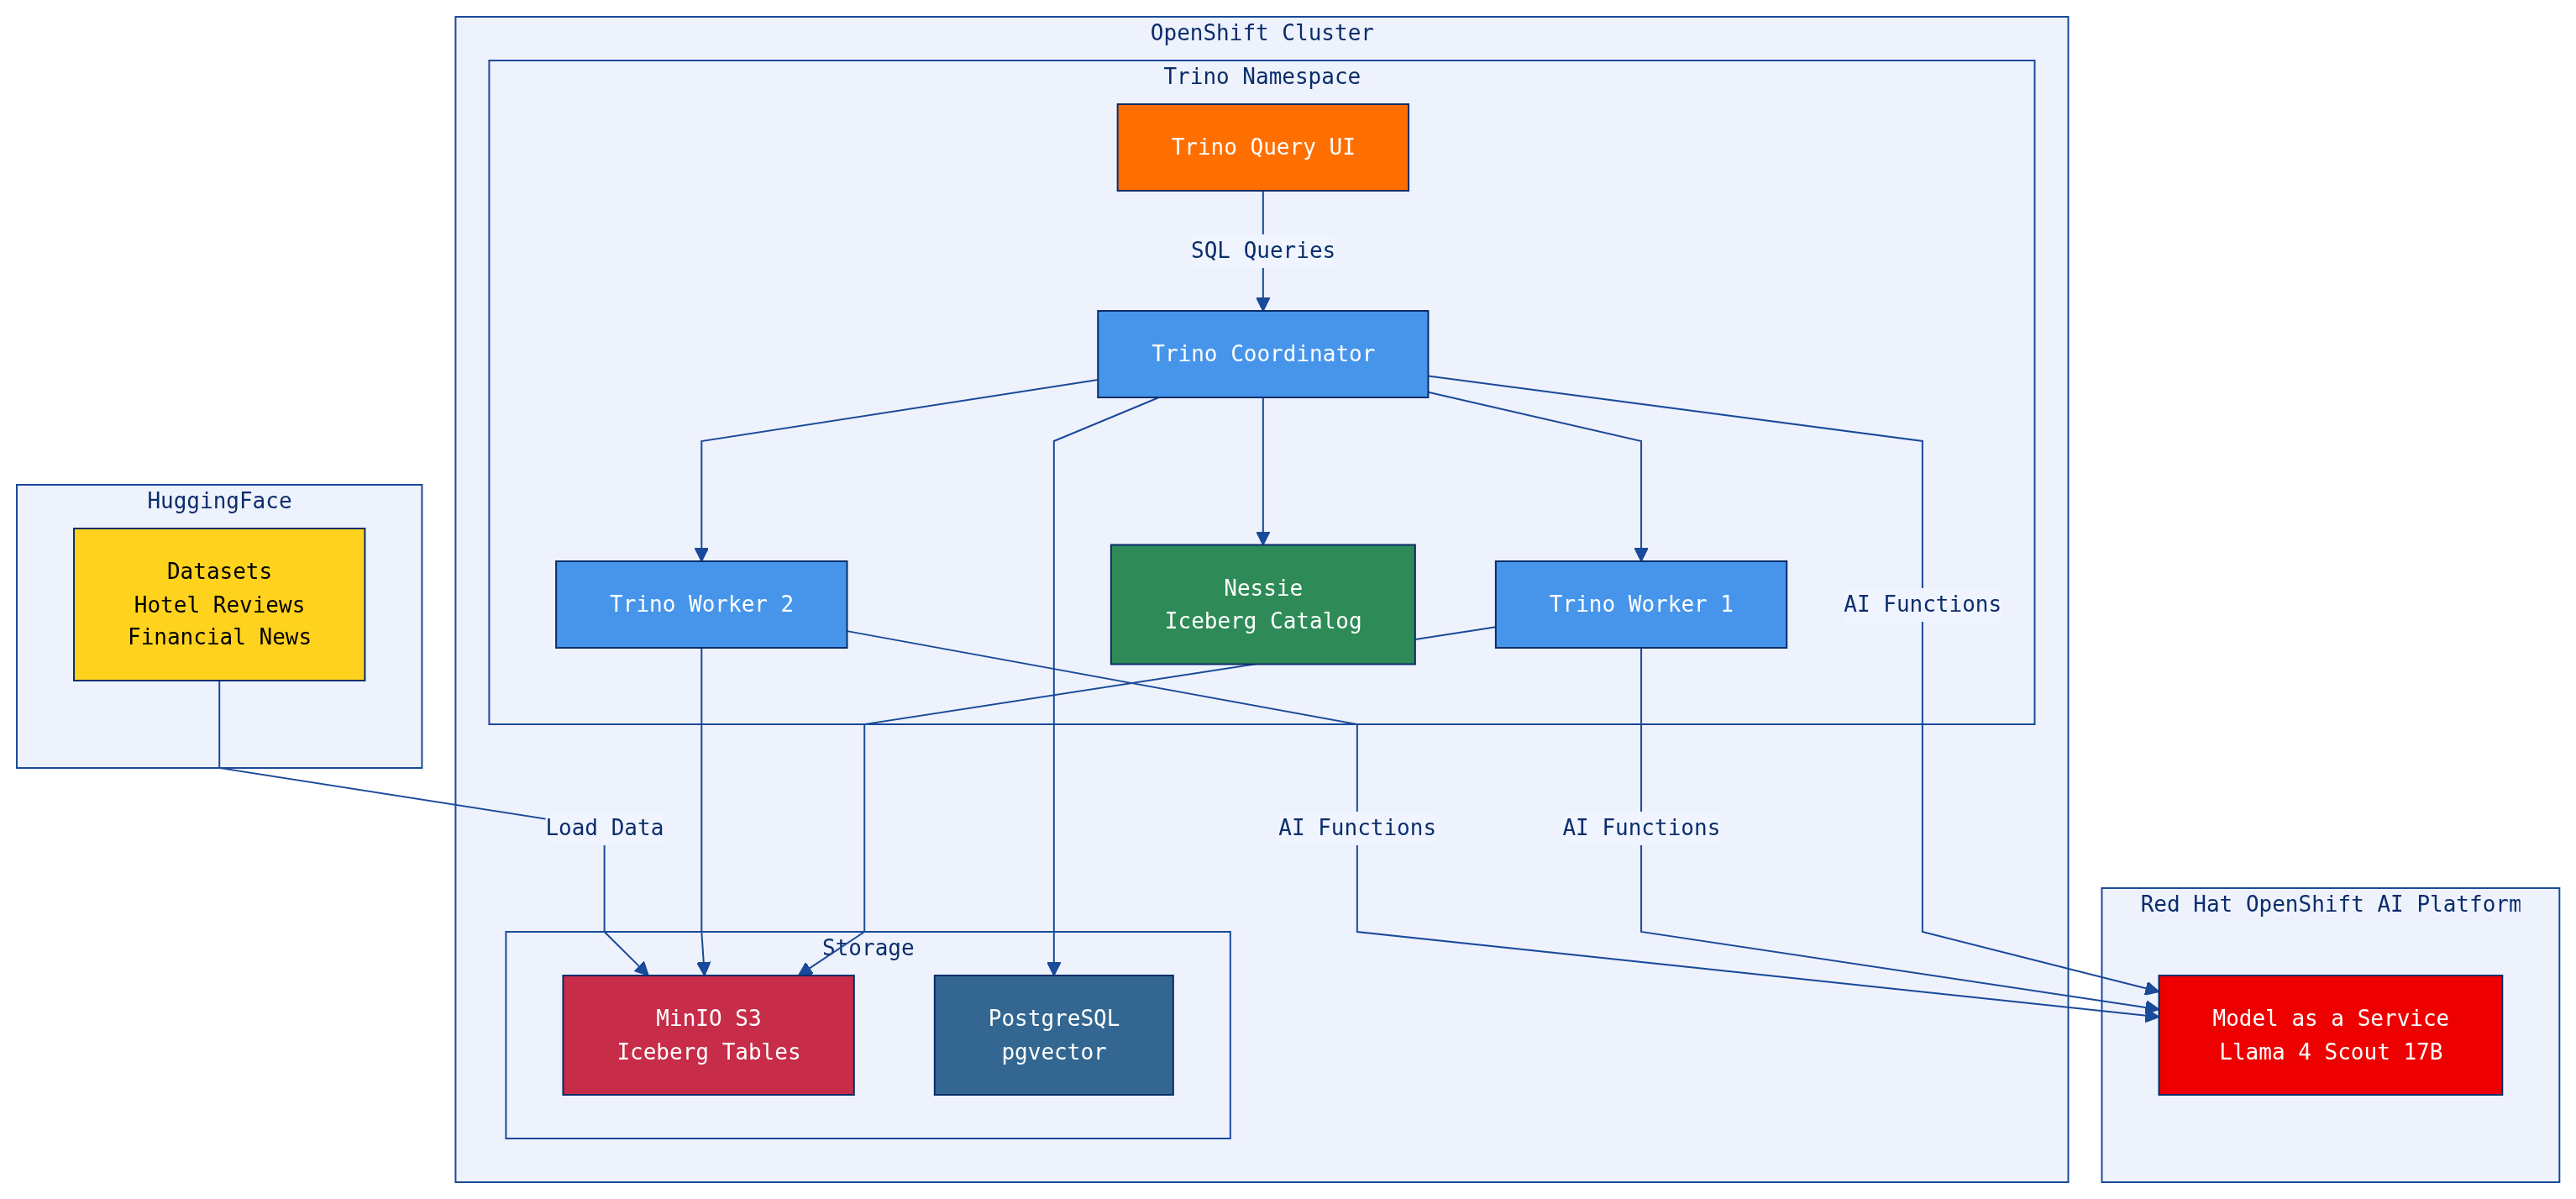
The stack runs entirely on OpenShift:
-
Red Hat OpenShift AI hosts LLMs as a Model-as-a-Service (MaaS) endpoint — in our case, Llama 4 Scout 17B with NVIDIA
-
Trino is the distributed SQL engine that federates queries across multiple data sources
-
Apache Iceberg on MinIO S3 provides the open table format lakehouse, managed by a Nessie catalog server
-
PostgreSQL (with pgvector) adds a relational/vector data source
-
HuggingFace datasets (hotel reviews, financial news) provide real-world text data for AI function demos
-
Trino Query UI gives analysts a web-based SQL editor
The key insight: Trino sits at the center, federating across data sources and LLM endpoints in a single query. A data analyst can join Iceberg tables with PostgreSQL, run sentiment analysis on the results, classify them by category, and generate an executive summary — all in one SQL statement.
What Are AI Functions?
Trino AI Functions let you call an LLM directly from SQL. They’re built-in functions that transform and enrich text data using large language models, without leaving your SQL environment.
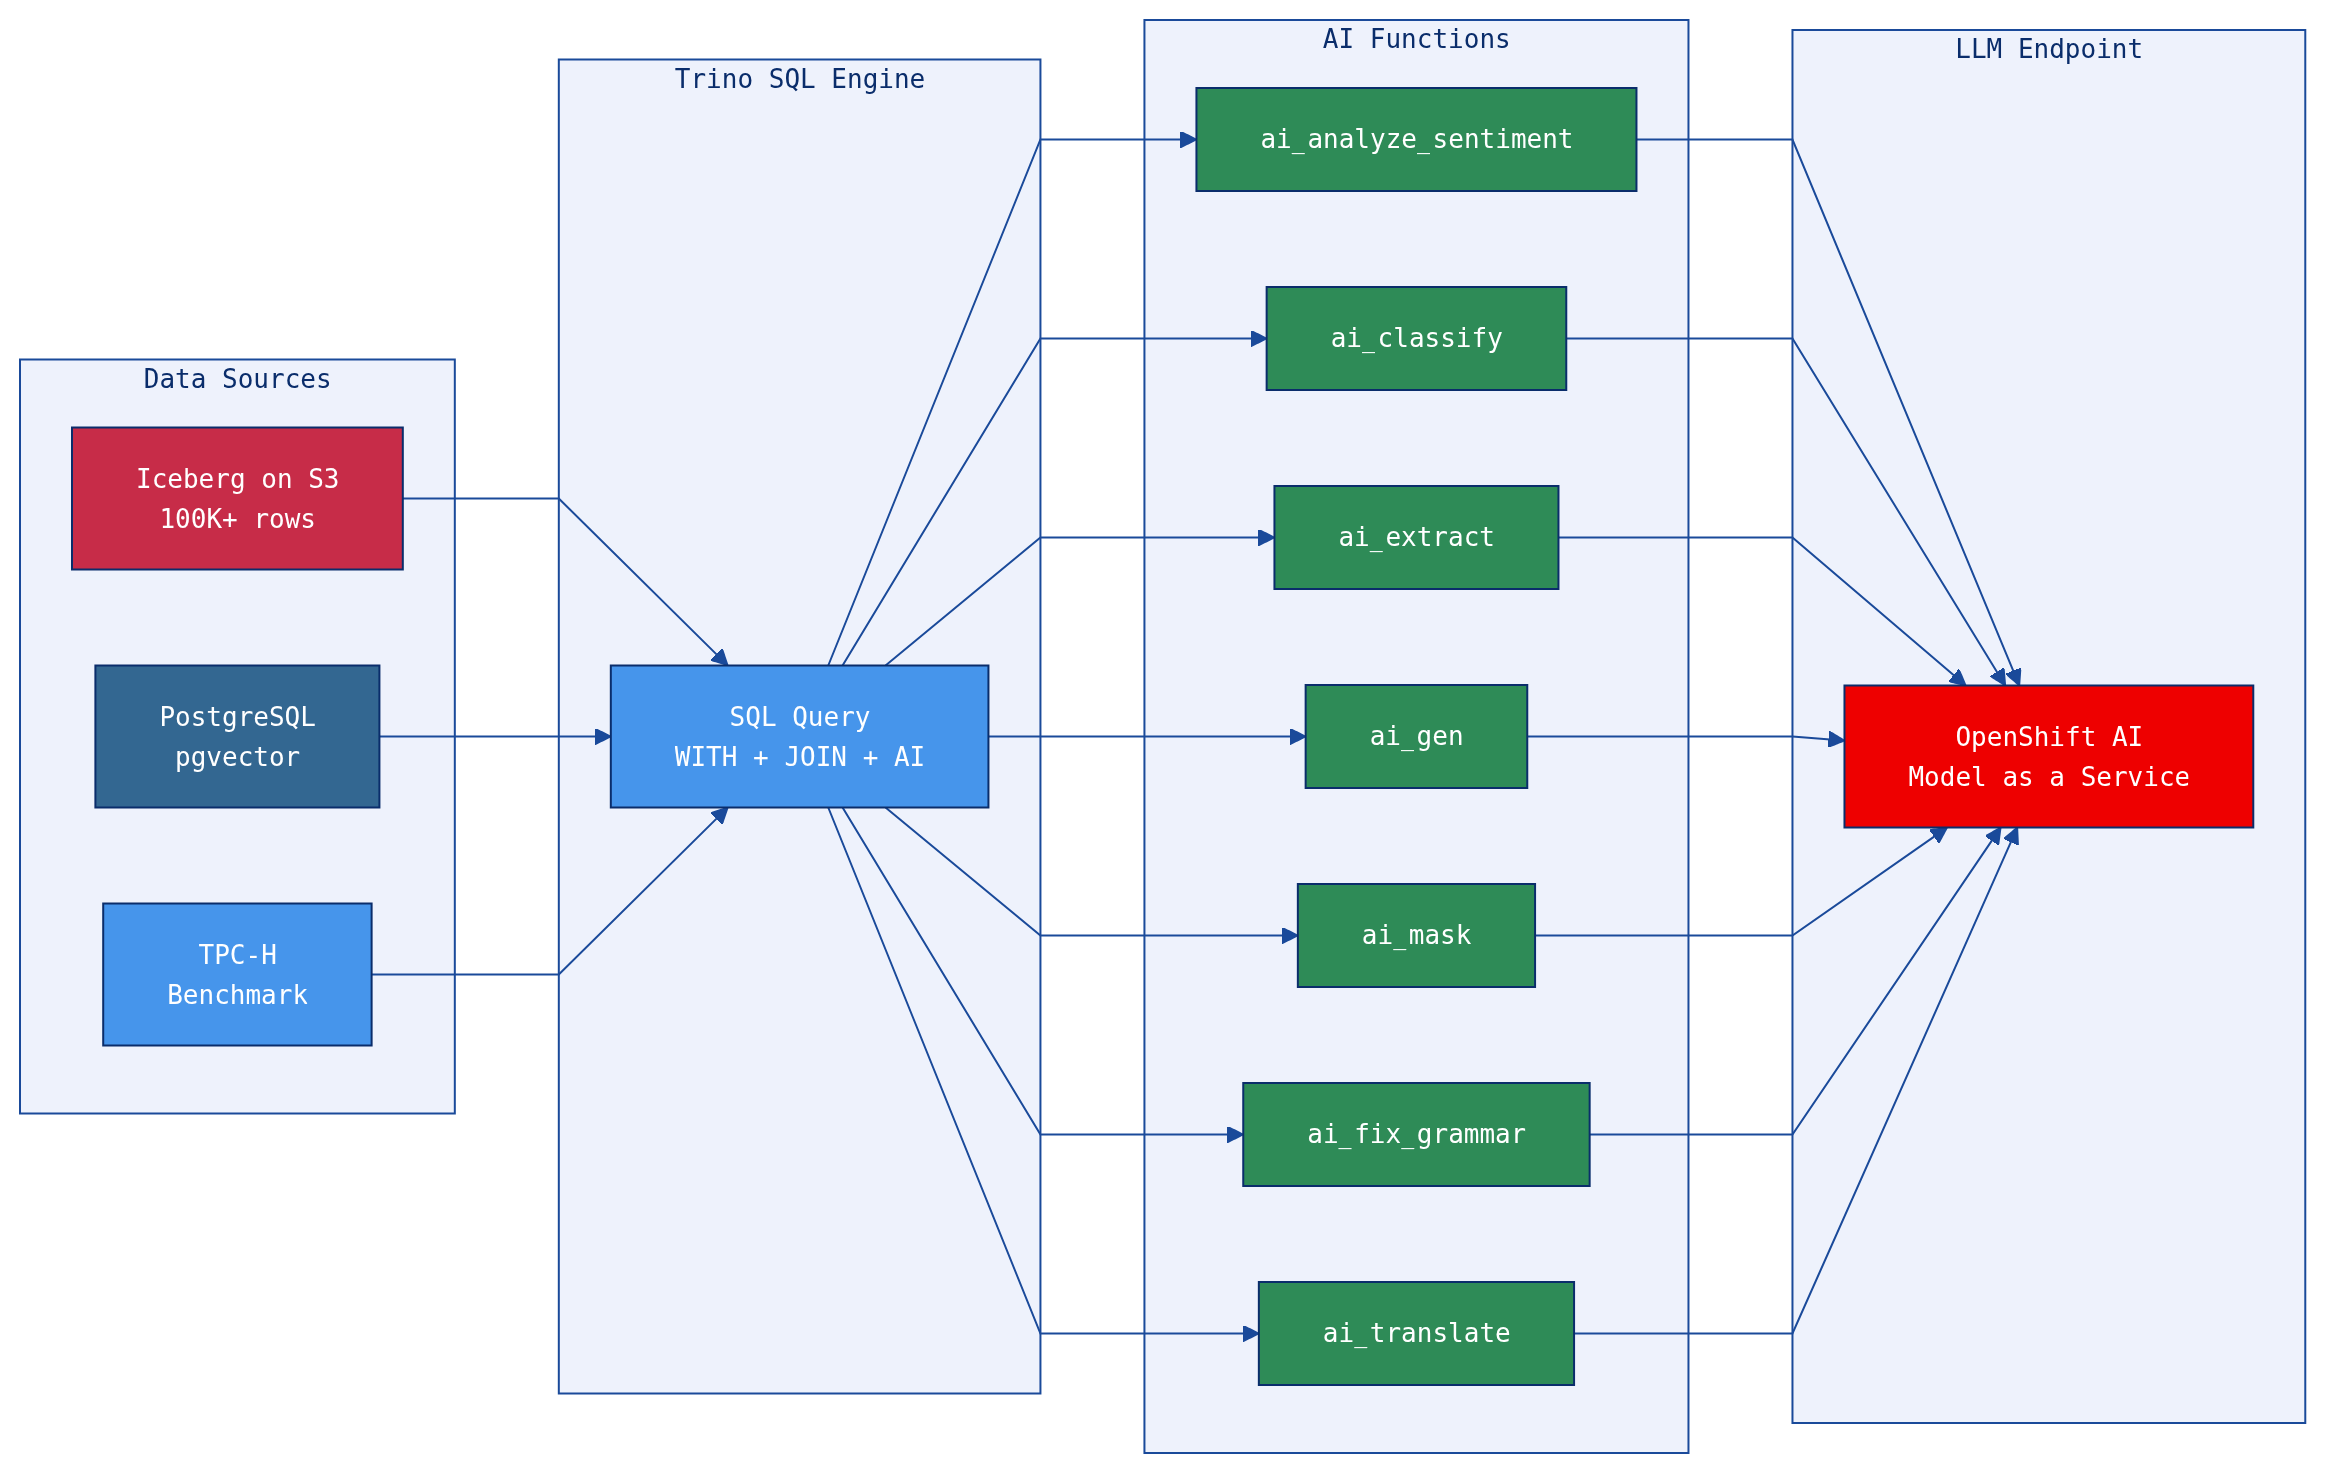
Seven functions cover the most common text analysis patterns:
| Function | What It Does | Example Use Case |
|---|---|---|
|
Classifies text as positive, negative, neutral, or mixed |
Customer feedback triage, threat detection |
|
Assigns text to one of your predefined categories |
Log categorization, spam detection, risk classification |
|
Pulls structured data from unstructured text |
Entity extraction from logs, parsing incident reports |
|
Corrects grammar and improves readability |
Cleaning noisy log data, polishing reports |
|
Generates new text from a prompt |
Executive summaries, threat reports, daily briefings |
|
Replaces sensitive data with |
PII redaction, compliance exports |
|
Translates text to a target language |
Multilingual log analysis, international collaboration |
The functions connect to any OpenAI-compatible endpoint. On OpenShift AI, that means you can use any model served via vLLM, NVIDIA NIM, or the MaaS gateway — keeping your data and models within your own infrastructure.
Why This Matters: Data Meets Model
Traditional approaches to applying AI to enterprise data involve extracting data, running it through Python notebooks, calling APIs, and loading results back. This creates fragile pipelines, data movement overhead, and security concerns.
With AI Functions in SQL:
-
Data stays in place. Queries run where the data lives — S3, PostgreSQL, or any Trino-connected source. No ETL to a separate ML environment.
-
Models are services. The LLM is an API call, not a deployment you manage in your notebook. OpenShift AI handles serving, scaling, and GPU allocation.
-
SQL is the interface. Data engineers and analysts already know SQL. No new frameworks, no new languages, no new tools.
-
Results are composable. AI function outputs are regular SQL columns — you can filter, join, aggregate, and export them like any other data.
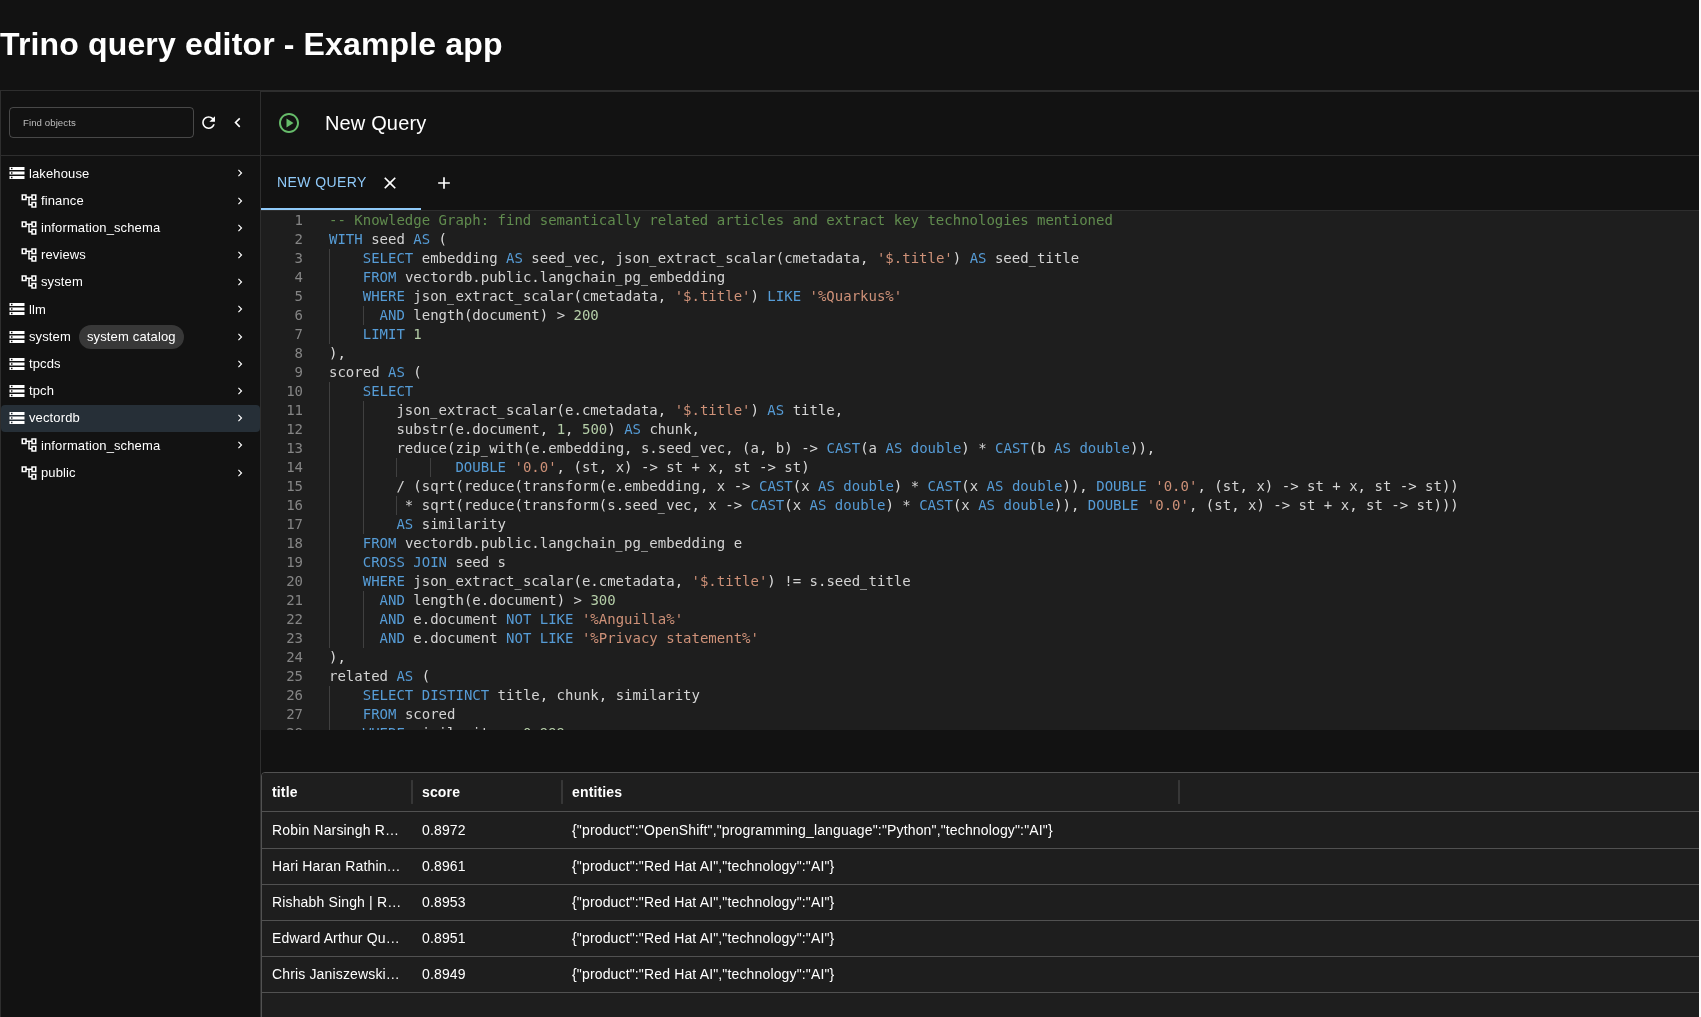
The Query UI in Action
The Trino Query UI lets analysts write and execute AI-enriched SQL queries directly in the browser — no CLI required. Here’s the knowledge graph example extracting technologies from semantically related developer articles:
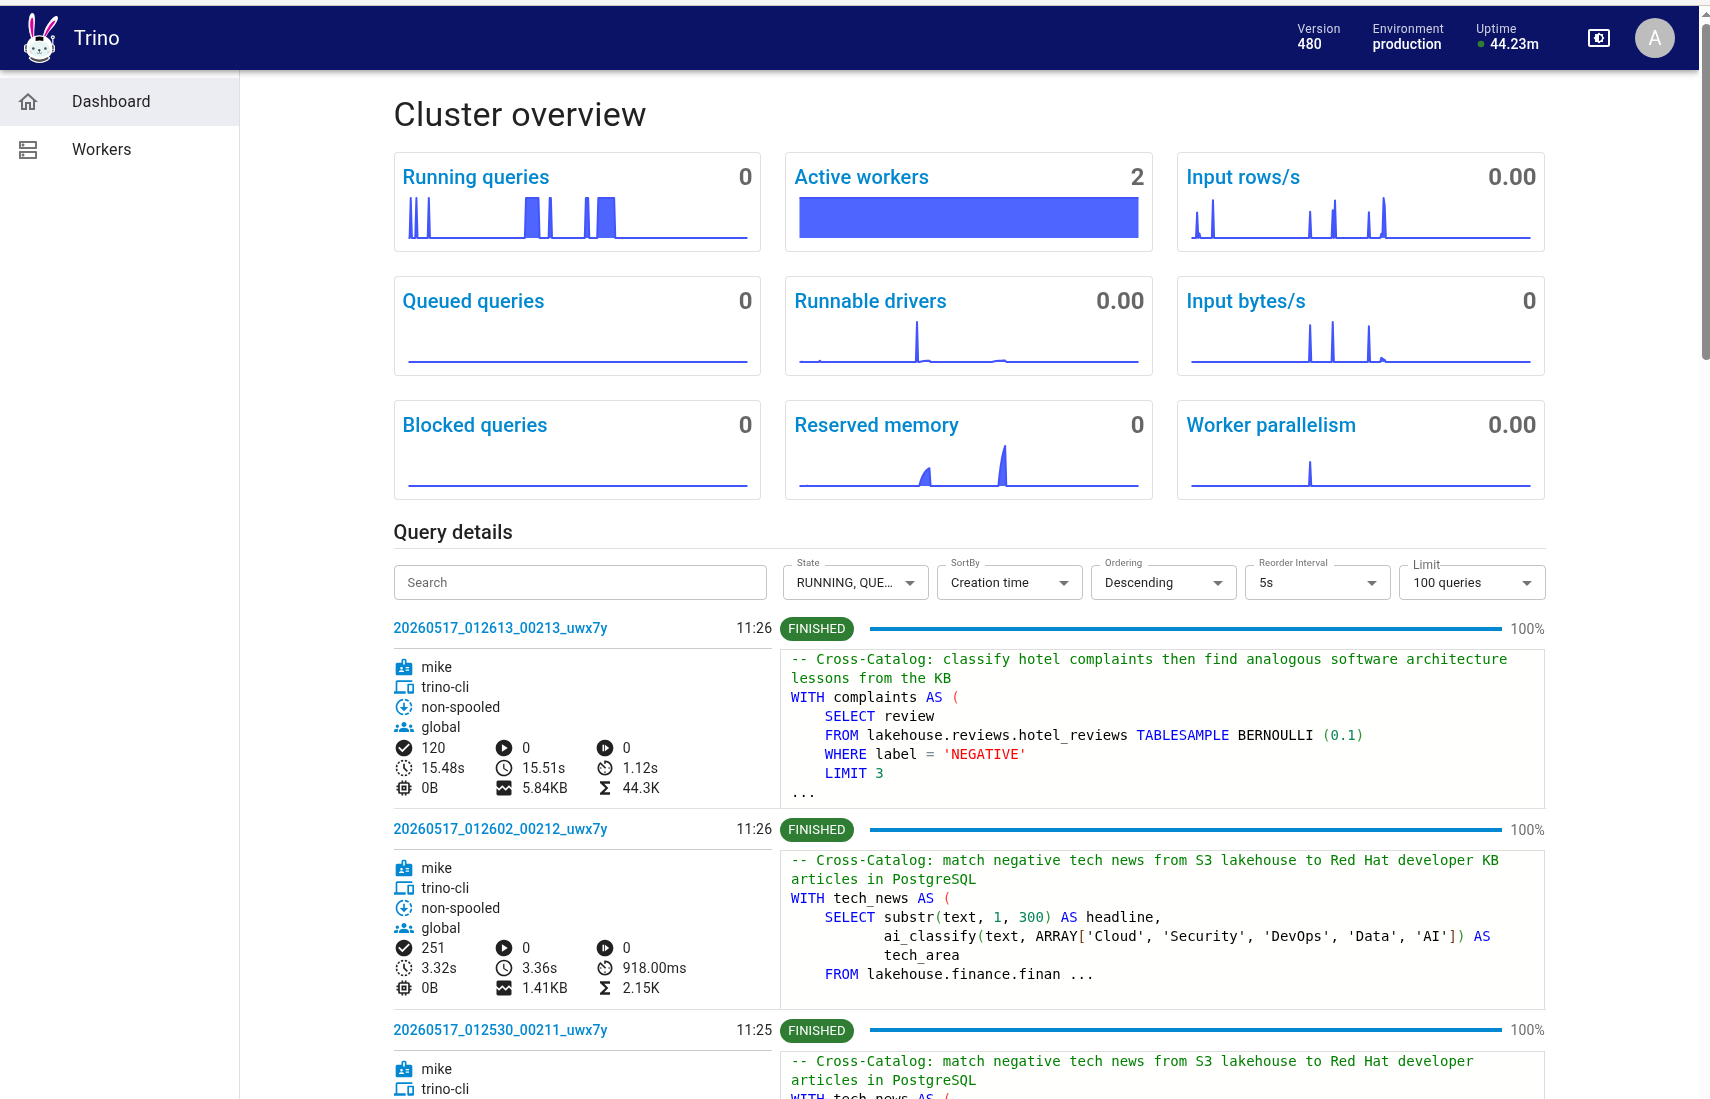
And the Trino cluster dashboard showing active workers processing AI function queries in parallel across the distributed engine:
34 Examples: From Security Analysis to Financial Intelligence
We built 34 example queries that demonstrate every AI function across three domains: cybersecurity log analysis, financial intelligence, and developer knowledge base search. Here’s the breakdown:
Self-Contained Examples (inline data)
| # | Example | AI Functions |
|---|---|---|
01-03 |
Sentiment analysis — insider threats, phishing emails, support requests |
|
04-07 |
Classification — firewall logs, phishing subjects, SIEM alerts, web requests |
|
08-10 |
Entity extraction — authentication logs, file integrity monitoring, process logs |
|
11-12 |
Grammar correction — firewall logs, IDS alerts |
|
13-14 |
Text generation — threat report summary, anomaly explanation |
|
15-16 |
PII masking — login events, firewall logs |
|
17-18 |
Translation — Japanese firewall logs, Spanish IDS alerts |
|
Lakehouse Examples (real data from S3)
| # | Example | AI Functions | Data Source |
|---|---|---|---|
19 |
Review intelligence pipeline |
|
17K hotel reviews |
20 |
Executive summary from guest feedback |
|
17K hotel reviews |
21 |
PII-safe multilingual review export |
|
17K hotel reviews |
22 |
Market mood ring — AI vs human labels |
|
100K financial news |
23 |
Financial threat intelligence |
|
100K financial news |
24 |
Multilingual trading desk |
|
100K financial news |
25 |
AI editorial pipeline |
|
100K financial news |
26 |
Daily analyst morning briefing |
|
100K financial news |
The lakehouse examples are the most interesting because they combine multiple AI functions in a single query against real data stored in Apache Iceberg on S3. For example, the Market Mood Ring (example 22) cross-validates AI sentiment against human-assigned labels and explains disagreements:
And the Daily Briefing (example 26) aggregates negative financial news into an analyst morning report:
WITH bad_news AS (
    SELECT text FROM lakehouse.finance.financial_news TABLESAMPLE BERNOULLI (0.5)
    WHERE label = 'negative' LIMIT 10
)
SELECT ai_gen(
    'You are a senior financial analyst. Write a concise morning briefing (5 bullet
    points max) summarizing the key risks and themes. Include actionable
    recommendations: ' ||
    (SELECT json_format(CAST(array_agg(text) AS JSON)) FROM bad_news)
) AS morning_briefing;
These aren’t toy examples. They query 100,000 real financial news articles stored as Iceberg tables on MinIO S3, with the LLM inference happening in parallel across Trino workers.
Part of a Modern Data Mesh
This architecture isn’t just a demo — it’s a pattern for how enterprises can operationalize AI within a data mesh strategy:
-
Data Products. Each Iceberg table (hotel reviews, financial news, vector embeddings) is a self-describing data product with its own schema, quality guarantees, and access controls.
-
Federated Governance. Trino federates across MinIO S3, PostgreSQL, and benchmark datasets without moving data. Domain teams own their sources; Trino provides a unified query layer.
-
AI as a Shared Capability. The LLM endpoint is a platform service — any domain team can call
ai_classify()orai_gen()from their SQL queries without provisioning GPUs or managing model lifecycles. -
Open Standards. Apache Iceberg, S3-compatible storage, OpenAI-compatible API, and SQL. No proprietary lock-in — swap MinIO for AWS S3, swap the LLM for Claude or GPT, swap Nessie for AWS Glue. The architecture is portable.
OpenShift AI: The Platform Advantage
Running this on Red Hat OpenShift AI provides specific advantages:
-
Model Serving at Scale. OpenShift AI’s MaaS gateway handles model serving, load balancing, and GPU scheduling. Models are exposed as simple REST endpoints that Trino calls via the OpenAI-compatible protocol.
-
Security by Default. OpenShift’s Security Context Constraints (SCCs) enforce non-root containers, capability dropping, and namespace isolation. Data never leaves the cluster.
-
One-Click Deployment. The entire stack — MinIO, Nessie, Trino, Query UI — deploys with a single
./install.shscript. Environment variables configure the LLM endpoint, S3 credentials, and optional PostgreSQL catalog. -
Kubernetes-Native Operations. Helm charts, K8s Jobs for data loading, OpenShift Routes for external access. Standard Kubernetes tooling for day-2 operations.
Hybrid Search: When Vectors Meet AI Functions
The architecture gets even more interesting when you connect Trino to a vector database. Our PostgreSQL instance (with pgvector) stores 154,000 document chunks from every article on developers.redhat.com, each with a 768-dimensional embedding vector. These embeddings power the Red Hat Developer RAG chatbot.
With Trino, we can compute cosine similarity in pure SQL — no pgvector operators needed — and combine it with AI functions for hybrid semantic + AI analysis:
-- Cosine similarity computed entirely in Trino SQL
reduce(
    zip_with(a.embedding, b.embedding,
             (x, y) -> CAST(x AS double) * CAST(y AS double)),
    DOUBLE '0.0', (s, x) -> s + x, s -> s
) / (sqrt(...) * sqrt(...)) AS cosine_similarity
This opens up powerful patterns that neither vector search nor AI functions can achieve alone:
Vector Search + AI Examples
| # | Example | What It Does | Functions Used |
|---|---|---|---|
27 |
Semantic Reading List |
Find articles similar to a seed by cosine similarity, generate a curated reading list |
Cosine similarity |
28 |
Topic Discovery |
Classify random knowledge base chunks into Red Hat product areas |
|
29 |
Content Quality Audit |
Analyze tone and fix grammar across the knowledge base |
|
30 |
Knowledge Graph |
Find semantically related articles, extract technologies and products mentioned |
Cosine similarity + |
31 |
Multilingual Knowledge Base |
Find similar articles, translate to Japanese and Korean on-the-fly |
Cosine similarity + |
For example, the Semantic Reading List (example 27) finds the 5 most similar articles to an LLM tutorial using cosine similarity over 768-dimensional embeddings, then asks the LLM to generate a recommended reading list:
WITH seed AS (
    SELECT embedding AS seed_vec
    FROM vectordb.public.langchain_pg_embedding
    WHERE json_extract_scalar(cmetadata, '$.title') LIKE '%LLM%'
    LIMIT 1
),
similar_docs AS (
    SELECT DISTINCT
        json_extract_scalar(e.cmetadata, '$.title') AS title,
        json_extract_scalar(e.cmetadata, '$.source') AS url,
        -- cosine similarity in pure Trino SQL
        reduce(zip_with(e.embedding, s.seed_vec,
               (a, b) -> CAST(a AS double) * CAST(b AS double)),
               DOUBLE '0.0', (st, x) -> st + x, st -> st)
        / (sqrt(reduce(transform(e.embedding, ...), ...))
         * sqrt(reduce(transform(s.seed_vec, ...), ...)))
        AS similarity
    FROM vectordb.public.langchain_pg_embedding e
    CROSS JOIN seed s
    ORDER BY similarity DESC
    LIMIT 5
)
SELECT ai_gen(
    'Create a recommended reading list from these articles: ' ||
    (SELECT json_format(CAST(array_agg(title) AS JSON))
     FROM similar_docs)
) AS reading_list;
The result: a semantically curated, LLM-summarized reading list — built from a single SQL query that spans a vector database and an LLM endpoint. In one run, it surfaced articles on Llama Stack, AI safeguards, Compressed Granite, and AI Agents — all semantically related to the seed article, ranked by embedding similarity, and summarized by the LLM.
And the Knowledge Graph (example 30) maps the technology landscape around a topic by finding related articles via embedding similarity, then extracting products, technologies, and programming languages from each:
"Accelerate model training on OpenShift AI..."   0.7742  {product=SFTTrainer, language=Python, technology=Trainer}
"Accelerated expert-parallel distributed..."     0.6786  {product=granite-4.0, language=Python, technology=FSDP}
"Optimizing LLMs for accuracy | RHEL AI..."      0.6617  {product=tokenizer, language=Python, technology=LINUX}
This is hybrid search in its purest form: vector similarity narrows the search space, AI functions enrich and structure the results, and SQL ties it all together. No external search infrastructure, no separate ML pipeline — just a query.
Federated Queries: Joining Across Data Sources
The real power emerges when you join data across catalogs. Trino federates queries across the Iceberg lakehouse on S3 and PostgreSQL in a single statement — something no single database can do alone.
Cross-Catalog Examples
| # | Example | Data Sources | AI Functions |
|---|---|---|---|
32 |
News-to-Docs: match financial news to KB articles |
|
|
33 |
Reviews-to-Architecture: hotel complaints as software lessons |
|
|
34 |
Federated Intelligence Briefing |
|
|
The Federated Intelligence Briefing (example 34) is the most ambitious — it pulls negative tech news from the S3 lakehouse, finds related Red Hat developer articles from PostgreSQL, and generates a structured intelligence report connecting market risks to technology solutions:
WITH negative_news AS (
    SELECT text FROM lakehouse.finance.financial_news     -- Iceberg on S3
    WHERE label = 'negative' AND text LIKE '%technology%'
    LIMIT 5
),
kb_highlights AS (
    SELECT json_extract_scalar(cmetadata, '$.title') AS title
    FROM vectordb.public.langchain_pg_embedding            -- PostgreSQL
    WHERE json_extract_scalar(cmetadata, '$.title') LIKE '%OpenShift%'
    LIMIT 5
)
SELECT ai_gen(                                             -- LLM via MaaS
    'Write an intelligence briefing connecting these market risks: ' ||
    (SELECT json_format(...) FROM negative_news) ||
    ' to these technology solutions: ' ||
    (SELECT json_format(...) FROM kb_highlights)
) AS intelligence_briefing;
A single SQL query that reads from S3, reads from PostgreSQL, calls an LLM, and produces an executive-ready intelligence report. Three data sources, one query, zero data movement.
The results are striking. In one run, the briefing automatically connected the SolarWinds supply-chain breach to OpenShift Service Mesh as a mitigation strategy, linked Uber’s service outages to Quarkus serverless architecture as a resilience pattern, and recommended OpenShift Pipelines for CI/CD hardening in response to Oracle’s manual support struggles. The LLM drew these connections entirely on its own — the query just put the right data in front of it by federating across an S3 data lake and a PostgreSQL knowledge base in a single SQL statement.
Getting Started
The entire stack deploys in under 10 minutes:
export OPENAI_API_KEY=<your-maas-token>
export OPENAI_BASE_URL=https://your-openshift-ai-endpoint
export HF_TOKEN=<your-huggingface-token>
export POSTGRES_HOST=postgres.your-namespace.svc.cluster.local
./install.sh
Then run the example queries:
./examples/run_all.shOr open the Trino Query UI in your browser and start writing SQL that thinks.
The source code, Helm charts, install script, and all 34 example queries are available in the https://github.com/eformat/trino-chart repository.
References
Emerging Tech Experience (ETX AI), Vibe Coding, GenAI
20 July 2025
Tags : ai, rhoai, openshift, llm, genai, llama-stack, emacs, agentic
“AI won’t take your job, but someone who understands AI will.” - Economist Richard Baldwin, 2023 World Economic Forum’s Growth Summit.
Vibe coding a GitHub project issues list using Red Hat Openshift AI, Agentic AI, MultiModal + MOE Models, MCP Tools in under 45 min.
Things To Do
It’s not often you spend an intensive week to just hack around. A nice break from the day job.
Here is the succint work flow:
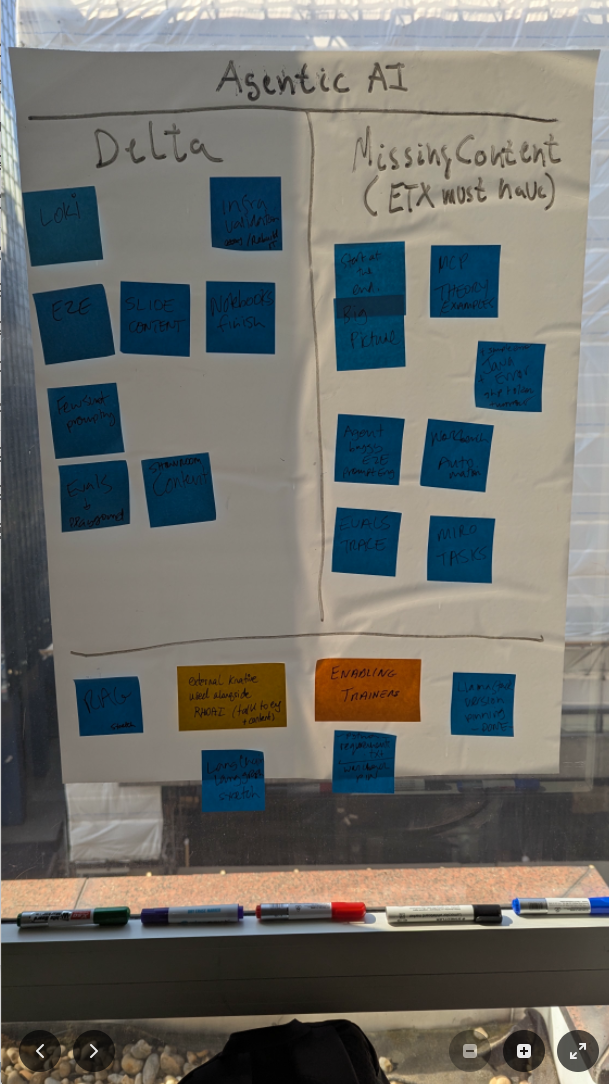
0. post-it note
1. eval models -> qwen wins
2. use qwen VL for first prompt
2.1. emacs + macros to reformat output
3. use llama4 scout for second text only prompt gen
3.1. emacs + macros to reformat output
4. llama stack playground - mcp::github agentic
Sticky notes
Given my past, sticky notes have taken over my life - very much like the scene in "The Fall Guy" - just google "sticky notes the fall guy" and watch that movie.
This was the INPUT for vibe coding, it is a backlog for things we wanted to work on after the hackathon.
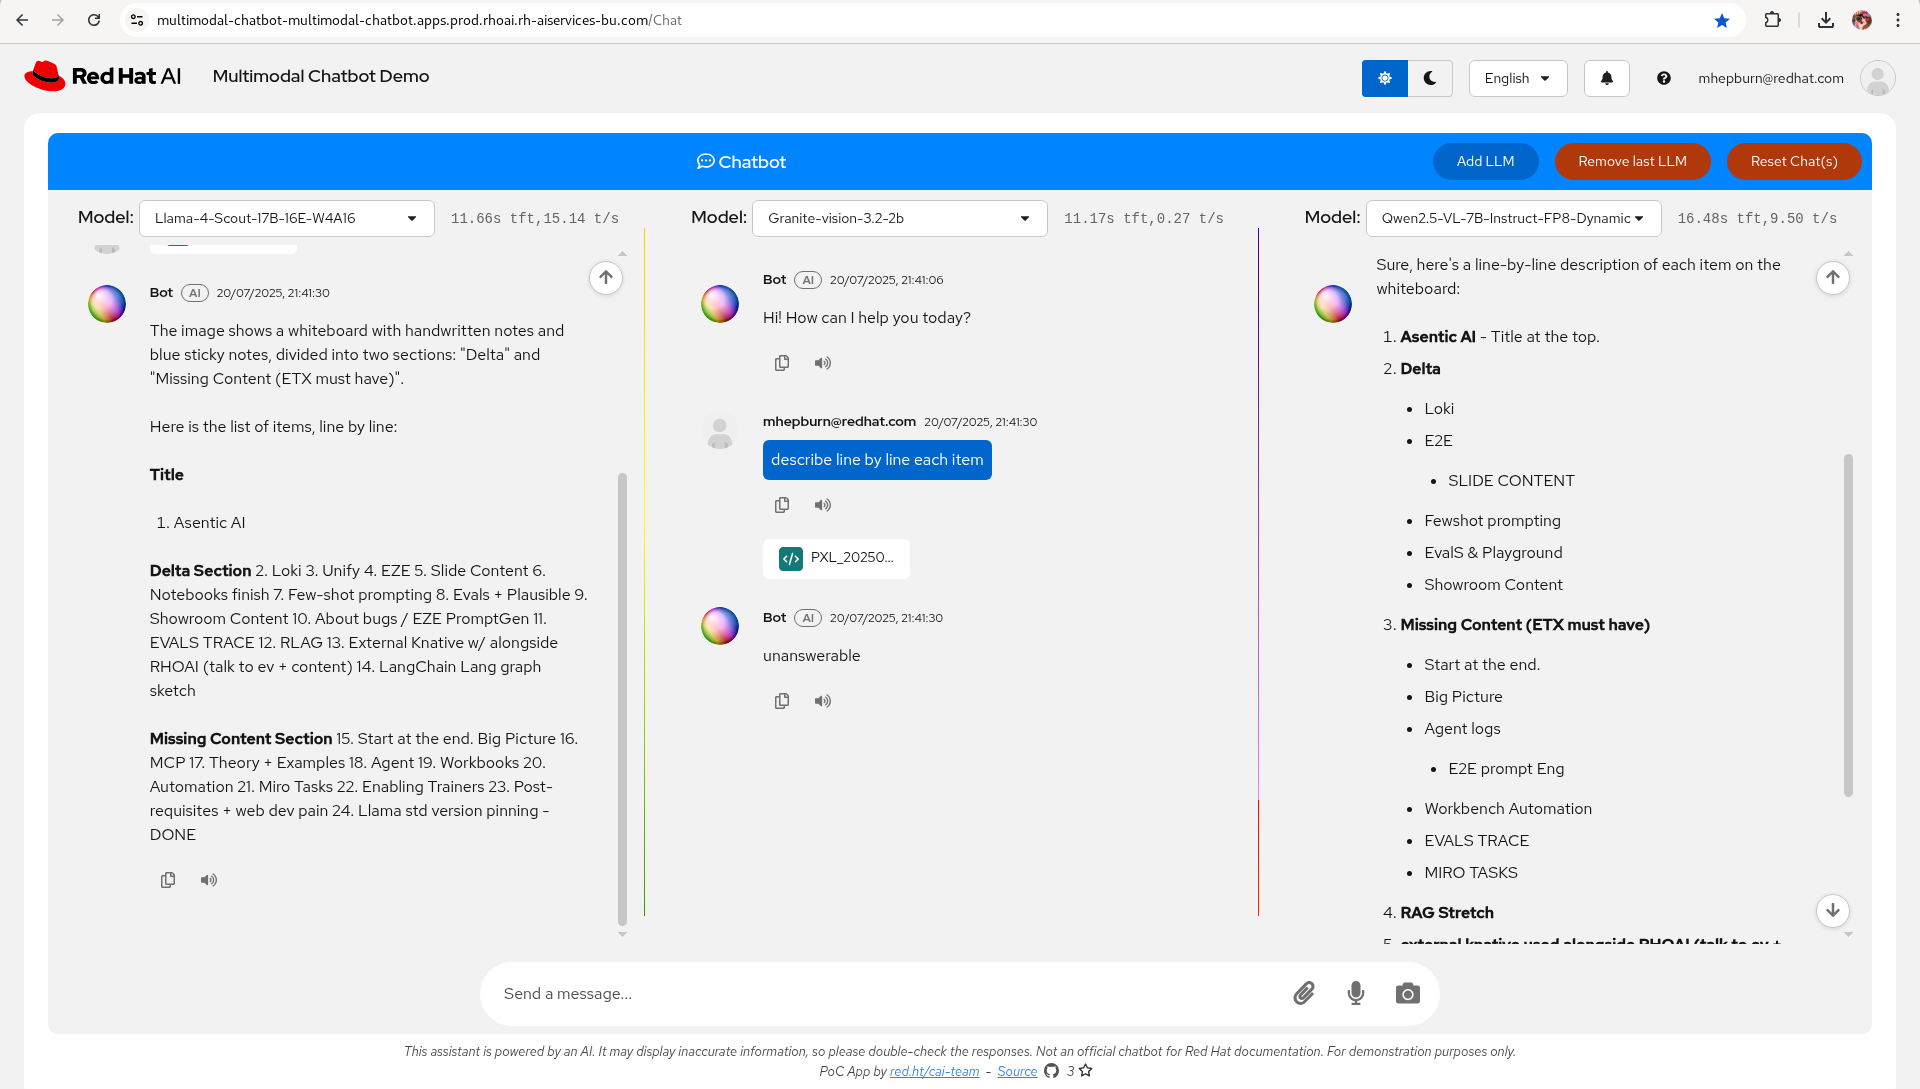
Multi Modal Chatbot
Next step - take the image and use the Red Hat Multi Modal Chatbot Demo to evaluate 3 models for Vision to Language:
-
Llama-4-Scout-17B-16E-W4A16
-
Granite-vision-3.2-2b
-
Qwen2.5-VL-7B-Instruct-FP8-Dynamic
Prompt: describe line by line each item.
Model: Qwen2.5-VL-7B-Instruct-FP8-Dynamic
Qwen wins for this step.
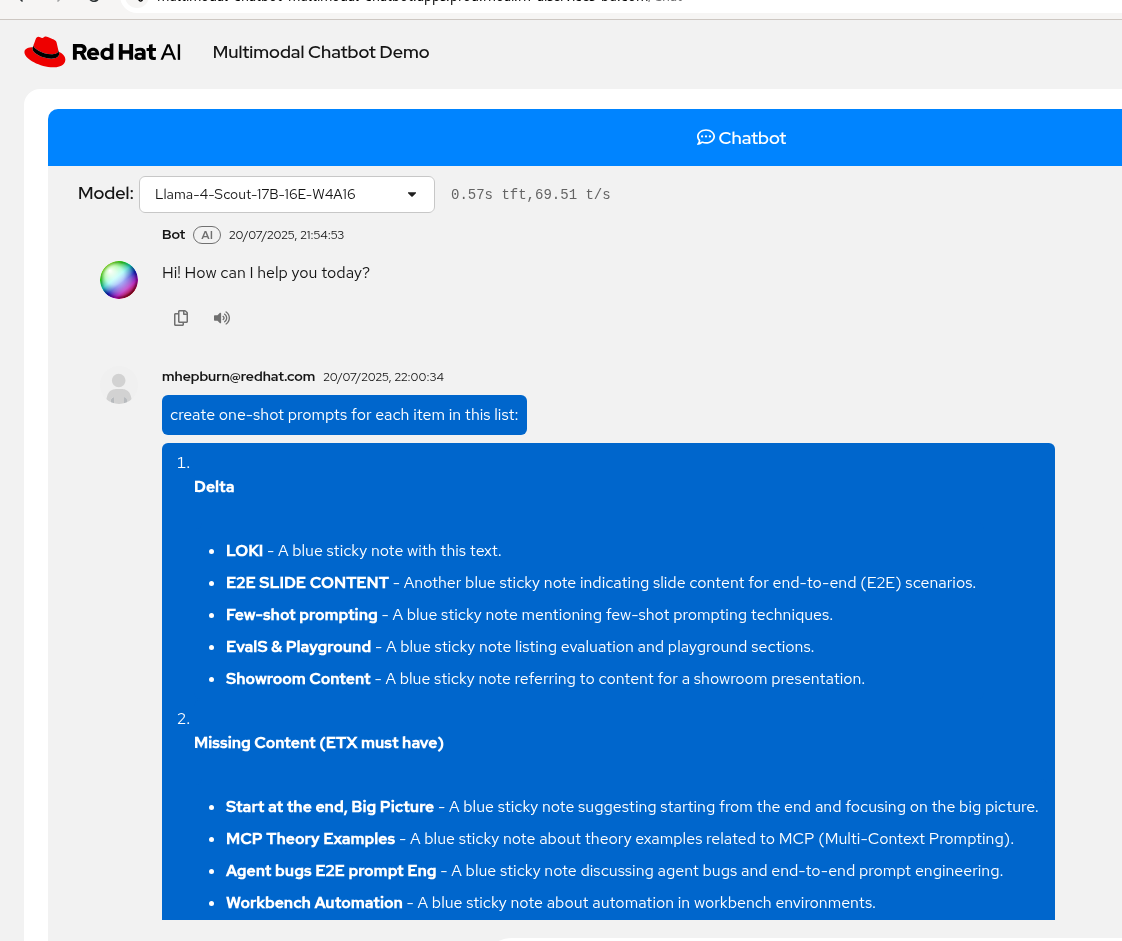
Generate Prompt for the mcp::github tool
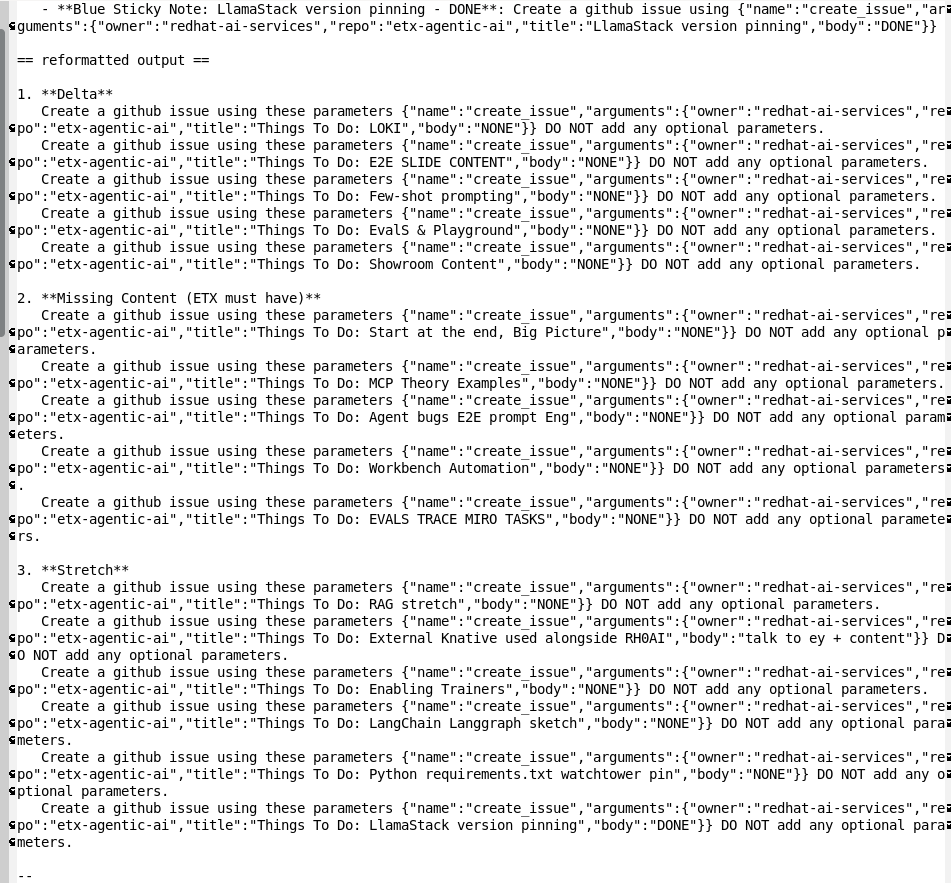
Next step - take the list of tasks, apply emacs + macros to reformat and clean up and generate the prompts for the mcp::github tool.
Prompt: create one-shot prompts for each item in this list:
Model: Llama-4-Scout-17B-16E-W4A16
LLama-4-Scout wins for this step (and of course emacs macros 😂)
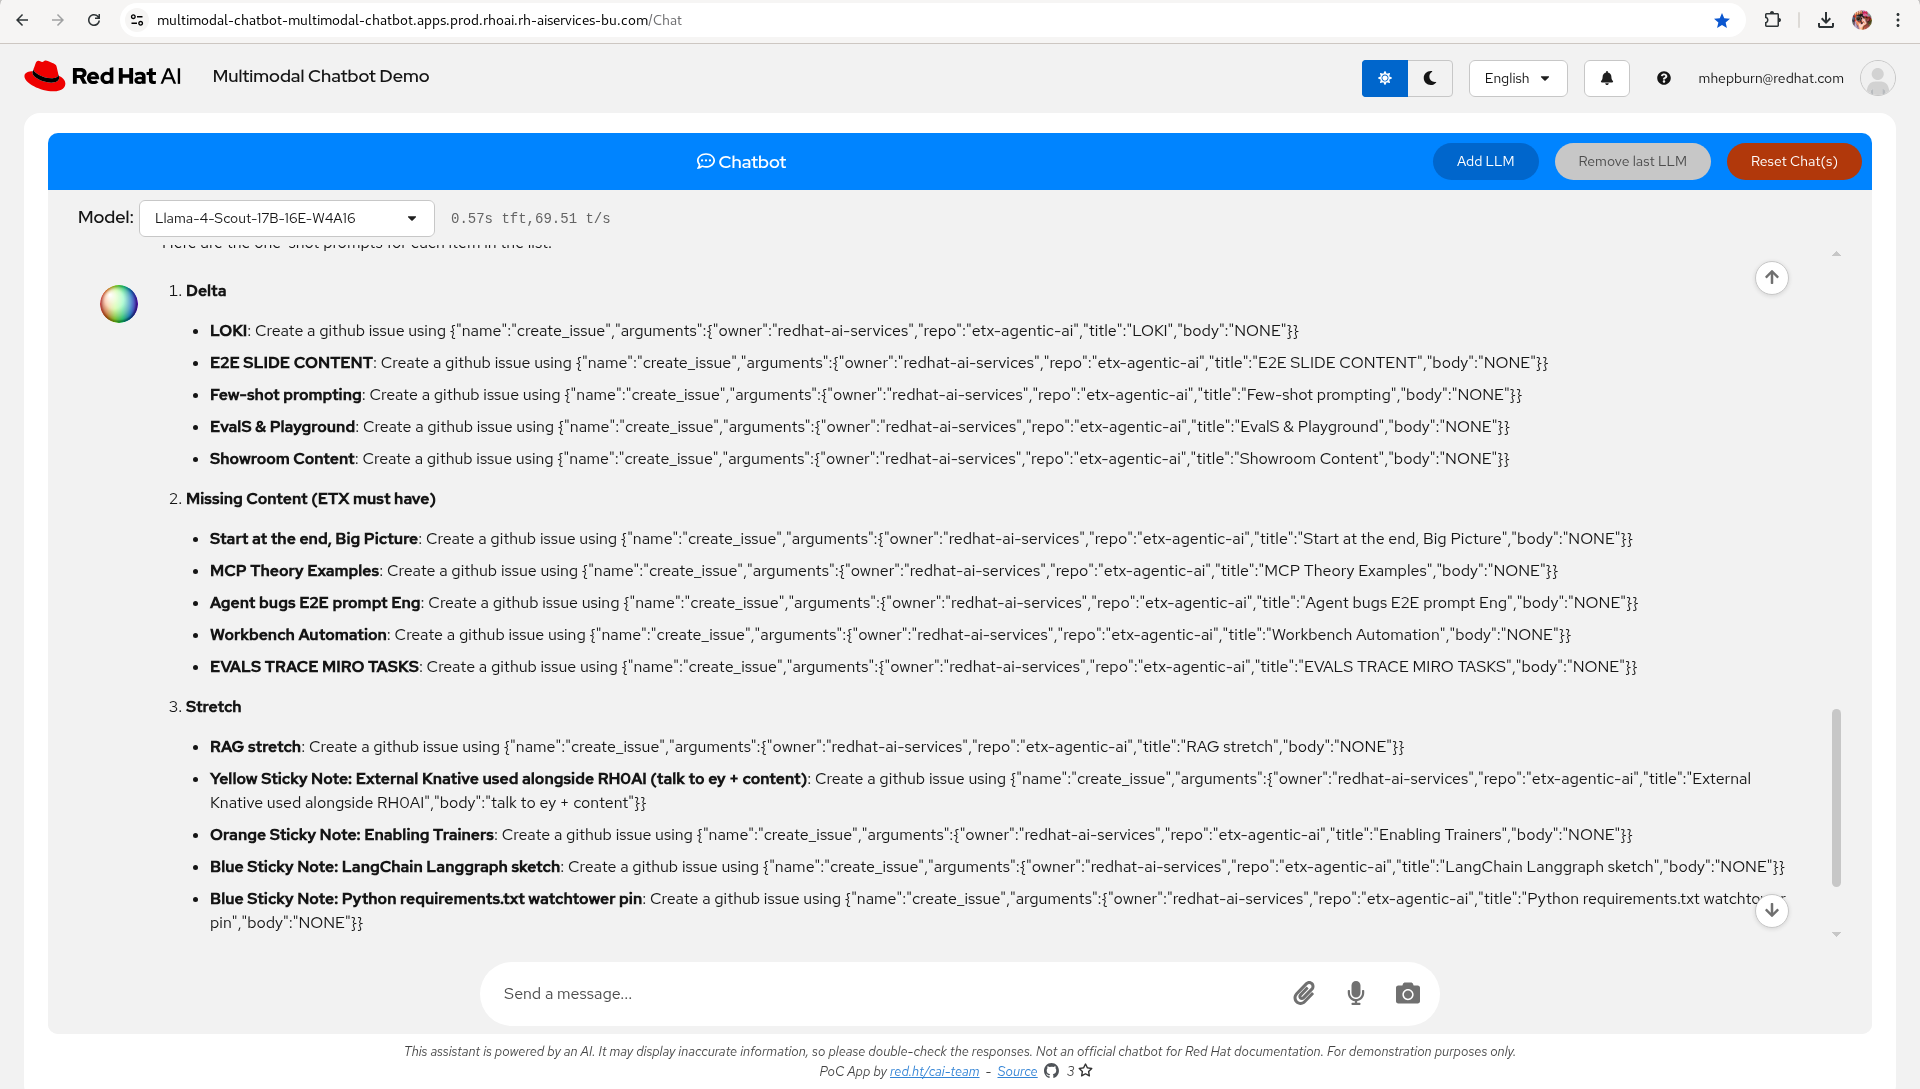
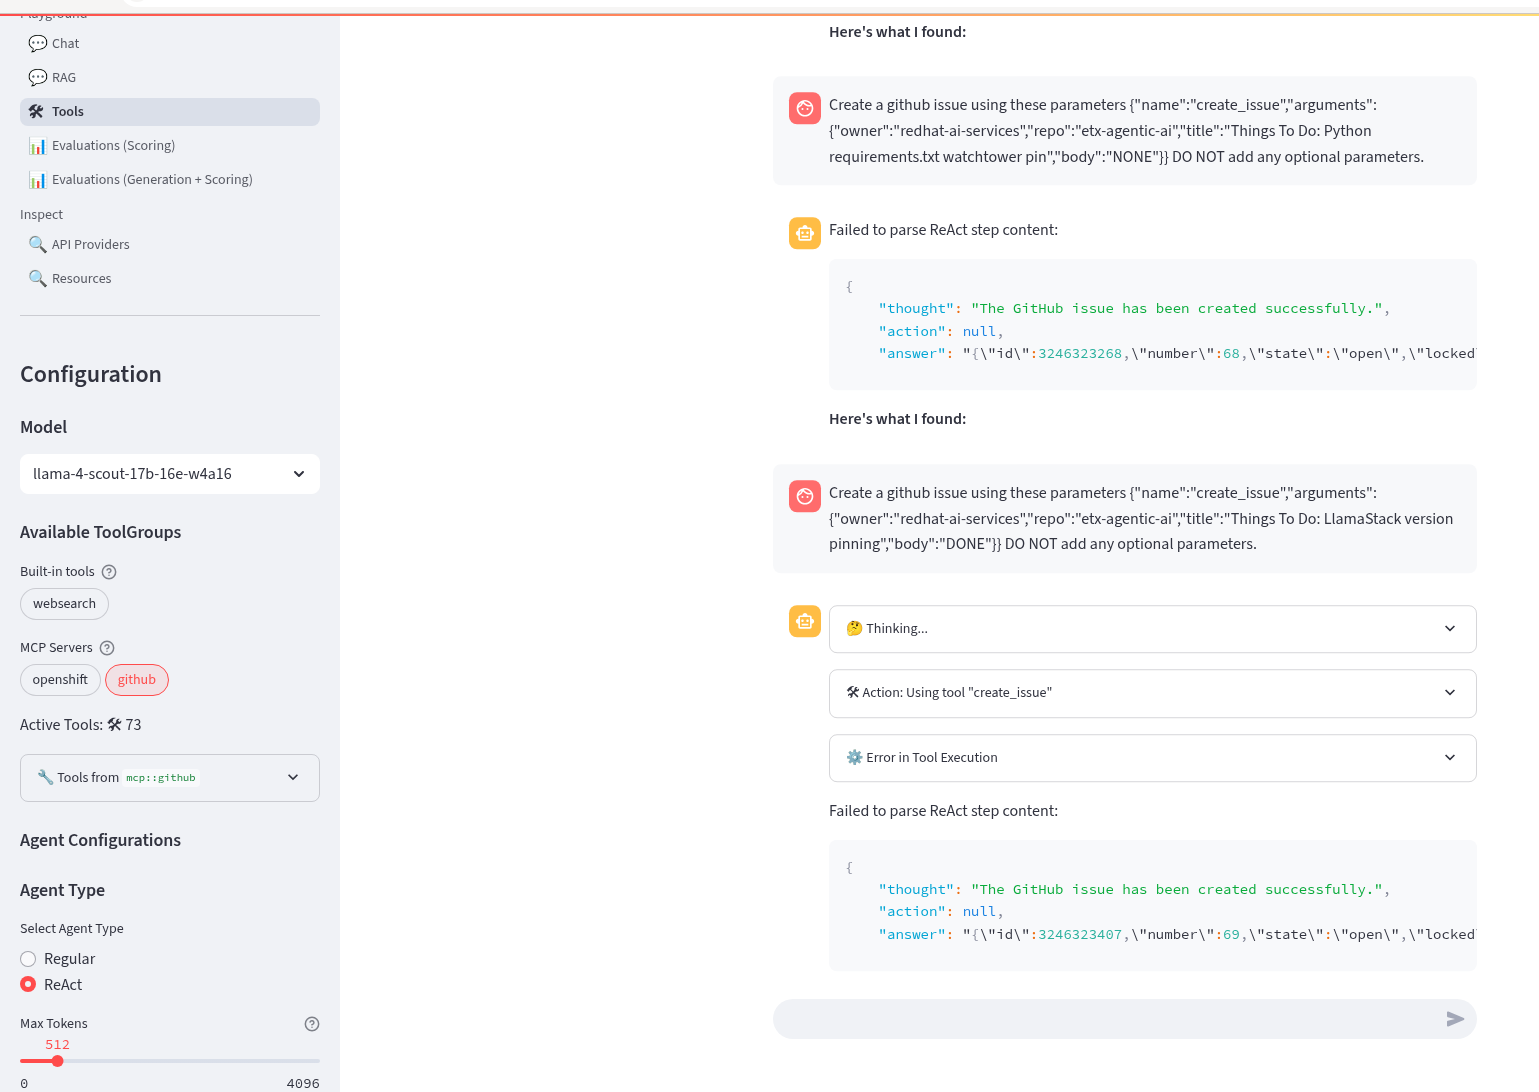
Use LLamaStack Playground in RHOAI to generate GitHub issues
Next step - take the generated prompts from the previous step and use them in the LLamaStack Playground, LLamaStack server and ReAct agent confgured, to call mcp::github to generate GitHub issues.
Prompt: Create a github issue using these parameters {"name":"create_issue","arguments":{"owner":"redhat-ai-services","repo":"etx-agentic-ai","title":"Things To Do: LlamaStack version pinning","body":"DONE"}} DO NOT add any optional parameters.
Model: Llama-4-Scout-17B-16E-W4A16
LLama-4-Scout wins for this step.
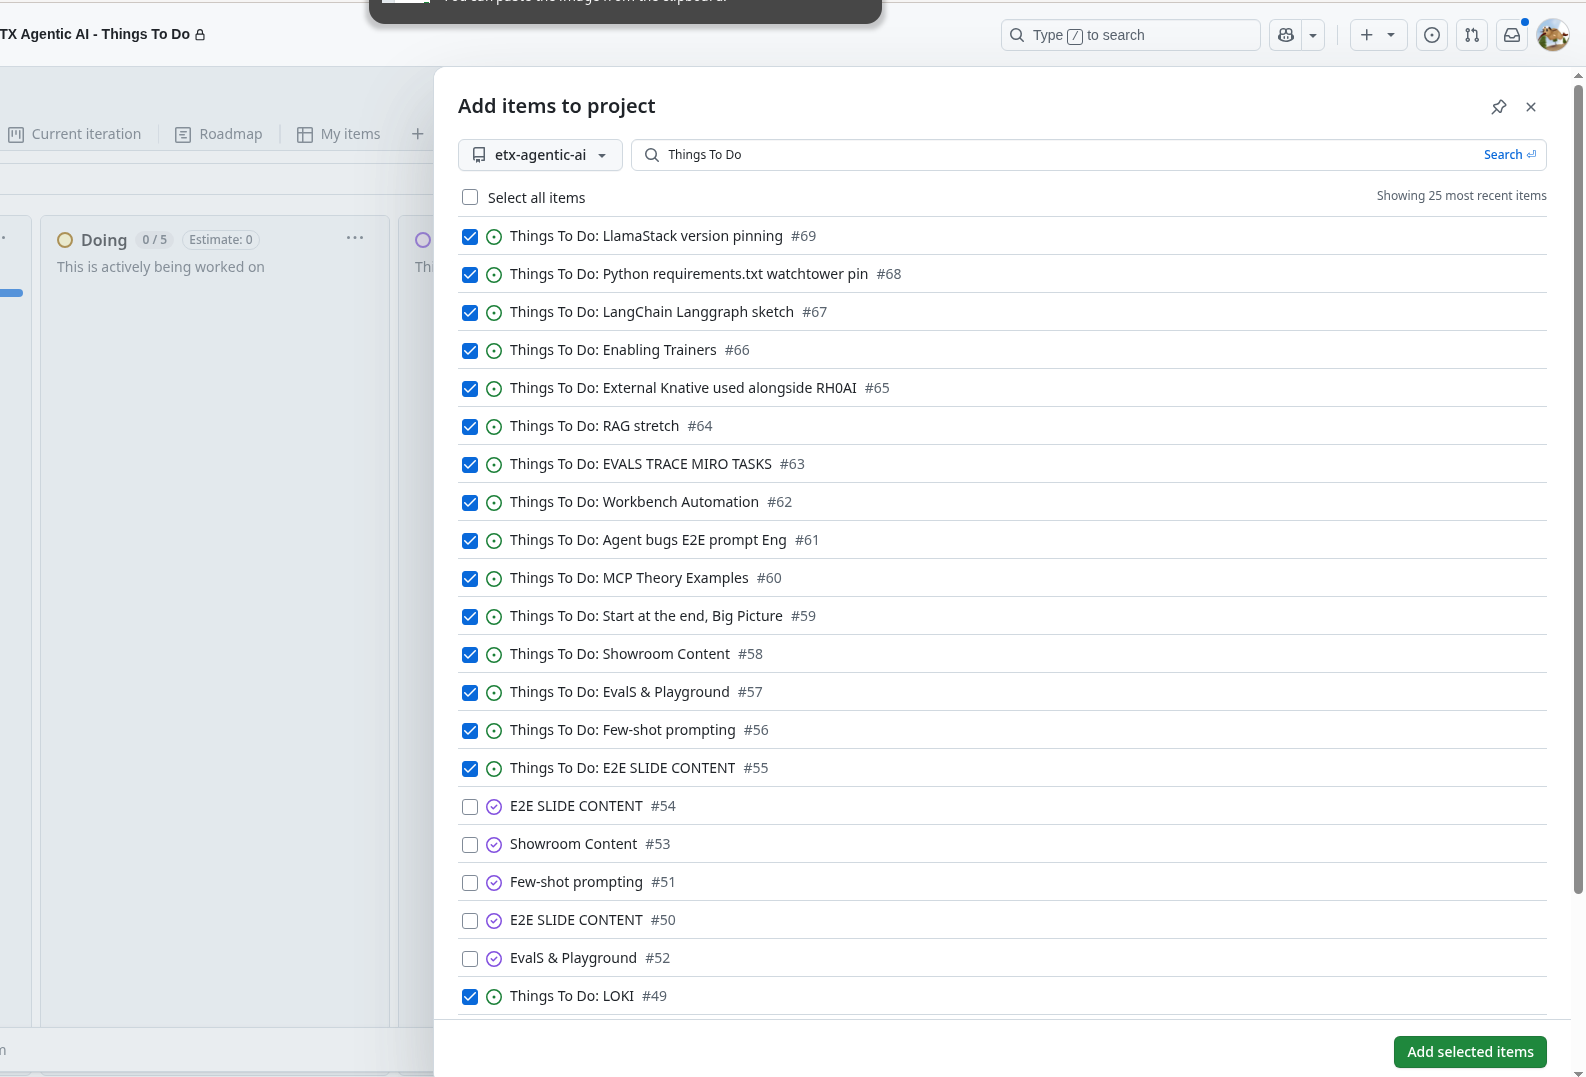
Add GitHub issues to the GitHub Project
Next step - go to the GitHub project and just select all the Things To Do issues we just created.
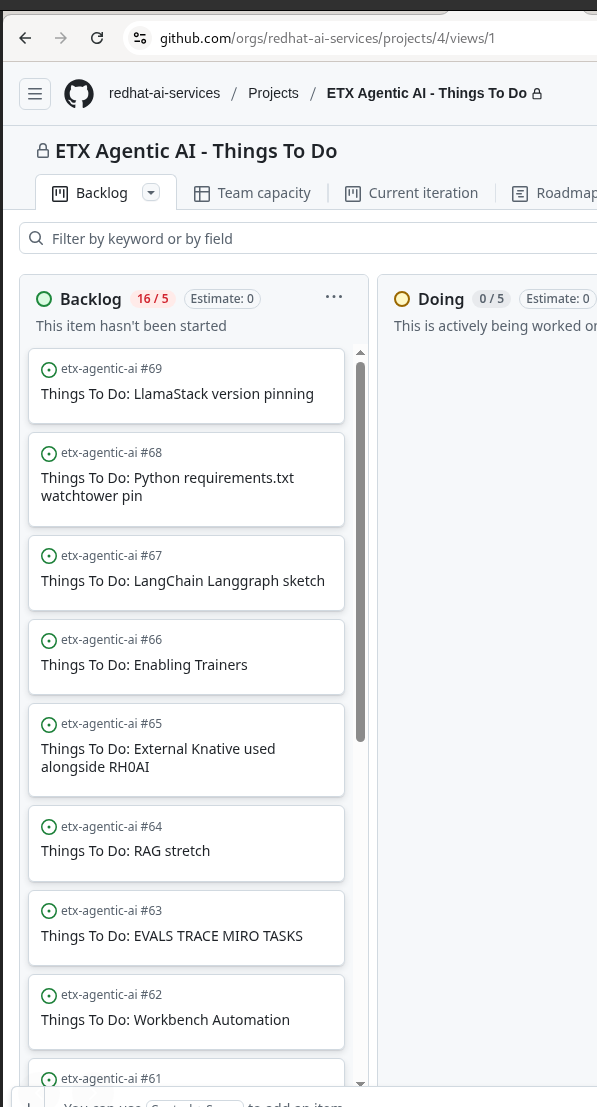
Vibe It - From a Picture of Post-It notes, using Agentic AI on RHOAI, to GitHub Project Issues
Thank you RedHat Emerging Tech Experience. 💓
Hope you Enjoy! 🔫🔫🔫
OpenShift SRE ❤️ GitOps + Policy as Code
24 December 2023
Tags : acm, gitops, policy, openshift
Within the enterprise - deploying and managing a fleet of OpenShift clusters can be a challenge. There are multiple ways and means to achieve your goals. I will lay out my favourite patterns and methods and a few tips and tricks I commonly use. In particular the methodology around using GitOps and Policy as Code.
GitOps, Everything as Code and Kubernetes Native
Everything as Code is the practice of treating all parts of the systems as code. This means storing the configuration in a Source Code repository such as git. By storing the configuration as code, environments can be life-cycled and recreated whenever they are needed. So why go to this effort ?
(1) Traceability - storing your config in git implies controls are in place to track who/why a config changes has been made. Changes can be applied and reverted. Changes can be tracked to a single user who made the change.
(2) Repeatable - moving from one cloud provider to another should be simple in modern application development. Picking a deployment target can be like shopping around for the best price that week. By storing all things as code, systems can be re-created quickly in various providers.
(3) Tested - infrastructure and code can be rolled out, validated, promoted into production environments with confidence and assurance it behaves as expected.
(4) Phoenix Server - no more fear of a servers' configuration drifiting. If a server needs to be patched or just dies, it’s OK. We can recreate it again from the stored configuration.
(5) Shared Understanding - when cross-functional teams use Everything as Code to desribe parts of their Product they are developing together, they increase the shared understanding between Developers and Operations, they speak the same language and use the same frameworks.
So How do we do it - GitOps ?
GitOps is a pattern to manage flow of work from development to production though Git Operations. The concept behind GitOps is quite straightforward.
-
Everything as Code: Git is always the source of truth on what happens in the system
-
Deployments, tests, rollbacks are always controlled through a Git flow
-
No manual deployments/changes: If you need to make a change, you need to make a Git operation such as commit + push, or raise a pull request.
The most popular GitOps tools in use today are ArgoCD and Flux. We use ArgoCD as the GitOps controller in OpenShift. This is supported as the "RedHat OpenShift GitOps Operator". We can align how our teams use and setup GitOps and their tooling - we are following patterns written about here.
When using OpenShift, we have a strong desire to stick to Kubernetes native methods of configuring the cluster, the middleware that runs upon it, as well as the applications - all using k8s native methods. I won’t cover deploying resources outside a cluster all that much - this usually needs other tools to help provision them. Some can be configured using the Operator Pattern, some may need tools like Crossplane to provision against cloud API’s. For now, we will assume that we have a hybrid or public cloud that provides storage, compute and networking services - all made available to us.
Code Structure
Take some time to organise your code. When you scale out your configuration to multiple environments/clusters/clouds - you need to be able to scale out individual bits of your repository, especially using folders. We use Kustomize heavily - and its use of bases and overlays encourages folders as the main mechanism for growth. Helm templating is also in use - because we need the flexibility to template applications even-though there is always a level of fungibility with templating languages.
Our main goal is to keep the code maintainable and discoverable. We need new developers to be able to easily on-board to using the code repo, as we would like to keep the burden of making changes very low. There is a continual tension between having one version of a piece of code that is shared across all your environments, (making it easy to maintain) with the trade-off that the blast radius can be large if an erroneous change is made that causes failures. As our codebase matures - we can code and transition around this tension. For example, we may use copy-and-paste reuse heavily at the start of our efforts to keep the blast radius low (to a single cluster) and gradually migrate the code to a single shared artifact as we become happy with its performance over time.
I like to keep my configuration repo as a git monorepo initially. Code is stored in one simple hierarchy.
gitops-monorepo
├── applications      | Infrastructure and application configurations
├── app-of-apps       | Top level pattern to define environments/clusters
├── bootstrap-acm     | Bootstrap our HUB cluster
├── policy-collection | All day#2 config is stored as configuration policy
├── README.md         | Always provide some Help !
The top level is kept quite simple. Applications that may be deployed to different clusters are stored in the application’s folder. We use the ArgoCD app-of-apps pattern to describe Applications that are deployed to each HUB cluster. We have a bootstrap folder for our HUB cluster (which is not GitOps) - we deploy ACM and ArgoCD from here. We could make this GitOps as well - however there are often manual steps required to get the environment ready for use e.g. creating an external Vault integration, creating cloud credentials etc. All other use case e.g. spoke cluster creation, day#2 configuration, application deployments - are done via GitOps.
A common folder structure for a Kustomize based application is shown below for the infrastructure risk compliance application. Here we configure the OpenShift Compliance Operator for all our clusters. We use the base folder for common deployment artifacts to all clusters - including the operator, operator group, scan settings and tailored profiles. We can the use the overlay folder to specify environment (develop | nonprod) and cluster (east | west) specific configuration. In this case we are using the PolicyGenerator in each application definition which is configured to pull secrets from different locations in vault.
applications/compliance/
├── input
│   ├── base
│   │   ├── kustomization.yaml
│   │   ├── namespace.yaml
│   │   ├── operatorgroup.yaml
│   │   ├── scan-setting-binding.yaml
│   │   ├── subscription.yaml
│   │   └── tailored-profile.yaml
│   └── overlay
│       ├── develop
│       │   ├── east
│       │   │   ├── input
│       │   │   │   └── kustomization.yaml
│       │   │   ├── kustomization.yaml
│       │   │   └── policy-generator-config.yaml
│       │   └── west
│       │       ├── input
│       │       │   └── kustomization.yaml
│       │       ├── kustomization.yaml
│       │       └── policy-generator-config.yaml
│       └── nonprod
│           ├── east
│           │   ├── input
│           │   │   └── kustomization.yaml
│           │   ├── kustomization.yaml
│           │   └── policy-generator-config.yaml
│           └── west
│               ├── input
│               │   └── kustomization.yaml
│               ├── kustomization.yaml
│               └── policy-generator-config.yaml
The one time I break this pattern - is when considering the Production environment. Often in highly regulated industries, production must be treated separately and often has stricter change control requirements surrounding it. This may include different git flows. For small, high trust teams, trunk based development is one of the best methods to keep the flow of changes coming! Often the closer you get to production though, a change in git flow techniques is required. So for Production, pull requests only.
NonProduction repo - no PR's required, trunk based development in place.
Production repo - PR's required.
The trade-off is of course you now have two repositories, often with duplicate code, and must merge from one to the other often. You also have to handle emergency fixes etc. In practice, this is manageable as long as you follow a Software Delivery Lifecycle where changes are made in lower environments first. Your quality and change failure frequency will be better off by doing this. A common pattern is to split out separate applications into separate git repos - and include them as remote repos once they become mature and stable enough.
Hub and Spoke
Open Cluster Management is an opensource community that supports managing Kubernetes clusters at scale. Red Hat priductises this as "Advanced Cluster Management (ACM)". One of the key concepts is the support of Configuration Policy and Placement on clusters using a hub and spoke design.
The biggest benefit of deploying a HUB cluster with Spokes (managed clusters) is that scale can be achieved through the decoupling of policy based computation and decisions - which happen on the HUB cluster- and then execution - which happens on the target cluster. So execution is completely off-loaded onto the managed cluster itself. Spoke managed clusters do the work and pull configuration from the HUB independently. This means a HUB does not become a single point of failure during steady state operations and Spoke clusters can number in the hundreds or thousands achieving scale.
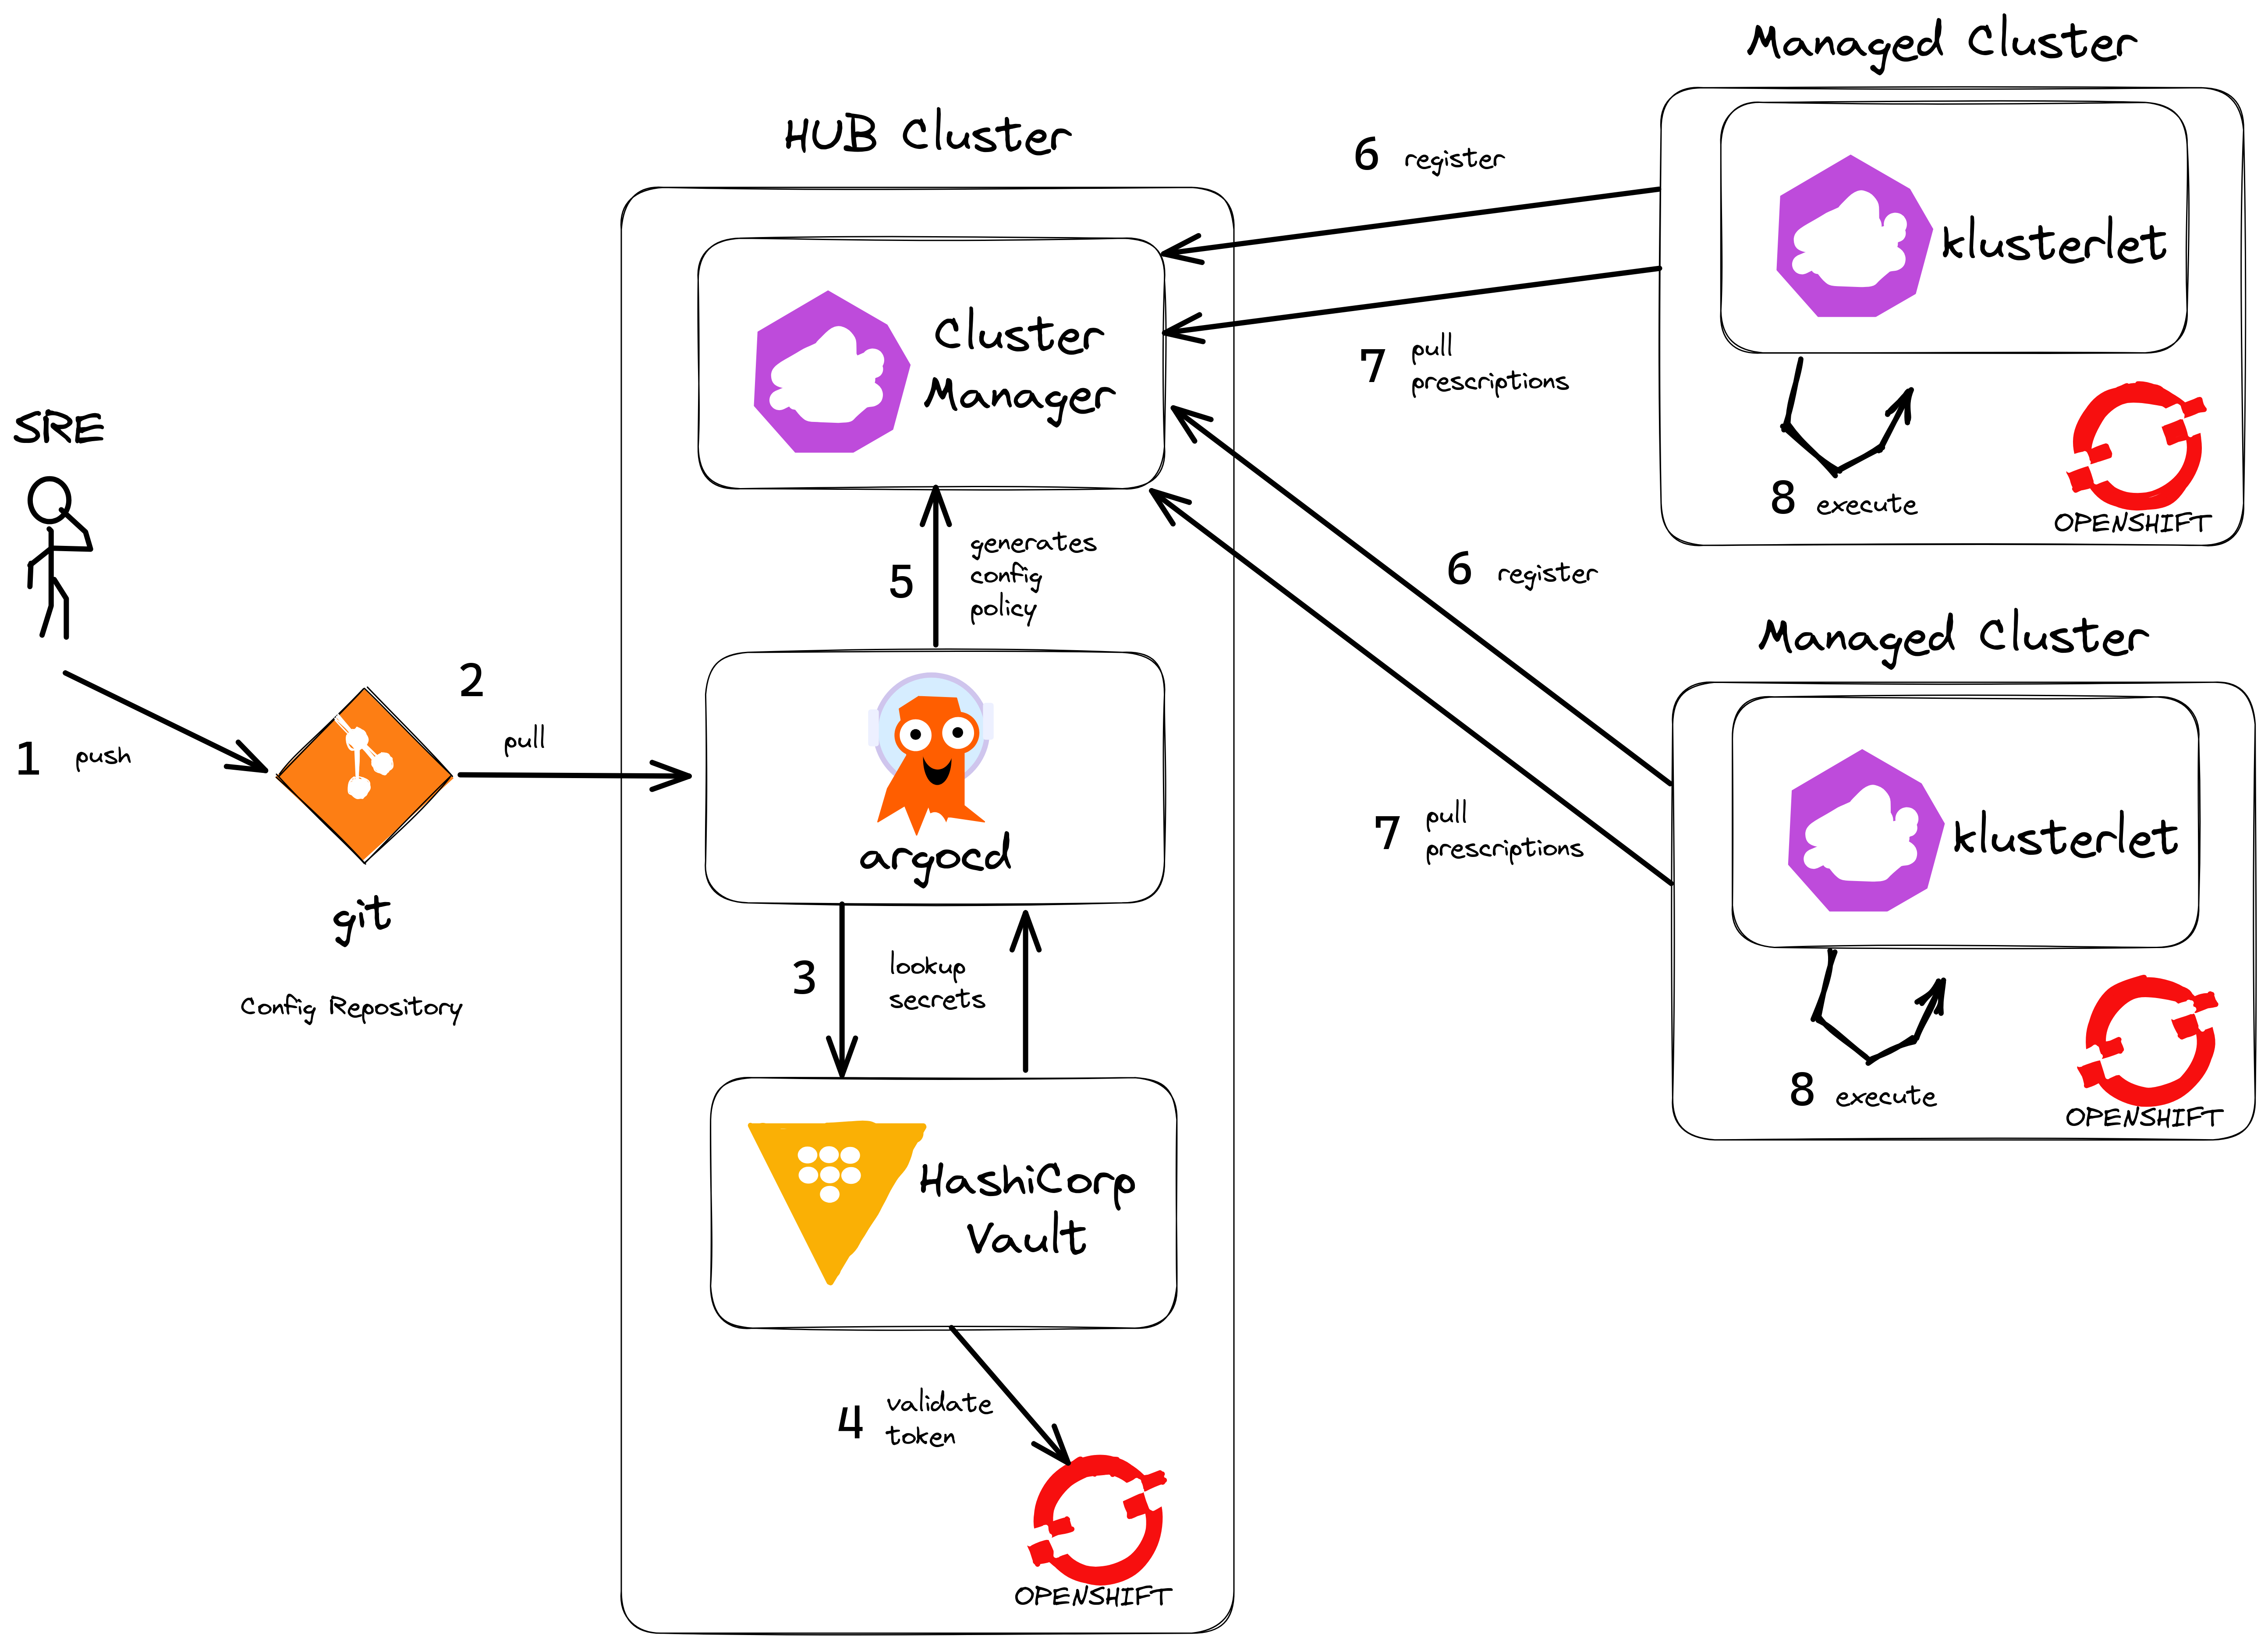
By introducing ArgoCD onto the HUB cluster - we can use it to deploy any application or configuration. The primary method is to package all the code as Configuration Policy. By doing this, we have fantastic visibility into each cluster, we control configration with Git and drift is kept to zero using GitOps - we like to say "if it’s not in git, it’s not real !"
Another benefit of using ArgoCD is to hydrate secrets from external vault providers like Hashicorp Vault (many others are supported). That way, any and all configuration (not just Kubernetes Secrets that can be mounted in pods) can be hydrated with values from our secrets vault provider, thus keeping secret values outside of Git itself.
There are more complex ArgoCD/ACM models available e.g. the multi-cluster pull, push models. However, the benefit here is one of simplicity - we have less moving parts to manage, so it is more anti-fragile. For each environment (develop | nonprod | prod) we deploy separate HUB clusters. That way we can test and promote configuration from the lower environments first (develop | nonprod) before getting to production.
Policy as Code
Policies are one key way for organisations to ensure software is high quality, easy to use and secure. Policy as code automates the decision-making process to codify and enforce policies in our environment. There are generally two types of policies:
-
Configuration Policy
-
Constraint Policy
ACM supports both types of policy. Because OpenShift is architected securely out of the box - there are many day#2 configurations that can be used to manage the platform in the manner required within your organisation.
Managing Operator configurations is one key way, as is applying MachineConfiguration to your cluster or introducing third party configurations. You can get a long way to configuring a secure, spec-compliant cluster without needing to use any Constraint Policy at all. The OpenSource leader in constraint policy is undoubtedly Open Policy Agent (OPA) which uses the rego language to encode constraint policy. There are many other choices that do not require the adoption of a specific language, but rather are pure yaml - Kyverno has wide adoption.
There is an open source repository that hosts example policies for Open Cluster Management.
This is a huge benefit as it provides a way to share policies from the community and vendors, as well as removing the burden of haing to write many custom policies yourself. Policies are organised under the NIST Special Publication 800-53 specification definitions.
If you follow this naming and grouping convention in your Policy annotations - then you can use the Governance Dashboard in ACM to graphically show you this structure as well.
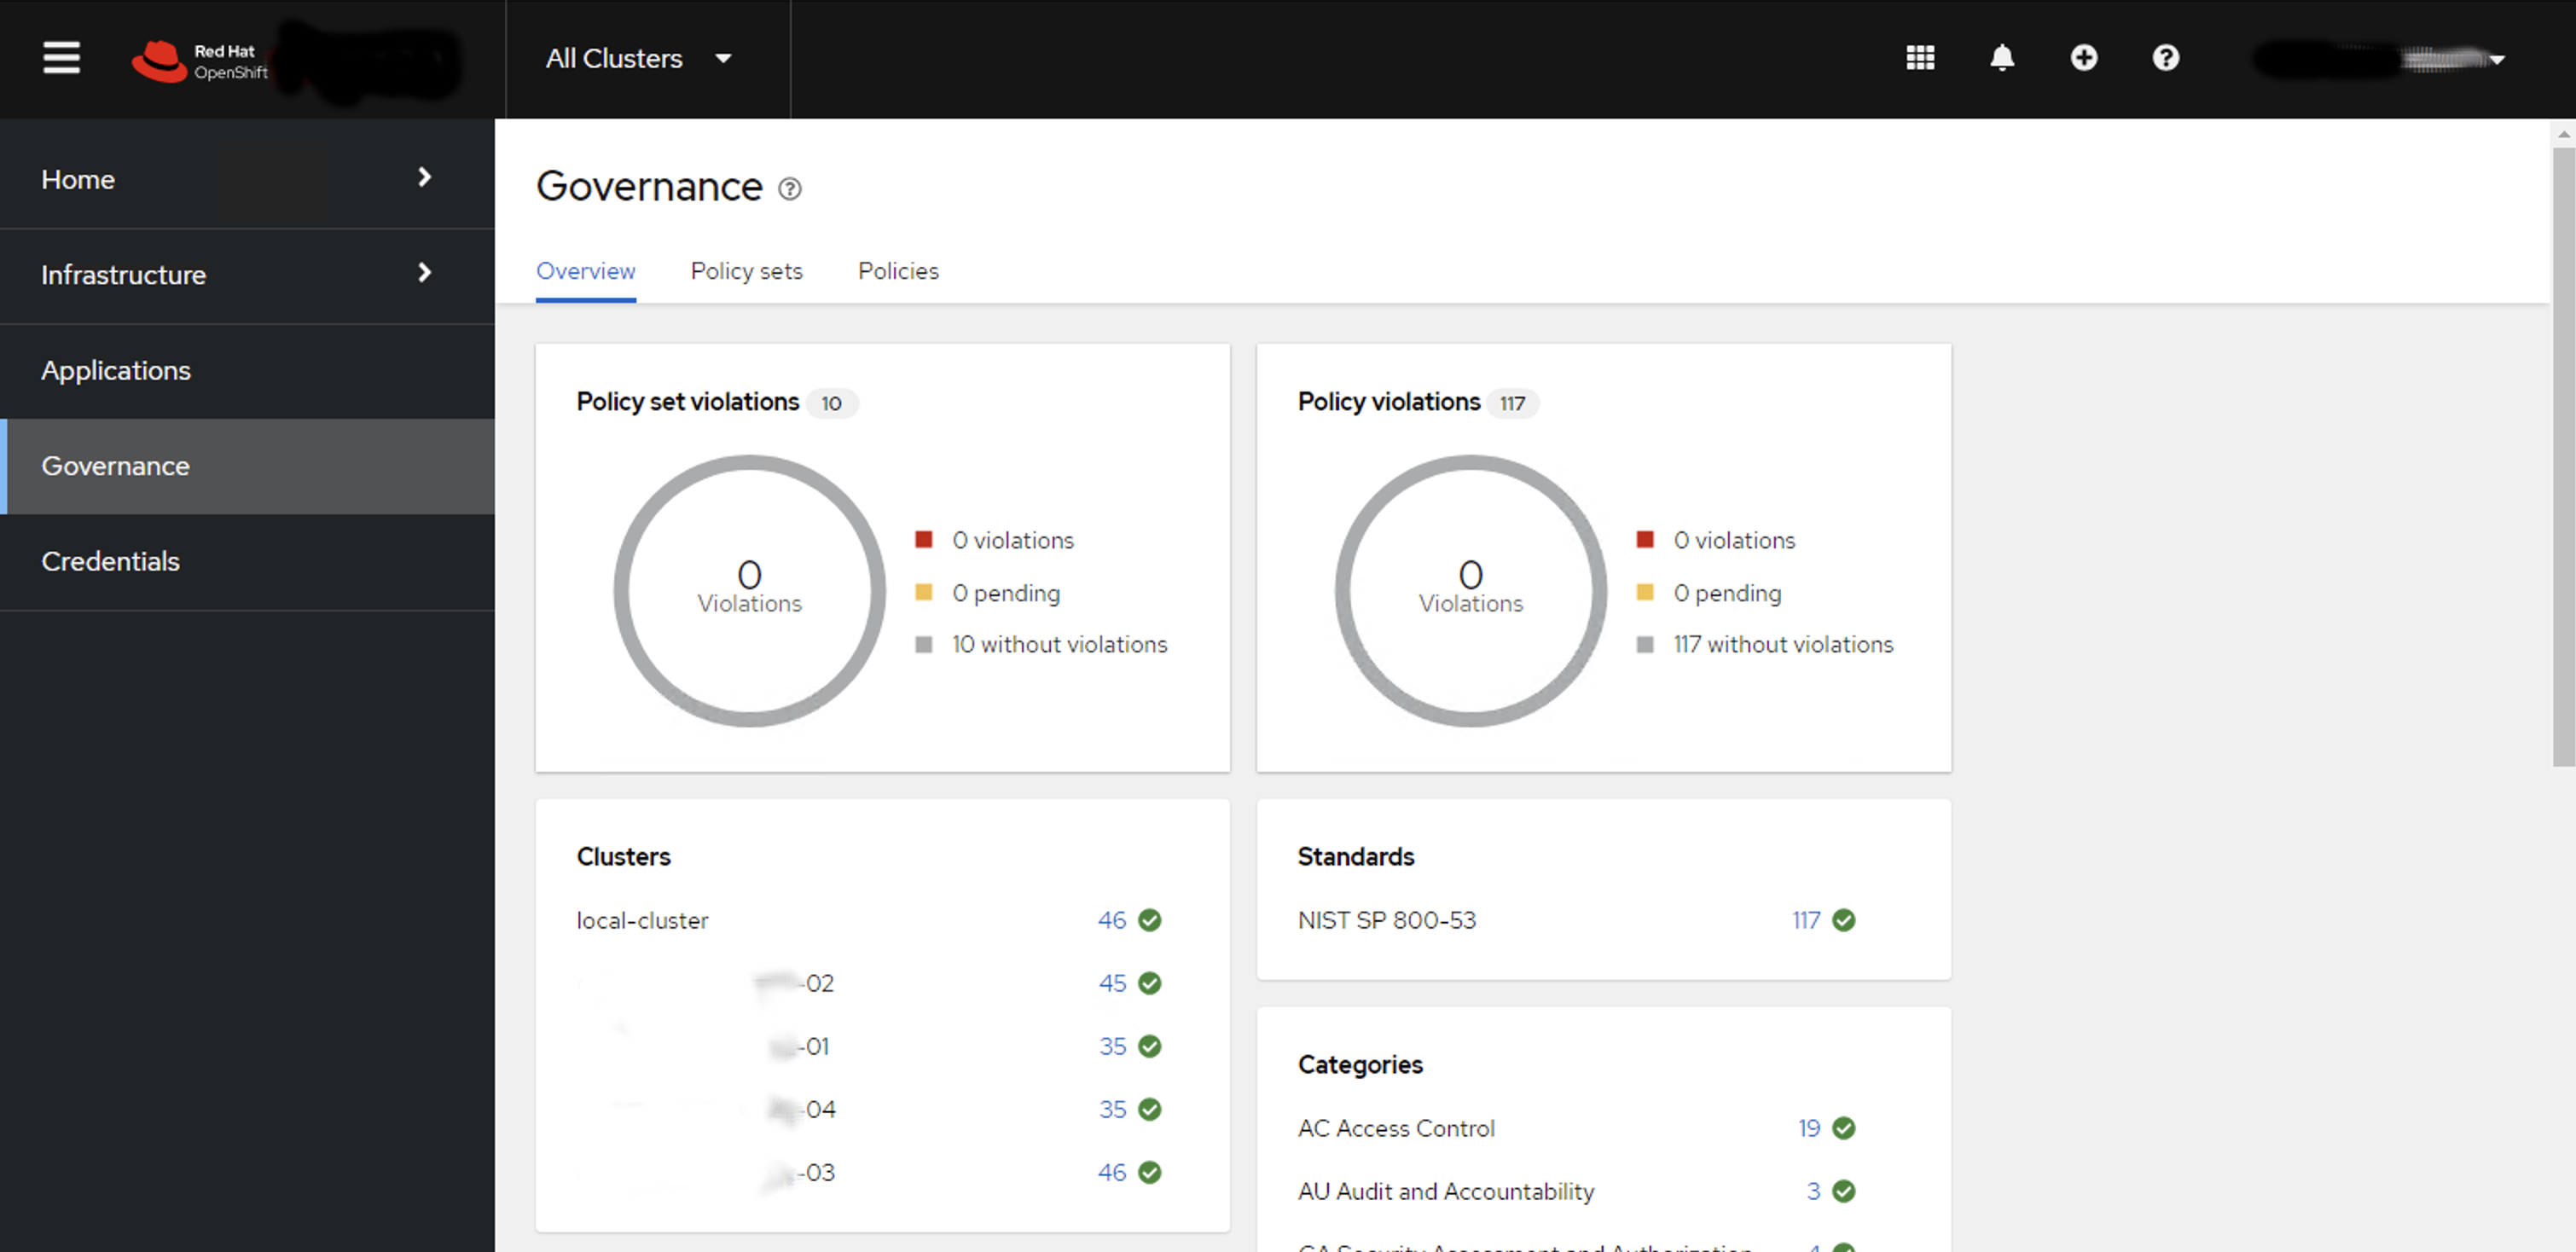
In the above picture we have five OpenShift clusters in our environment using the NIST 800-53 convention for configuration policy. It becomes is easy to overview an environment to check on configuration drift. SRE’s can easily determine that their environment configuration is healthy. They can drill down into individual clusters, or areas of configuration across their entire fleet.
Configuration Drift nearly becomes a thing of the past ! as GitOps and ACM ensure configuration policy is applied to all clusters and environments - so troubleshooting configuration management can generally be performed by exception only saving a lot of time and effort.
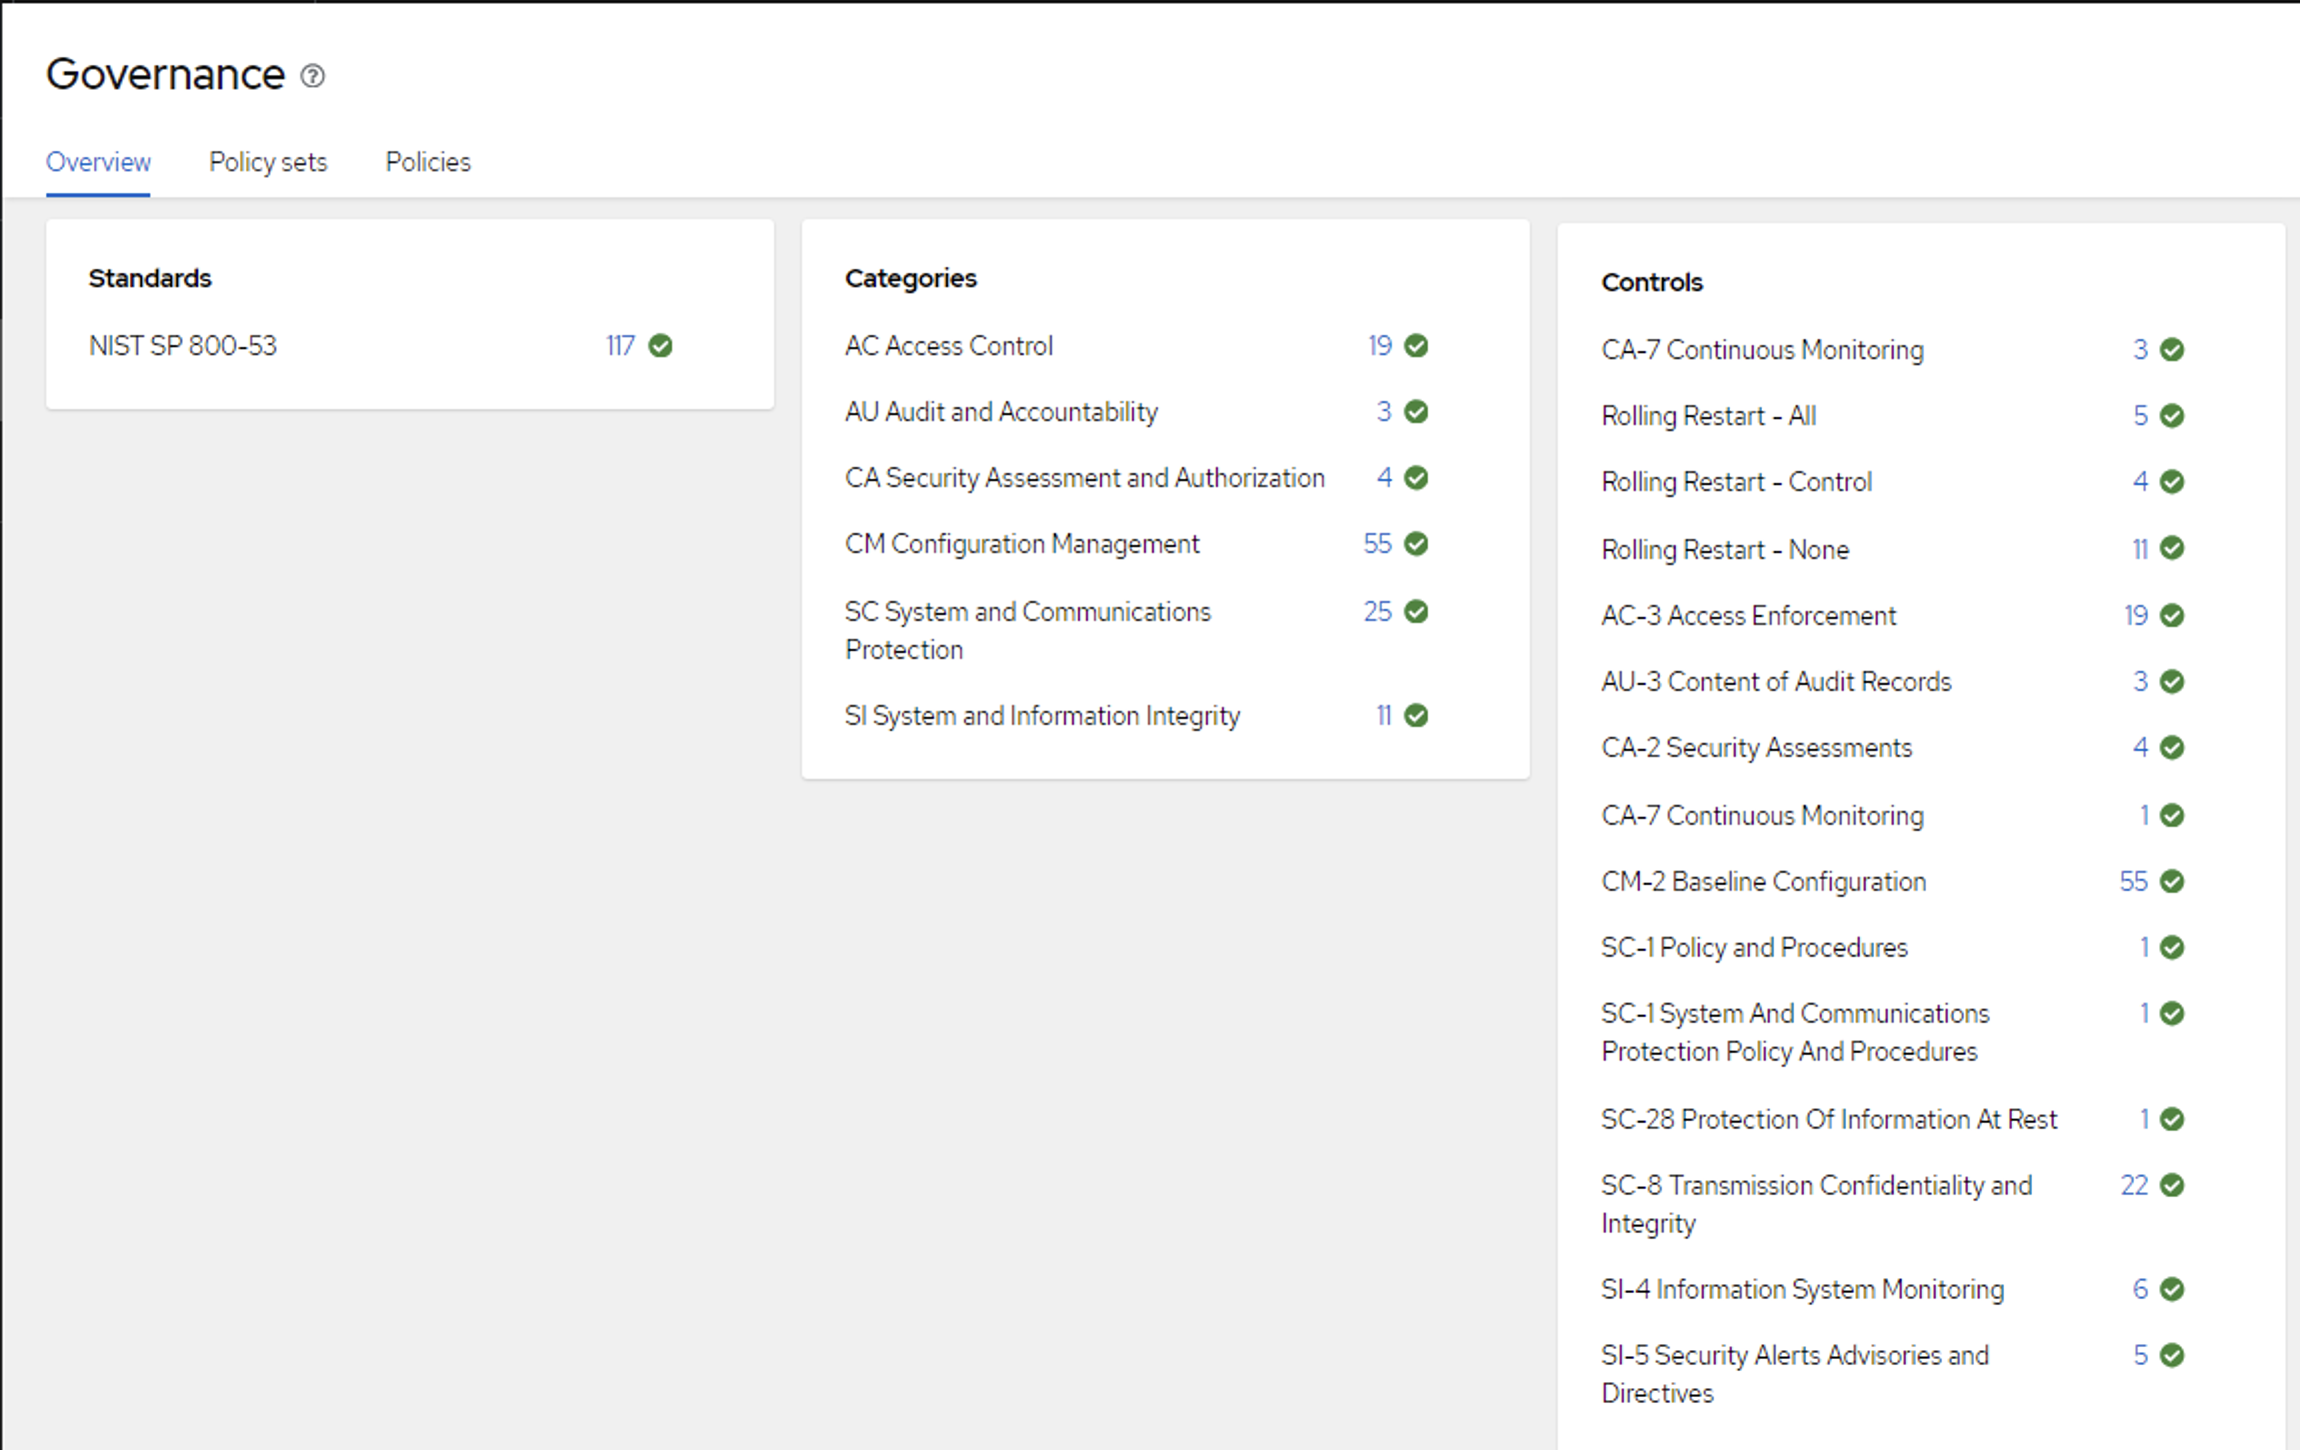
Even with hundreds of policies applied across multiple clusters, the NIST grouping and policy search allows an SRE to easily find individual policies. So if we wanted to check an Access Control policy - we can see if it is applied in multiple dimensions both across clusters and down to individual cluster level.
Writing policy boilerplate can be very time-consuming. I make heavy use of the awesome PolicyGenerator tool that allows you to specify YAML config using Kustomize (or if you compile this PR you can use Helm via Kustomize as well!) and have the policy generated for you. You can see a number of PolicySets that use the PolicyGenerator that can be used straight away in your code base.
App of Apps
In our mono repo, I like to use the ArgoCD App Of Apps pattern to declaratively specify all the applications that exist in each HUB cluster. You can then drop ArgoCD Application YAML definition files into the folder to easily deploy any number of applications.
apiVersion: argoproj.io/v1alpha1
kind: Application
metadata:
  name: develop-app-of-apps
  namespace: open-cluster-management-global-set
  labels:
    rht-gitops.com/open-cluster-management-global-set: policies
spec:
  destination:
    namespace: open-cluster-management-global-set
    server: 'https://kubernetes.default.svc'
  project: default
  source:
    path: app-of-apps/develop/my-dev-hub-cluster-01
    directory:
      include: "*.yaml"
    repoURL: https://git/gitops-monorepo.git
    targetRevision: main
  syncPolicy:
    automated:
      selfHeal: true
    syncOptions:
    - Validate=true
One thing to note is the careful use of syncPolicy options. I explicitly do not want to set prune: true for example, so leaving deleting turned off. You will want to tune deletion behaviour using Policy, in particular the PolicyGenerator setting called pruneObjectBehavior which can take various values such as None|DeleteAll. It is also worth setting policyAnnotations: {"argocd.argoproj.io/compare-options": "IgnoreExtraneous"} in the PolicyGenerator so that ArgoCD shows the correct sync status.
ArgoCD Vault Plugin
Managing secrets is an important concern from day zero. The two main methods in popluar use today take different approaches. The first has encrypted secrets in the codebase. The second - my preferred, is to keep secret values out of our code base altogether by using a secrets vault. There are many ways to achieve this depending on the type of vault in use and the integration points needed at scale. For the GitOps model I drew out earlier, we can make use of the ArgoCD Vault Plugin and the sidecar pattern to hydrating secrets values in all of our configuration. This has the benefit of being able to hydrate secrets values into Policy code directly as well as creating secrets for pods to mount.
My sidecar configMap for ArgoCD contains the three methods I use to call the AVP plugin using helm, Kustomize or via straight YAML. Note that Kustomize has the helm plugin enabled using these flags --enable-alpha-plugins --enable-helm build:
  helm-plugin.yaml: |
    apiVersion: argoproj.io/v1alpha1
    kind: ConfigManagementPlugin
    metadata:
      name: argocd-vault-plugin-helm
    spec:
      init:
        command: [sh, -c]
        args: ["helm dependency build"]
      generate:
        command: ["bash", "-c"]
        args: ['helm template "$ARGOCD_APP_NAME" -n "$ARGOCD_APP_NAMESPACE" -f <(echo "$ARGOCD_ENV_HELM_VALUES") . | argocd-vault-plugin generate -s open-cluster-management-global-set:team-avp-credentials -']
  kustomize-plugin.yaml: |
    apiVersion: argoproj.io/v1alpha1
    kind: ConfigManagementPlugin
    metadata:
      name: argocd-vault-plugin-kustomize
    spec:
      generate:
        command: ["sh", "-c"]
        args: ["kustomize --enable-alpha-plugins --enable-helm build . | argocd-vault-plugin -s open-cluster-management-global-set:team-avp-credentials generate -"]
  vault-plugin.yaml: |
    apiVersion: argoproj.io/v1alpha1
    kind: ConfigManagementPlugin
    metadata:
      name: argocd-vault-plugin
    spec:
      generate:
        command: ["sh", "-c"]
        args: ["argocd-vault-plugin -s open-cluster-management-global-set:team-avp-credentials generate ./"]
And from our ArgoCD ApplicationSet or Application all you need to do is specify the plugin name:
        plugin:
          name: argocd-vault-plugin-kustomize
You can read more about it here.
Hope you Enjoy! 🔫🔫🔫
Open Source Web Analytics
07 May 2023
Tags : openshift, web, analytics, plausible
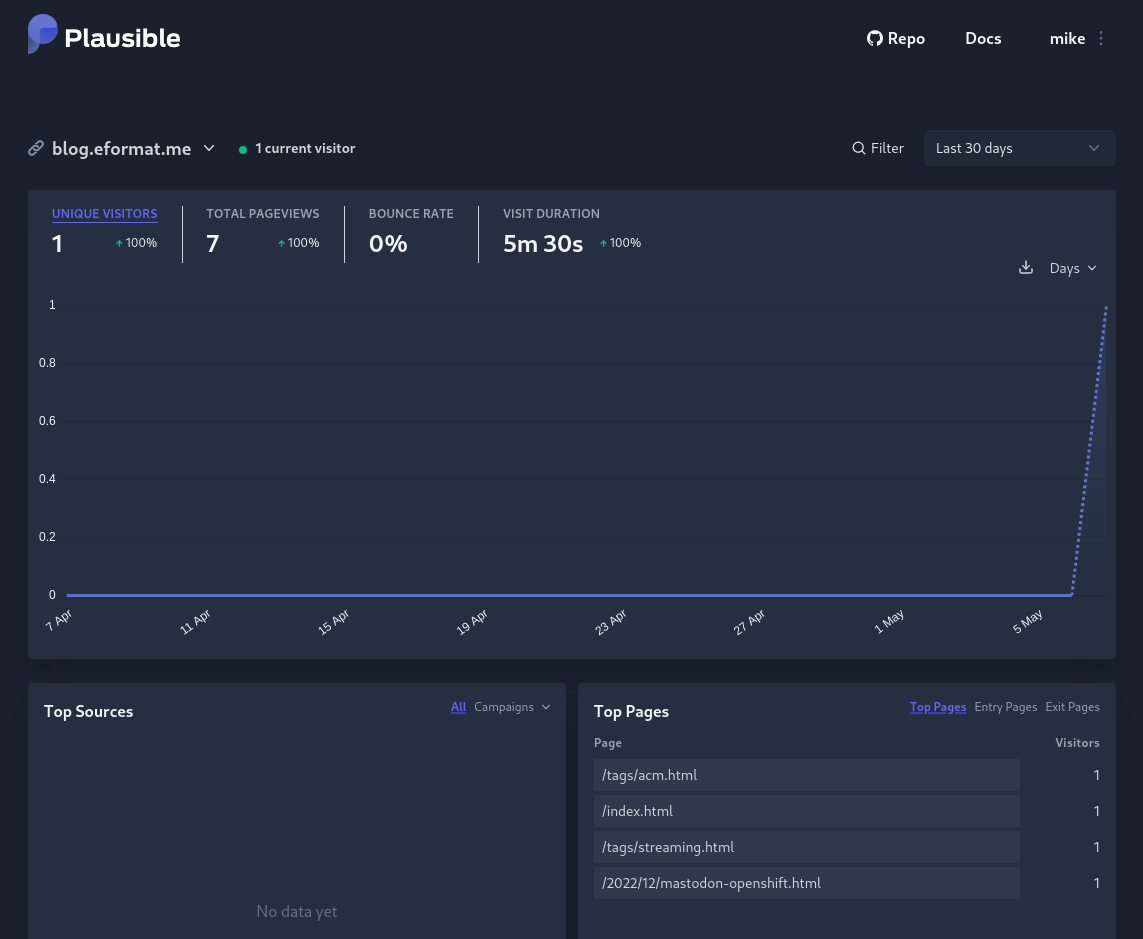
No one is reading your blog ! 😭 Lolz, but seriously how do you know ? i recently stumbled across Plausible - an easy to use, OpenSource and privacy-friendly analytics solution.
Running on OpenShift
Plausible has a very handy self-hosting section in their docs.
I checked out the kubernetes help and modified them to run on OpenShift
# Create a new namespace for all resources
oc new-project plausible
# Create a configmap from the plausible-conf.env file
oc -n plausible create secret generic plausible-config \
  --from-env-file=plausible-conf.env
# Please change the Postgres and Clickhouse passwords to something more secure here!
# Create the Postgres user
oc -n plausible create secret generic plausible-db-user \
  --from-literal='username=postgres' --from-literal='password=postgres'
# Create the Clickhouse user
oc -n plausible create secret generic plausible-events-db-user \
  --from-literal='username=clickhouse' --from-literal='password=clickhouse'
# Deploy plausible
oc -n plausible apply -f ./kubernetes/openshift
Your deployments should look something like this:
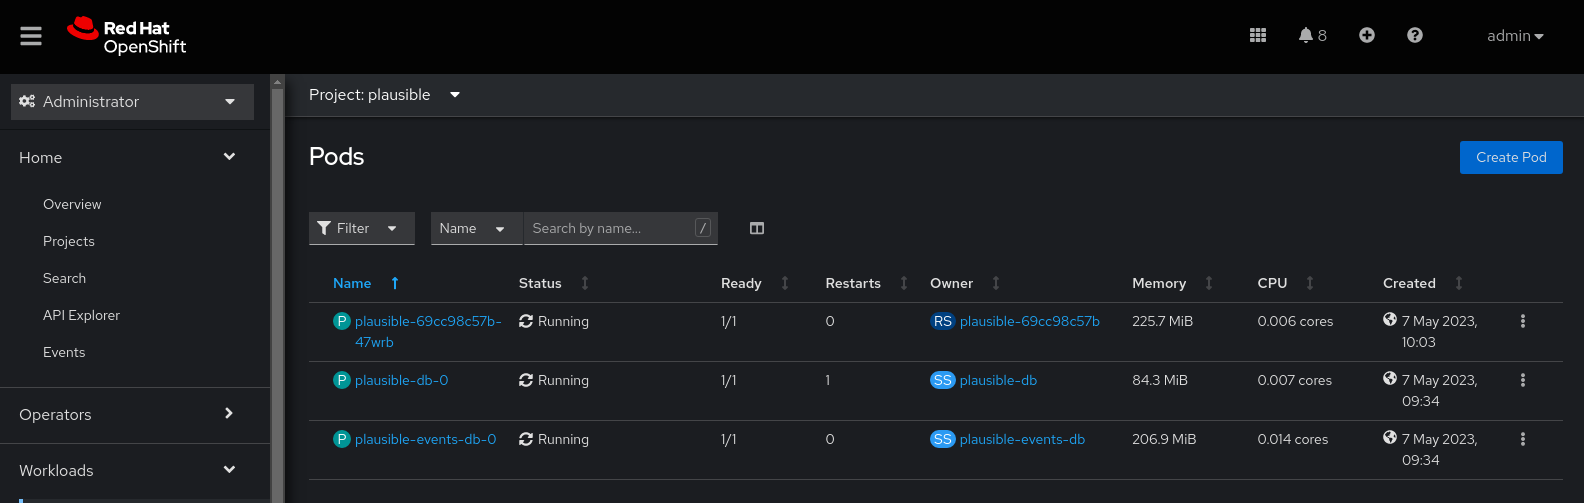
Next, i logged into Plausible, created an account, then set the config to disable self registration i.e. in your plausible-config secret
DISABLE_REGISTRATION=trueNext, i added this blog as a target website in Plausible, and put the generated html into the blog header section
    <!-- WebAnalytics -->
    <script defer data-domain="blog.eformat.me" src="https://plausible.apps.sno.eformat.me/js/script.js"></script>
Once deployed, Viola! 🧝 Checkout the public Analytics dashboard link in the nav-bar.
OpenShift Install, Semi-Connected Registries and Mirror by Digest Images
12 April 2023
Tags : openshift, gitops, registries, disconnected
I have been working with disconnected OpenShift clusters quite a lot recently. One of the things you need to deal with is disconnected registries and mirror by digest images.
Quay Transparent Proxy-Pull Through Cache
There are a couple general approaches to configuring registries when disconnected. The product documentation has great depth of detail about using a Quay Mirror Registry. This is the right approach when wanting disconnected. The downside when you are testing things out in a lab is the mirror import process is both time-consuming and uses a lot of disk space.
One approach i have become fond of is a what i call a semi-connected method, where your clusters' use a Quay Transparent Proxy-Pull Through Cache to speed things up. This still uses disk space, but you don’t need to import all the images before installing a cluster.
After you install the quay mirror registry on the provisioning host, set this in your config.yaml and restart the quay pods or service:
FEATURE_PROXY_CACHE: trueThis setup mimics what you would need to do when disconnected i.e. we always pull from the mirror registry when installing - but it is quicker to test as the mirror registry is connected. When configuring the OpenShift install method, the pull secret i use is just to the mirror. More on that below.
If you also set the cache timeout for your Organisations to be months or even years! then your images will hang around for a long time.
For installing OpenShift, you really need (at a minimum) two mirror organisations. I set up these two (admin is a default):
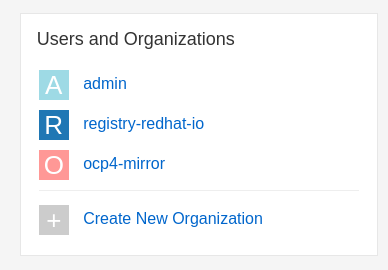
Where each Organisation points to these registries:
registry-redhat-io -> registry.redhat.io
ocp4-mirror -> quay.io/openshift-release-dev
One nice trick is that you can base64 decode your Red Hat pull-secret (you download this from cloud.redhat.com) and use those credentials in the Organisation mirror registry setup for authentication.
OCP Install Configuration
Now comes for the tricky part - configuring your OpenShift installer setup. There are a several ways to do this. The one you use depends on your install method and how you wish to control the registries.conf that gets configured for you cluster nodes.
I have been working with the Agent-based installer method for Bare Metal (i fake it on libvirt with sushy) - you can check out all the code here.
The issue i think everyone quickly discovers is that the OpenShift installer sets all mirror’s by digest to be true i.e. mirror-by-digest-only = true. If you check the installer code its here:
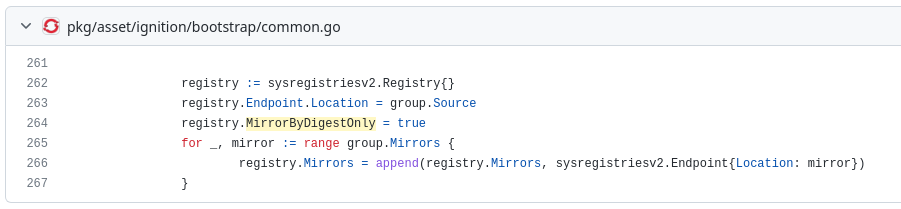
Setting mirror by digest to true is intentional, it helps stop image spoofing or getting an image from a moving tag.
Unfortunately not all Operators pull by digest either. In fact the deployments that are part of the openshift-marketplace do not. So after a cluster install we see Image Pull errors like this:
$ oc get pods -n openshift-marketplace
NAME                                   READY   STATUS             RESTARTS      AGE
certified-operators-d2nd9              0/1     ImagePullBackOff   0             15h
certified-operators-pqrlz              0/1     ImagePullBackOff   0             15h
community-operators-7kpbm              0/1     ImagePullBackOff   0             15h
community-operators-k662l              0/1     ImagePullBackOff   0             15h
marketplace-operator-84457bfc9-v22db   1/1     Running            4 (15h ago)   16h
redhat-marketplace-kjrt9               0/1     ImagePullBackOff   0             15h
redhat-marketplace-sqch2               0/1     ImagePullBackOff   0             15h
redhat-operators-4m4gt                 0/1     ImagePullBackOff   0             15h
redhat-operators-62z6x                 0/1     ImagePullBackOff   0             15h
And checking one of the pods we see it is trying to pull by tag:
$ oc describe pod certified-operators-d2nd9
Normal  BackOff  2m2s (x4179 over 15h)  kubelet  Back-off pulling image "registry.redhat.io/redhat/certified-operator-index:v4.12"
Unfortunately you cannot configure ImageContentSourcePolicy for mirror-by-digest-only = false so (currently) the only solution is to apply MachineConfig post your install as a day#2 thing as documented in this Knowledge Base Article
Hopefully in an upcoming OpenShift relaease (4.13 or 4.14) we will be able to use the new API’s for CRDs ImageDigestMirrorSet ImageTagMirrorSet - see Allow mirroring images by tags RFE for more details on these changes.
For now though, i use butane and MachineConfig as per the KB article at post install time to configure mirror-by-digest-only = false for my mirror registries that need it. From my git repo:
butane 99-master-mirror-by-digest-registries.bu -o 99-master-mirror-by-digest-registries.yaml
oc apply -f 99-master-mirror-by-digest-registries.yaml
This will reboot your nodes to apply the MCP, you may add or change the butane template(s) and yaml to suit the nodes you need to target e.g. masters or workers (or any other) node role. In my case it’s targeting a SNO cluster so master is fine.
All going well your marketplace pods should now pull images and run OK
$ oc get pods -n openshift-marketplace
NAME                                   READY   STATUS    RESTARTS   AGE
certified-operators-d2nd9              1/1     Running   0          16h
community-operators-k662l              1/1     Running   0          16h
marketplace-operator-84457bfc9-v22db   1/1     Running   5          16h
redhat-marketplace-kjrt9               1/1     Running   0          16h
redhat-operators-62z6x                 1/1     Running   0          16h
A word of warning when using the Assited Installer / Agent Installer method. If you try to set mirror-by-digest-only = false registries in your AgentServiceConfig using the provided ConfigMap e.g. something like this:
apiVersion: v1
kind: ConfigMap
metadata:
  name: quay-mirror-config
  namespace: multicluster-engine
  labels:
    app: assisted-service
data:
  LOG_LEVEL: "debug"
  ca-bundle.crt: |
    -----BEGIN CERTIFICATE-----
    ! Put you CA for your mirror registry here !
    -----END CERTIFICATE-----

  registries.conf: |
    unqualified-search-registries = ["registry.redhat.io", "registry.access.redhat.com", "docker.io"]

    [[registry]]
      prefix = ""
      location = "registry.redhat.io/redhat"
      mirror-by-digest-only = false
      [[registry.mirror]]
        location = "quay.eformat.me:8443/registry-redhat-io/redhat"
The registry mirror setting will get reset to mirror-by-digest-only = true by the installer.
Similarly, if you try and set MachineConfig in the ignitionConfigOverride in the InfraEnv e.g.
apiVersion: agent-install.openshift.io/v1beta1
kind: InfraEnv
...
  # User for modify ignition during discovery
  ignitionConfigOverride: '{"ignition": {"version": "3.1.0"}, "storage": {"files": [{"path": "/etc/containers/registries.conf", "mode": 420, "overwrite": true, "user": { "name": "root"},"contents": {"source": "data:text/plain;base64,dW5xd..."}}]}}'
it also gets overriden by the installer. I tried both these methods and failed 😭😭
Summary
For now, the only way to configure mirror-by-digest-only = false is via MachineConfig post-install.
You can always try and only mirror images by digest, just remember that various operators and components may not be configured this work this way.
The future looks bright with the new API’s, as this has been a long-standing issue now.
🏅Good luck installing out there !!
ACM & ArgoCD for Teams
17 February 2023
Tags : openshift, argocd, acm, gitops
Quickly deploying ArgoCD ApplicationSets using RHACM’s Global ClusterSet
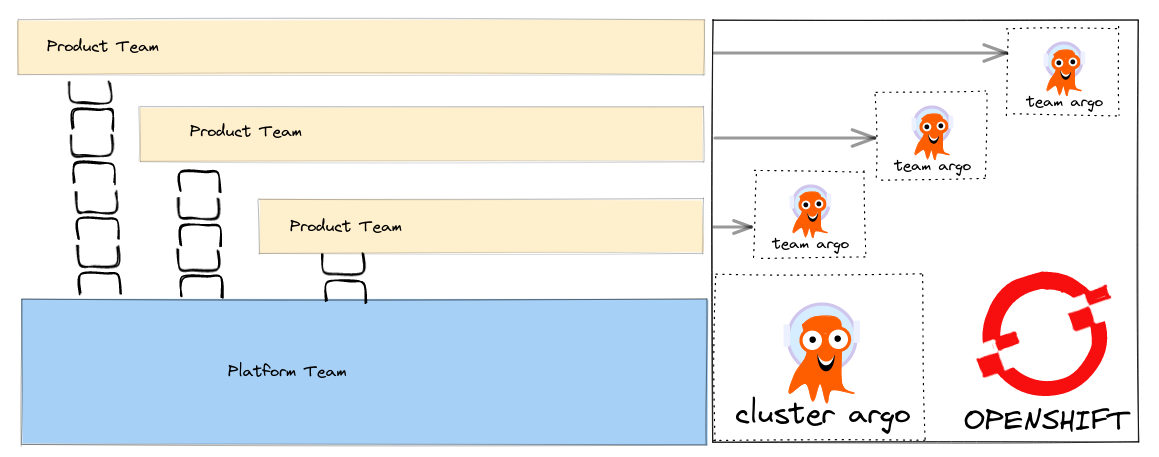
I have written about how we can align our Tech to setup GitOps tooling so that it fits with our team structure.
How can we make these patterns real using tools like Advanced Cluster Manager (ACM) that help us deploy to a fleet of Clusters ? ACM supports Policy based deployments so we can track compliance of our clusters to the expected configuration management policy.
The source code is here - https://github.com/eformat/acm-gitops - git clone it so you can follow along.
Global ClusterSet’s
When a cluster is managed in ACM there are several resources created out of the box you can read about them here in the documentation. This includes a namespace called open-cluster-management-global-set. We can quickly deploy ApplicationSet’s in this global-namespace that generates Policy to create our team based ArgoCD instances.
We can leverage the fact that ApplicationSet’s can be associated with a Placement - that way we can easily control where our Policy and Team ArgoCD’s are deployed across our fleet of OpenShift clusters by using simple label selectors for example.
Bootstrap a Cluster Scoped ArgoCD for our Policies
We are going Bootstrap a cluster-scoped ArgoCD instance into the open-cluster-management-global-set namespace.
We will deploy our Team ArgoCD’s using ACM Policy that is generated using the PolicyGenerator tool which you can read about here from its' reference file.
Make sure to label the cluster’s where you want to deploy to with useglobal=true.
oc apply -f bootstrap-acm-global-gitops/setup.yamlThis deploys the following resources:
-
SubscriptionResource - The GitOps operatorSubscription, including disabling the default ArgoCD and setting cluster-scoped connections for our namespaces - see theARGOCD_CLUSTER_CONFIG_NAMESPACESenv.var that is part of theSubscriptionobject. If your namespace is not added here, you will get namespace scoped connections for your ArgoCD, rather than all namespaces. -
GitOpsClusterResource - This resource provides a Connection between ArgoCD-Server and the Placement (where to deploy exactly the Application). -
PlacementResource - We use aPlacementresource for this global ArgoCD which deploys to a fleet of Clusters, where the Clusters needs to be labeled withuseglobal=true. -
ArgoCDResource - The CR for our global ArgoCD where we will deploy Policy. We configure ArgoCD to download thePolicyGeneratorbinary, and configure kustomize to run with the setting:
kustomizeBuildOptions: --enable-alpha-pluginsDeploy the Team Based ArgoCD using Generated Policy
We are going to deploy ArgoCD for two teams now using the ACM PolicyGenerator.
The PolicyGenerator runs using kustomize. We specify the generator-input/ folder - that holds our YAML manifests for each ArgoCD - in this case one for fteam, one for zteam.
You can run the PolicyGenerator from the CLI to test it out before deploying - download it using the instructions here e.g.
kustomize build --enable-alpha-plugins team-gitops-policy/We specify the placement rule placement-team-argo - where the Clusters needs to be labeled with teamargo=true.
We add some default compliance and control labels for grouping purposes in ACM Governance.
We also set the pruneObjectBehavior: "DeleteAll so that if we delete the ApplicationSet the generated Policy s deleted and all objects are removed. For this to work, we must also set the remediationAction to enforce for our Policies.
One last configuration is to set the ArgoCD IgnoreExtraneous compare option - as Policy is generated we do not want ArgoCD to be out of sync for these objects.
apiVersion: policy.open-cluster-management.io/v1
kind: PolicyGenerator
metadata:
  name: argocd-teams
placementBindingDefaults:
  name: argocd-teams
policyDefaults:
  placement:
    placementName: placement-team-argo
  categories:
    - CM Configuration Management
  complianceType: "musthave"
  controls:
    - CM-2 Baseline Configuration
  consolidateManifests: false
  disabled: false
  namespace: open-cluster-management-global-set
  pruneObjectBehavior: "DeleteAll"
  remediationAction: enforce
  severity: medium
  standards:
    - generic
  policyAnnotations: {"argocd.argoproj.io/compare-options": "IgnoreExtraneous"}
policies:
  - name: team-gitops
    manifests:
      - path: generator-input/
Make sure to label the cluster’s where you want to deploy to with teamargo=true.
To create our Team ArgoCD’s run:
oc apply -f applicationsets/team-argo-appset.yamlTo delete them, remove the AppSet
oc delete appset team-argoSummary
You can now take this pattern and deploy it across multiple clusters that are managed by ACM. You can easily scale out the number of Team Based ArgoCD and have fine grained control over their individual configuration including third party plugins like Vault. ACM offers a single plane of glass to check if your clusters are compliant to the generated policies, and if not - take remedial action.
You can see the code in action in this video.
🏅Enjoy !!
SNO, MetalLB, BGP
02 February 2023
Tags : openshift, metallb, bgp, frr, bird
Using SNO and MetalLB in BGP Mode
So yeah, i was reading this awesome blog post on 'How to Use MetalLB in BGP Mode' and thought i need to give this a try with SNO at home.
I won’t repeat all the details linked in that post, please go read it before trying what comes next as i reference it. Suffice to say the following:
-
SNO - Single Node OpenShift
-
MetalLB - creates
LoadBalancertypes of Kubernetes services on top of a bare-metal (like) OpenShift/Kubernetes. I’m going to do it in a kvm/libvirt lab. -
BGP - Border Gateway Protocol - runs and scales the internet - (ftw! seriously, go read about bpg hijacking) - with MetalLB we can use BGP mode to statelessly load balance client traffic towards the applications running on bare metal-like OpenShift clusters.
The idea is that you can have both normal Routing/HAProxy service ClusterIP’s on the SDN as well as LoadBalancer’s being served by BGP/MetalLB in your SNO Cluster. OpenShift SDN (OVNKubernetes as well as OPenShiftSDN) both support MetalLB out of the box.
The Lab Setup
Networking Services
There are some complexities in my home lab, mainly caused by the constraint of having teenagers who feel good bandwidth is a basic human right and not a luxury.
So i need to keep the connections to their myriad of devices running smoothly as well as serving my own geek needs. To make this happen and keep things relatively simple, i have a pretty standard setup and use my Mesh network. I am not trying any telco grade stuff (e.g. SRIOV) - so have no main Cisco/vendor switching involved.
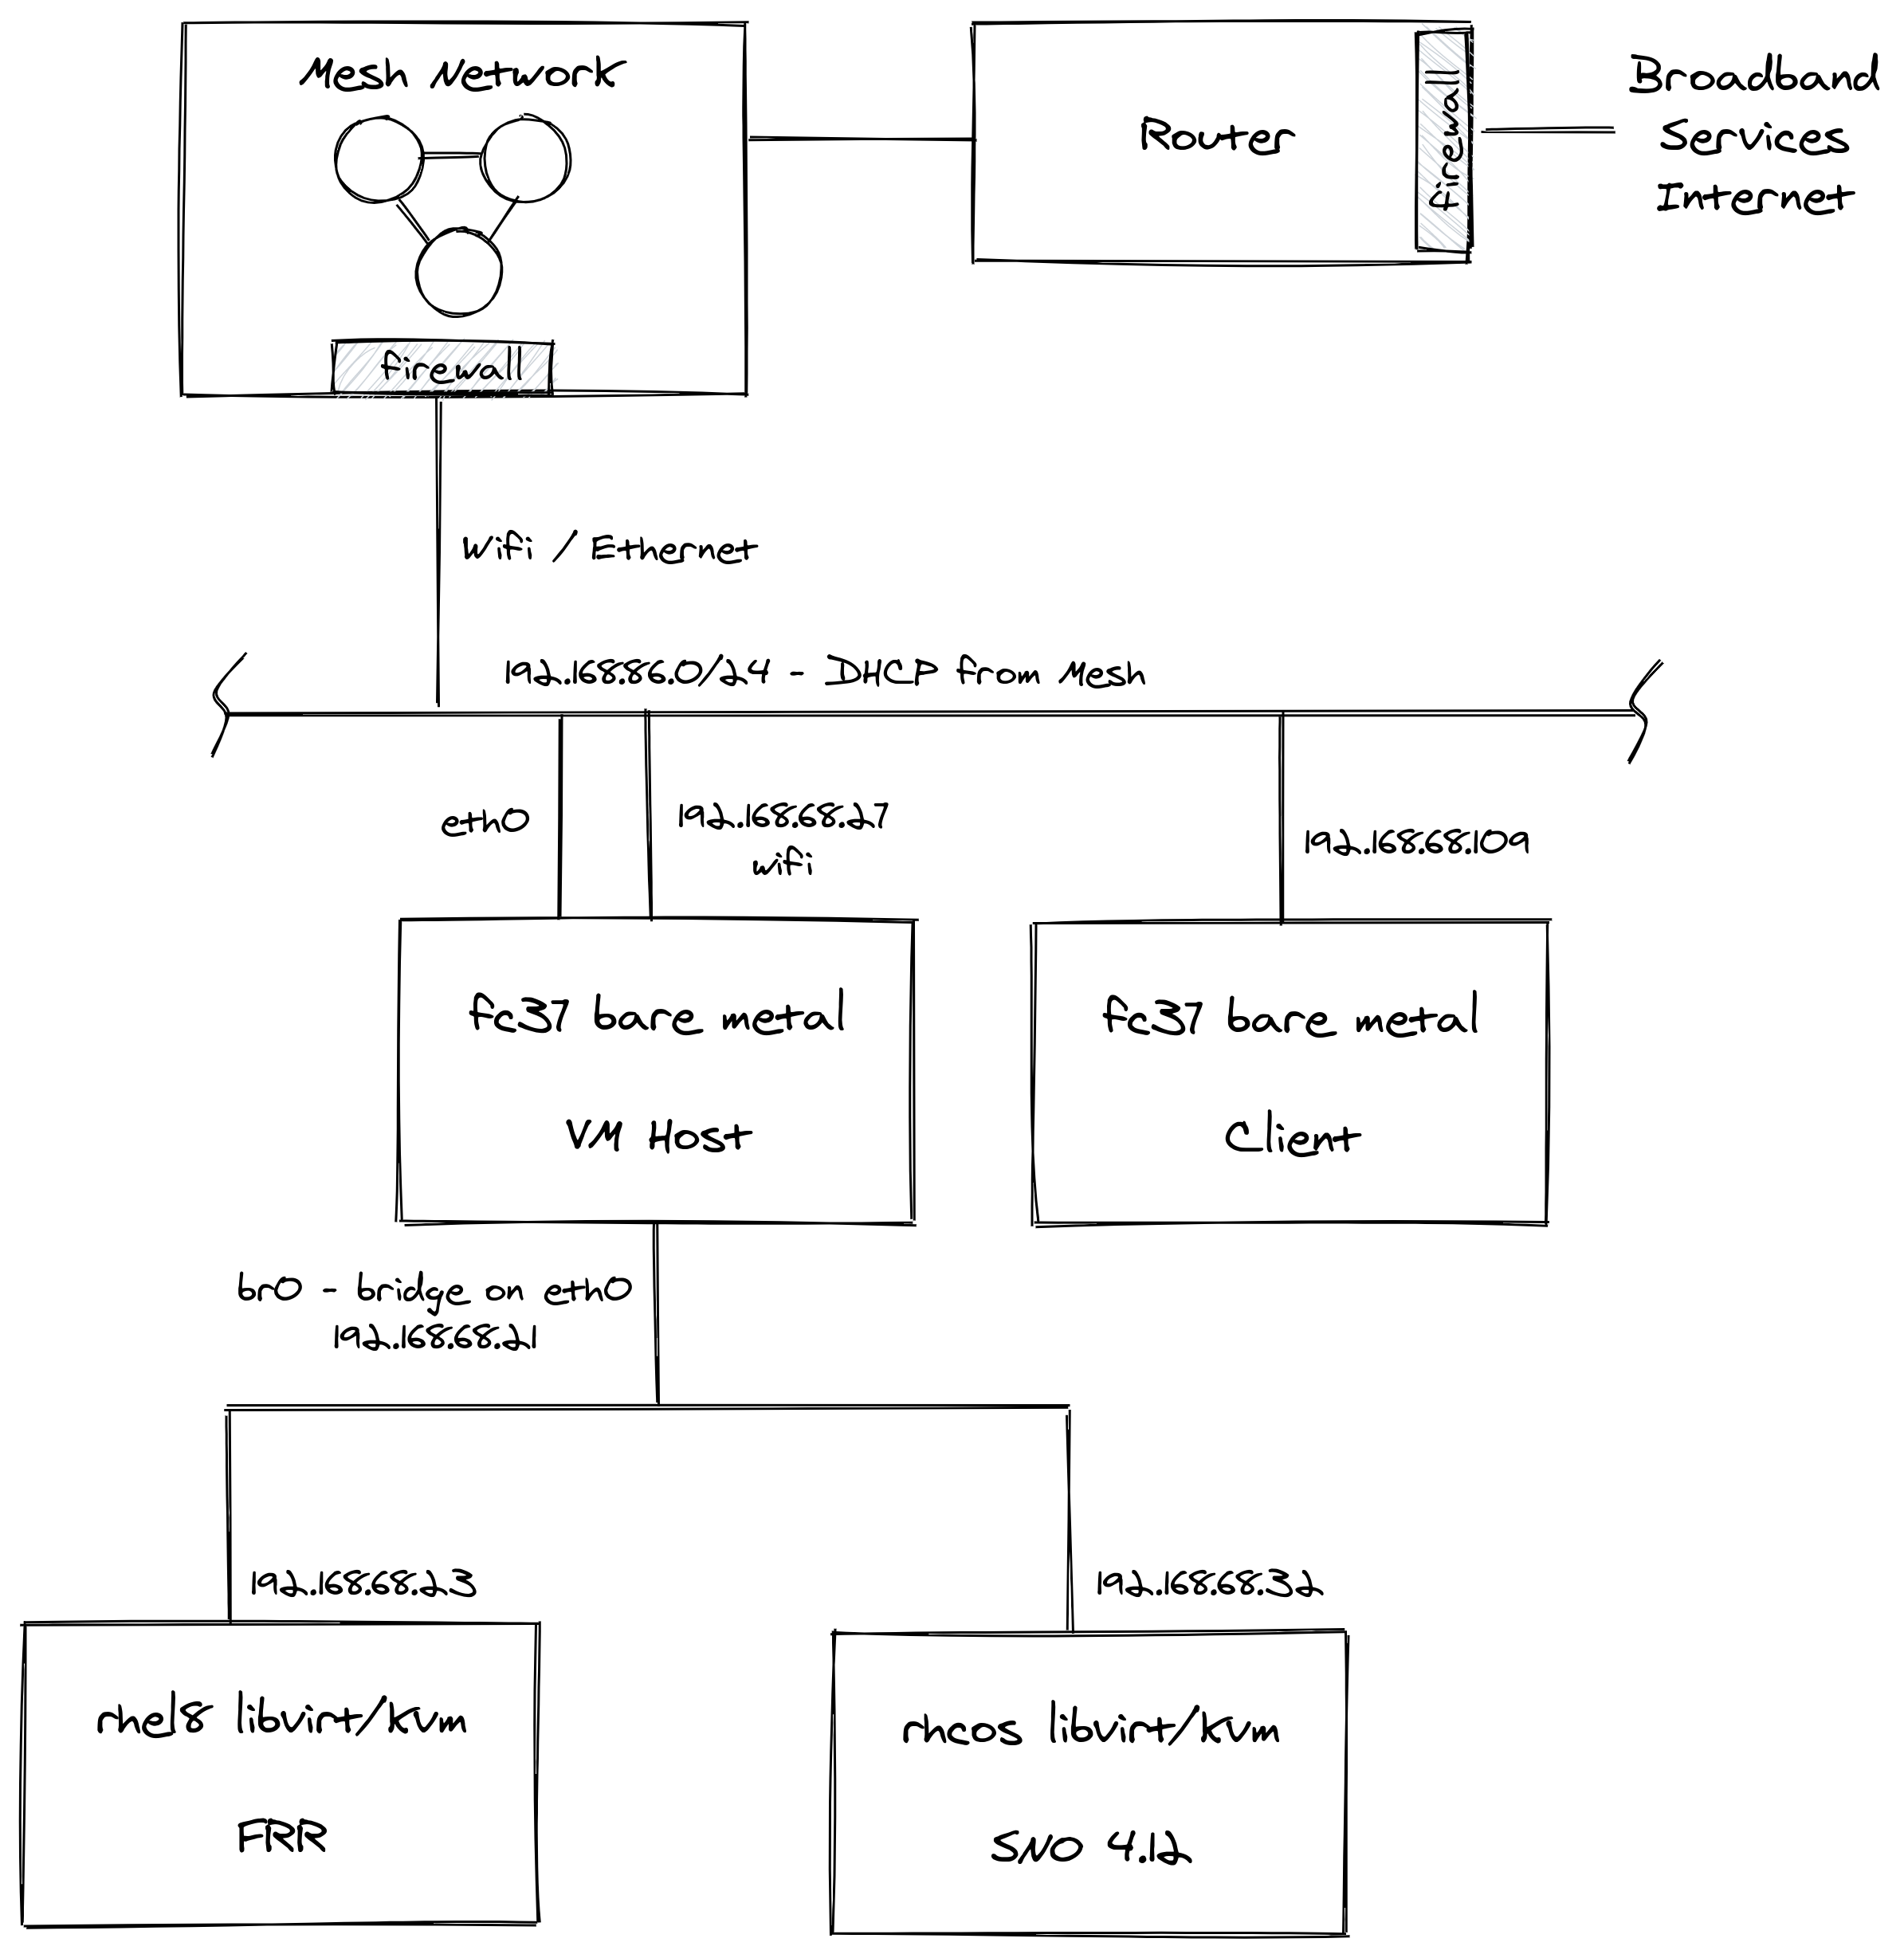
Router - Plain old broadband router with firewall and port-forwarding facilities.
Mesh Network - Connectivity via Wifi Mesh, 1G Ethernet around the house, comes with another firewall and port-forwarding facilities.
VMHost - Fedora Core box running libvirt/kvm. Has thin-lvm, nvme based storage. Hosts DNS, HTTPD, HAProxy services. Multiple network connections including eth0 which is bridged directly to the lab hosts via br0. When you add the virsh network, also make sure to change the defaults for bridge mode to:
cat /etc/sysctl.d/99-netfilter-bridge.conf
net.bridge.bridge-nf-call-ip6tables = 0
net.bridge.bridge-nf-call-iptables = 0
net.bridge.bridge-nf-call-arptables = 0

cat /etc/modules-load.d/br_netfilter.conf
br_netfilter

sudo sysctl -p /etc/sysctl.d/99-netfilter-bridge.conf
And the bridge looks like this:
cat <<EOF > /etc/libvirt/qemu/networks/sno.xml
<network>
  <name>sno</name>
  <uuid>fc43091f-de22-4bf5-974b-98711b9f3d9e</uuid>
  <forward mode="bridge"/>
  <bridge name='br0'/>
</network>
EOF

virsh net-define /etc/libvirt/qemu/networks/sno.xml
virsh net-start sno
virsh net-autostart sno
If you have a firewall on this host (firewalld, iptables) make sure to allow these ports and traffic to flow: 179/TCP (BGP), 3784/UDP and 3785/UDP (BFD).
SNO - Single Node OpenShift 4.12 libvirt/kvm installed using libvirt Bootstrap In-Place methodology from a single iso. A snippet from my install-config file showing the networking setup.
cat << EOF > install-config.yaml
...
networking:
  networkType: OVNKubernetes
  machineNetwork:
  - cidr: 192.168.86.0/24
When doing boostrap in-place, normally you rely on DHCP assignment for hostname, ip, dns, gateway. However, due to my DHCP being mesh controlled i modified the installer ISO to setup the networking manually. Set up so we copy the network form the boostrap image:
cat << EOF > install-config.yaml
...
bootstrapInPlace:
  installationDisk: "--copy-network /dev/vda"
Setup the ip address, gateway, network, hostname, device, dns as per the OpenShift docs.
arg1="rd.neednet=1"
arg2="ip=192.168.86.32::192.168.86.1:255.255.255.0:sno:enp1s0:none nameserver=192.168.86.27"
coreos-installer iso customize rhcos-live.x86_64.iso --live-karg-append="${arg1}" --live-karg-append="${arg2}" -f
DNS - I run bind/named on my VMHost to control OpenShift api.* and apps.* cluster domain. The SOA is in the cloud, so I can route from anywhere to the FQDN OK. In the lab, the internal DNS server just gives you the lab IP address. Externally you are forwarded to the Router which port-forwards via the firewall’s and Mesh to the correct SNO instance. I don’t show it, but I run HAProxy on the VMHost - that way I can serve external traffic to multiple OpenShift clusters in the lab simultaneously. My DNS zone looks like this:
ns1       IN     A       192.168.86.27
api       IN     A       192.168.86.32
api-int   IN     A       192.168.86.32
*.apps    IN     A       192.168.86.32
DHCP - One of the drawback’s of my mesh tech is that it does not allow you to override DNS on a per host / DHCP assigned basis. This is required to setup OpenShift (need control over DNS etc). I could have installed another DHCP server on linux to do this job, but I just figured "no need", I will stick with the mesh as DHCP provider (see SNO section above for manual networking configuration).
BGP - Once installed, the bpg network looks like this.
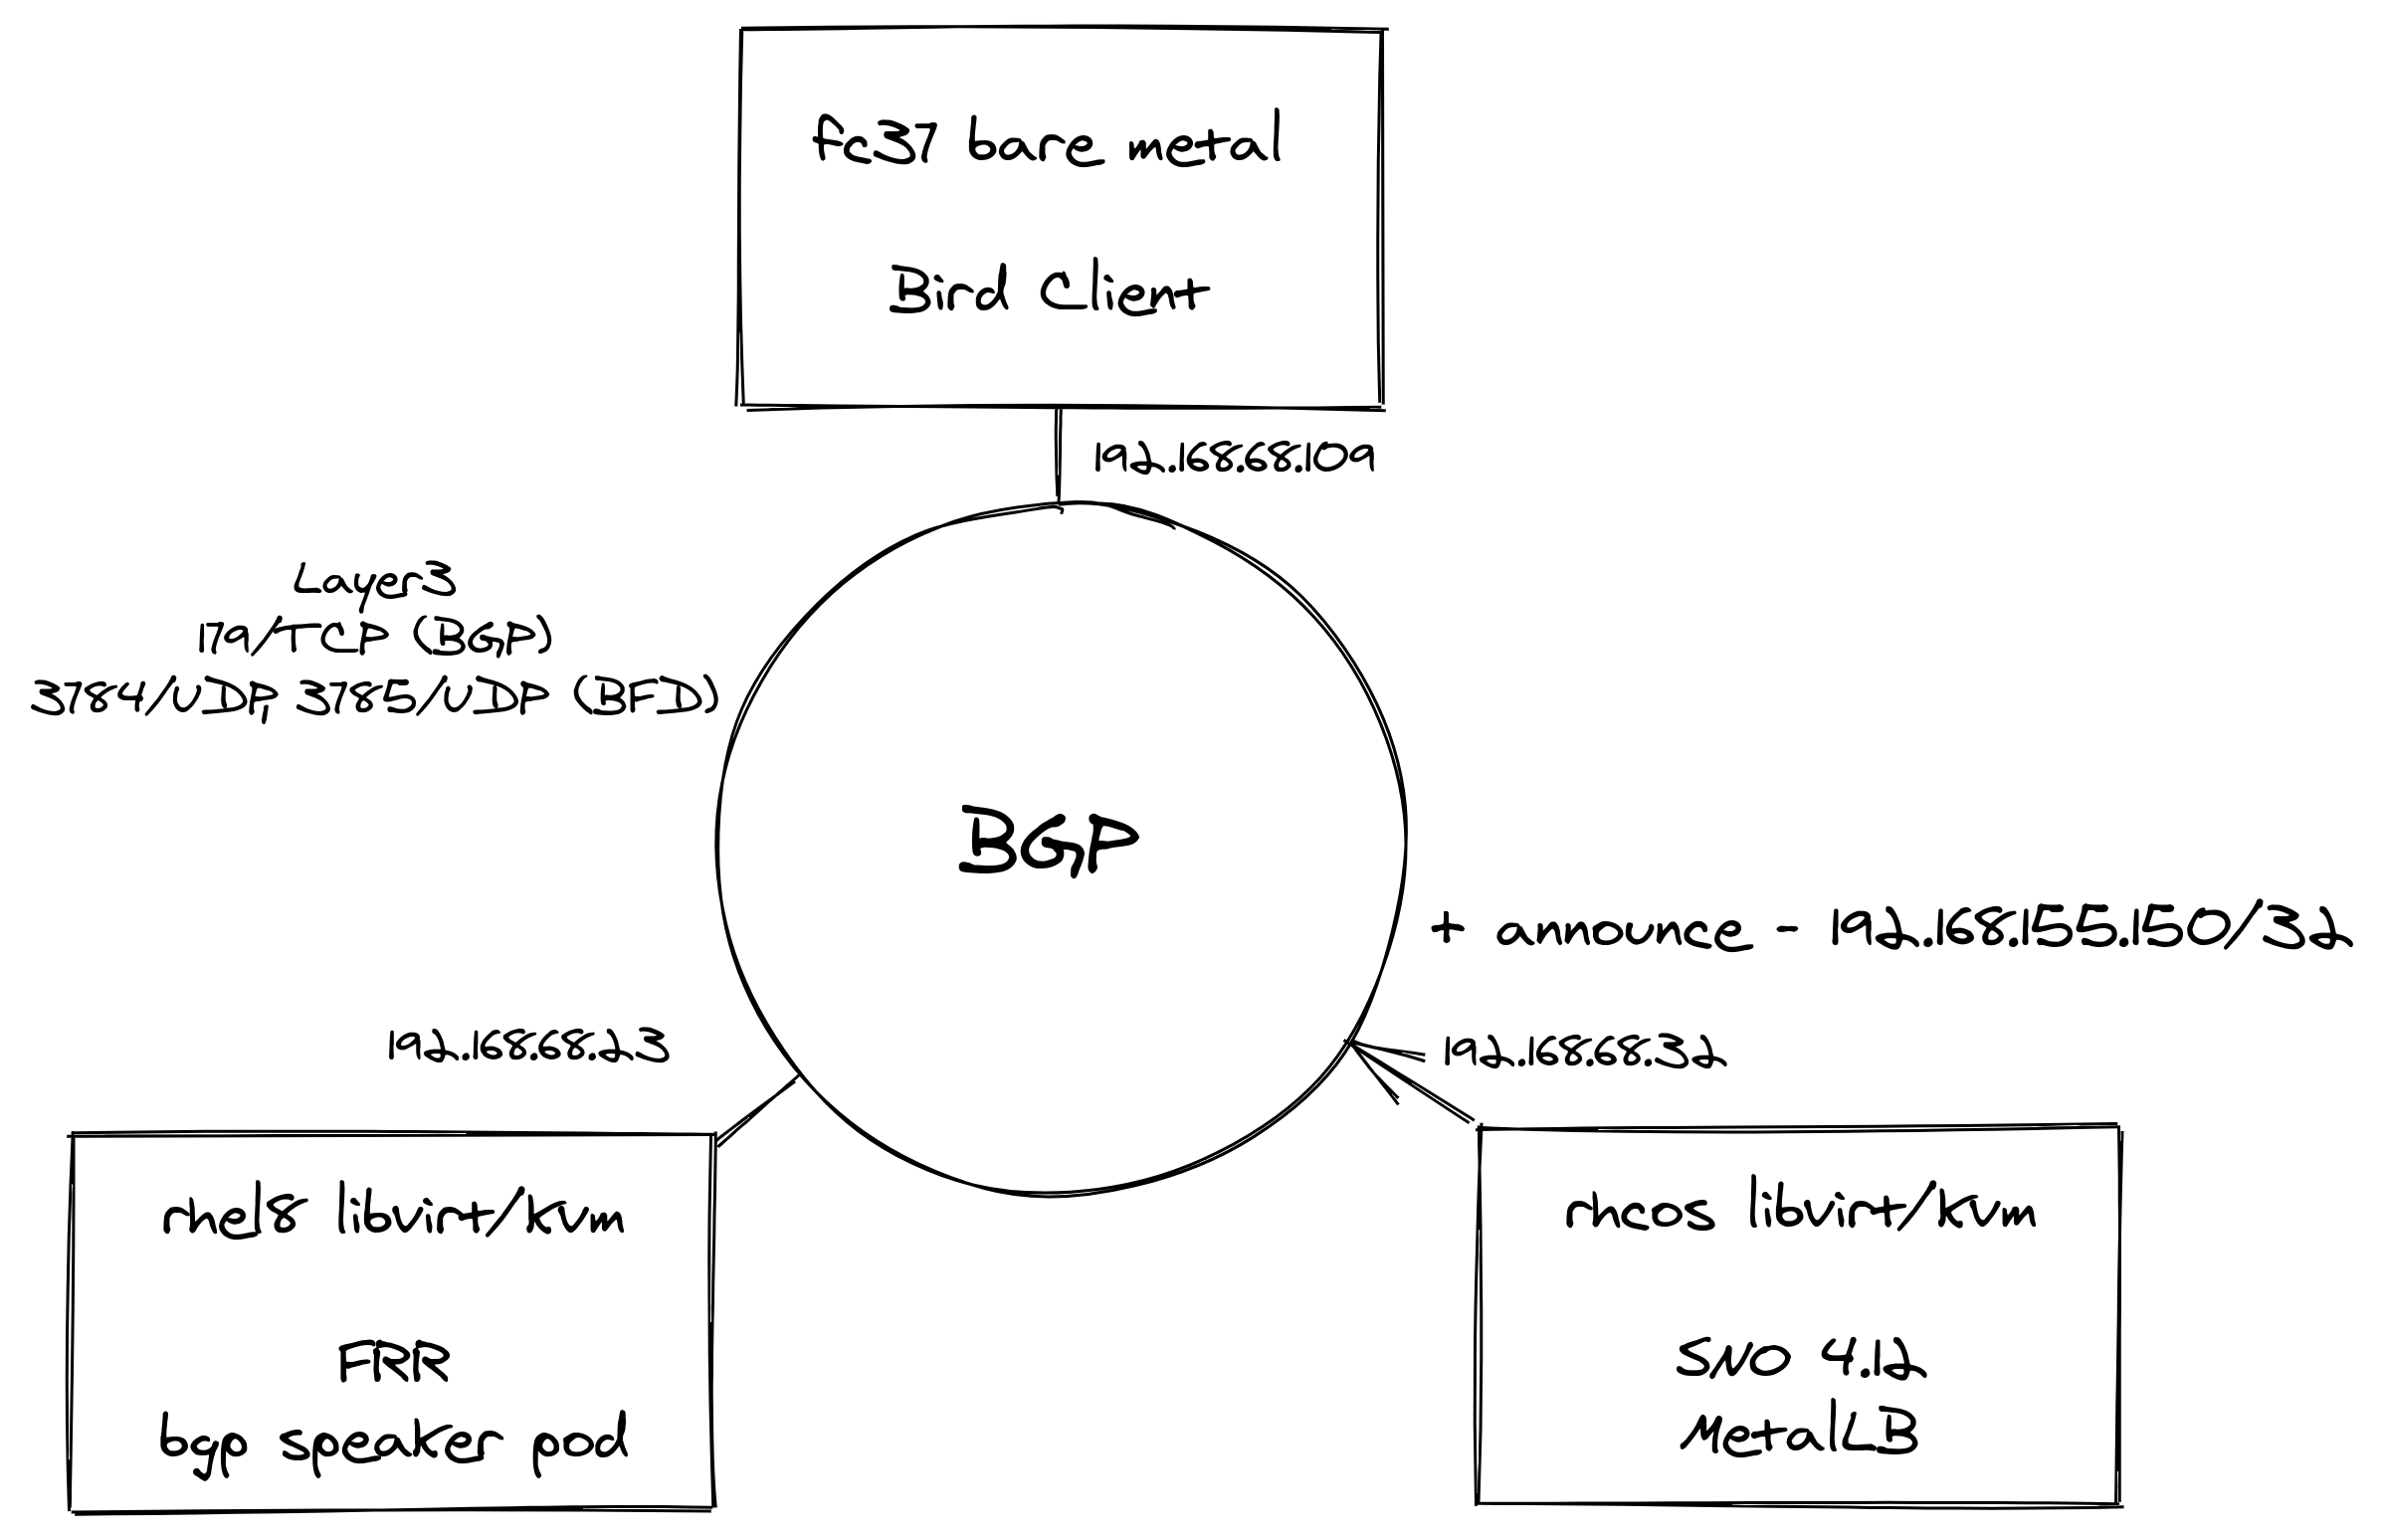
When creating LoadBalancer services in SNO, MetalLB with the help of FRR binds an External IP to the service. Since we only have one SNO node, BFD is not in use like the article (multiple worker nodes as BGPPeer’s). That’s OK though we are just trying it out here!
A nice addition for demoing, is being able to configure a Bird daemon on my Fedora Core laptop so that any BGP announcements are automatically added to its routing setup.
FRR - RHEL8 VM running FRRouting (FRR) as a pod - this is an open source Internet routing protocol suite for Linux and Unix platforms. The configuration i used is from the linked blog post at the top. From the blog use the same vtysh.conf and daemons files. My frr.conf files was as folows - i added an additional entry for my Bird Client BGPPeer at 192.168.86.109
cat <<'EOF' > /root/frr/frr.conf
frr version master_git
frr defaults traditional
hostname frr-upstream
!
debug bgp updates
debug bgp neighbor
debug zebra nht
debug bgp nht
debug bfd peer
log file /tmp/frr.log debugging
log timestamp precision 3
!
interface eth0
 ip address 192.168.86.23/24
!
router bgp 64521
 bgp router-id 192.168.86.23
 timers bgp 3 15
 no bgp ebgp-requires-policy
 no bgp default ipv4-unicast
 no bgp network import-check
 neighbor metallb peer-group
 neighbor metallb remote-as 64520
 neighbor 192.168.86.32 peer-group metallb
 neighbor 192.168.86.32 bfd
 neighbor 192.168.86.30 remote-as external
!
 address-family ipv4 unicast
  neighbor 192.168.86.32 next-hop-self
  neighbor 192.168.86.32 activate
  neighbor 192.168.86.30 next-hop-self
  neighbor 192.168.86.30 activate
 exit-address-family
!
line vty
EOF
Running FRR with podman is pretty straight forward:
podman run -d --rm -v /root/frr:/etc/frr:Z --net=host --name frr-upstream --privileged quay.io/frrouting/frr:masterSome useful commands i found to show you the BGP/FRR details:
podman exec -it frr-upstream vtysh -c "show ip route"
podman exec -it frr-upstream ip r
podman exec -it frr-upstream vtysh -c "show ip bgp sum"
podman exec -it frr-upstream vtysh -c "show ip bgp"
podman exec -it frr-upstream vtysh -c "show bfd peers"
podman exec -it frr-upstream vtysh -c "show bgp summary"
podman exec -it frr-upstream vtysh -c "show ip bgp neighbor"
As in the blog post, when looking at your "show ip bgp neighbor" you should see BGP state = Established for the BGPPeers once everything is connected up.
MetalLB - Installed on SNO as per the blog post. Check there for a detailed explanation. The commands I used were as follows:
oc apply -f- <<'EOF'
---
apiVersion: v1
kind: Namespace
metadata:
  name: metallb-system
spec: {}
EOF
oc apply -f- <<'EOF'
---
apiVersion: operators.coreos.com/v1
kind: OperatorGroup
metadata:
name: metallb-operator
namespace: metallb-system
spec: {}
EOFoc apply -f- <<'EOF'
---
apiVersion: operators.coreos.com/v1alpha1
kind: Subscription
metadata:
name: metallb-operator-sub
namespace: metallb-system
spec:
name: metallb-operator
channel: "stable"
source: redhat-operators
sourceNamespace: openshift-marketplace
EOFoc get installplan -n metallb-system
oc get csv -n metallb-system -o custom-columns='NAME:.metadata.name, VERSION:.spec.version, PHASE:.status.phase'oc apply -f- <<'EOF'
---
apiVersion: metallb.io/v1beta1
kind: MetalLB
metadata:
name: metallb
namespace: metallb-system
spec:
nodeSelector:
node-role.kubernetes.io/worker: ""
EOFoc apply -f- <<'EOF'
---
apiVersion: metallb.io/v1beta1
kind: IPAddressPool
metadata:
name: address-pool-bgp
namespace: metallb-system
spec:
addresses:
- 192.168.155.150/32
- 192.168.155.151/32
- 192.168.155.152/32
- 192.168.155.153/32
- 192.168.155.154/32
- 192.168.155.155/32
autoAssign: true
protocol: bgp
EOFoc apply -f- <<'EOF'
---
apiVersion: metallb.io/v1beta1
kind: BFDProfile
metadata:
name: test-bfd-prof
namespace: metallb-system
spec:
transmitInterval: 300
detectMultiplier: 3
receiveInterval: 300
echoInterval: 50
echoMode: false
passiveMode: true
minimumTtl: 254
EOFoc apply -f- <<'EOF'
---
apiVersion: metallb.io/v1beta1
kind: BGPPeer
metadata:
name: peer-test
namespace: metallb-system
spec:
bfdProfile: test-bfd-prof
myASN: 64520
peerASN: 64521
peerAddress: 192.168.86.23
EOFoc apply -f- <<'EOF'
apiVersion: metallb.io/v1beta1
kind: BGPAdvertisement
metadata:
name: announce-test
namespace: metallb-system
EOFClient - Fedora Core laptop i’m writing this blog post on ;) I installed Bird and configured it to import all bgp addresses from the FRR neighbour as follows.
dnf install -y bird

cat <<'EOF' > /etc/bird.conf
log syslog all;
protocol kernel {
        ipv4 {
              import none;
              export all;
        };
}
protocol kernel {
        ipv6 {
              import none;
              export all;
        };
}
protocol direct {
        disabled;               # Disable by default
        ipv4;                   # Connect to default IPv4 table
        ipv6;                   # ... and to default IPv6 table
}
protocol static {
        ipv4;
}
protocol device {
        scan time 10;
}
protocol bgp {
        description "OpenShift FFR+MetalLB Routes";
        local as 64523;
        neighbor 192.168.86.23 as 64521;
        source address 192.168.86.109;
        ipv4 {
            import all;
            export none;
        };
}
EOF

systemctl start bird
journalctl -u bird.service
Workload Demo
OK, time to try this out with a real application on OpenShift. I am going to use a very simple hello world container.
Login to the SNO instance and create a namespace and a deployment.
oc new-project welcome-metallb
oc create deployment welcome --image=quay.io/eformat/welcome:latest
Now create a LoadBalancer type service, MetalLB will do its thing.
oc apply -f- <<'EOF'
---
apiVersion: v1
kind: Service
metadata:
  name: welcome
spec:
  selector:
    app: welcome
  ports:
    - port: 80
      protocol: TCP
      targetPort: 8080
  type: LoadBalancer
EOF
We can see an ExternalIP was assigned along with a NodePort by MetalLB.
oc get svc

NAME      TYPE           CLUSTER-IP       EXTERNAL-IP       PORT(S)        AGE
welcome   LoadBalancer   172.30.154.119   192.168.155.150   80:30396/TCP   7s
If we describe the service, we can see that the address was also announced over BGP.
oc describe svc welcome

Name:                     welcome
Namespace:                welcome-metallb
Labels:                   <none>
Annotations:              <none>
Selector:                 app=welcome
Type:                     LoadBalancer
IP Family Policy:         SingleStack
IP Families:              IPv4
IP:                       172.30.154.119
IPs:                      172.30.154.119
LoadBalancer Ingress:     192.168.155.150
Port:                     <unset>  80/TCP
TargetPort:               8080/TCP
NodePort:                 <unset>  30396/TCP
Endpoints:                10.128.0.163:8080
Session Affinity:         None
External Traffic Policy:  Cluster
Events:
  Type    Reason        Age   From                Message
  ----    ------        ----  ----                -------
  Normal  IPAllocated   57s   metallb-controller  Assigned IP ["192.168.155.150"]
  Normal  nodeAssigned  57s   metallb-speaker     announcing from node "sno" with protocol "bgp"
We can check on our FRR Host the BGP route was seen:
[root@rhel8 ~]# podman exec -it frr-upstream vtysh -c "show ip route"
Codes: K - kernel route, C - connected, S - static, R - RIP,
       O - OSPF, I - IS-IS, B - BGP, E - EIGRP, N - NHRP,
       T - Table, v - VNC, V - VNC-Direct, A - Babel, F - PBR,
       f - OpenFabric,
       > - selected route, * - FIB route, q - queued, r - rejected, b - backup
       t - trapped, o - offload failure

K>* 0.0.0.0/0 [0/100] via 192.168.86.1, eth0, src 192.168.86.23, 19:16:24
C>* 192.168.86.0/24 is directly connected, eth0, 19:16:24
B>* 192.168.155.150/32 [20/0] via 192.168.86.32, eth0, weight 1, 00:02:12
And from our Client that Bird also added the route correctly from the announcement:
route -n

Kernel IP routing table
Destination     Gateway         Genmask         Flags Metric Ref    Use Iface
0.0.0.0         192.168.86.1    0.0.0.0         UG    600    0        0 wlp2s0
192.168.86.0    0.0.0.0         255.255.255.0   U     600    0        0 wlp2s0
192.168.155.150 192.168.86.23   255.255.255.255 UGH   32     0        0 wlp2s0
We can try the app endpoint from our Client
$ curl 192.168.155.150:80
Hello World ! Welcome to OpenShift from welcome-5575fd7854-7hlxj:10.128.0.163
🍾🍾 Yay ! success. 🍾🍾
If we deploy the application normally using a Route
oc new-project welcome-router
oc new-app quay.io/eformat/welcome:latest
oc expose svc welcome
and a ClusterIP type Service:
$ oc get svc welcome
NAME      TYPE        CLUSTER-IP       EXTERNAL-IP   PORT(S)    AGE
welcome   ClusterIP   172.30.121.184   <none>        8080/TCP   62s
We see that that MetalLB and normal HAProxy based Routing can happily co-exist in the same cluster.
$ curl welcome-welcome-router.apps.foo.eformat.me
Hello World ! Welcome to OpenShift from welcome-8dcc64fcd-2ktv4:10.128.0.167
If you delete the welcome-metallb project or LoadBalancer service, you will see the BGP announcement to remove the routing OK.
🏅That’s it !! Go forth and BGP !
Running Mastodon on OpenShift
31 December 2022
Tags : openshift, social, fediverse, mastodon
Join the Fediverse with OpenShift
Who knew that fediverse was a portmanteau of "federation" and "universe" ? an ensemble of interconnected servers that are used for microblogging. If you are itching to try out your own Mastodon instance on OpenShift i have just the helm template for you.
It should be as simple as logging into OpenShift and running helm, where CLUSTER_DOMAIN is your cluster apps domain name.
helm upgrade --install my-fediverse . \
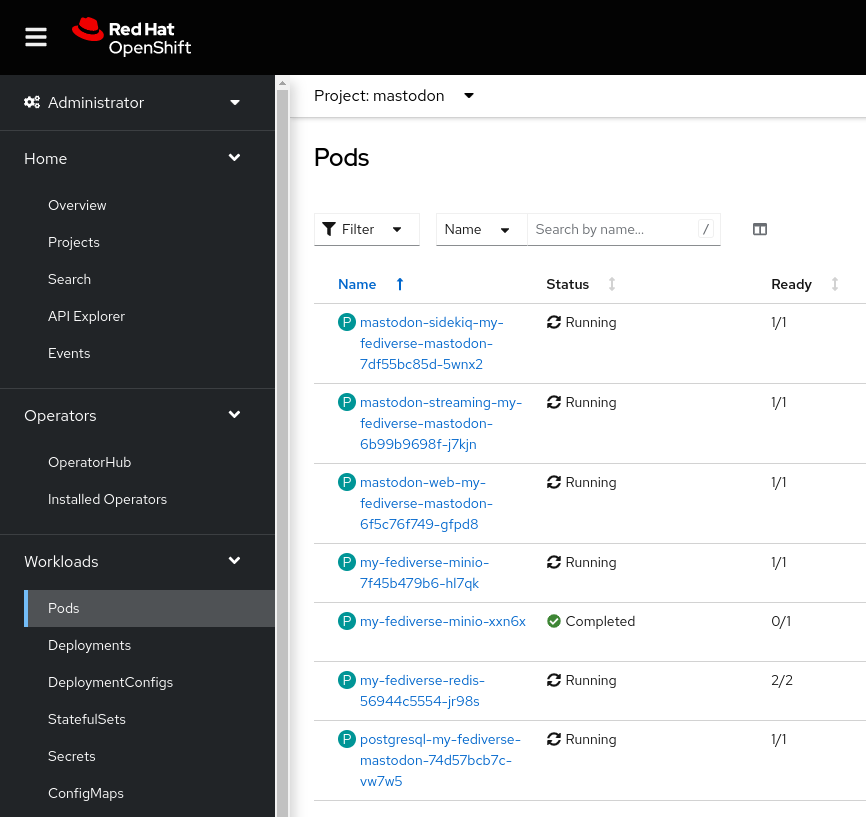
--create-namespace --namespace mastodon \
--set mastodon.local_domain=mastodon.<CLUSTER DOMAIN>This will get you a basic server installed, using the lastest Mastodon image. You should change the values.yaml to adjust the default passwords and secrets prior to deploying anything other than a play-around instance - see the README.md for how to use rake to generate new secrets. Once deployed, you should see these pods running in your mastodon namespace.
A note on S3
Mastodon can store its microblogging images in S3. The helm chart uses a minio instance running in OpenShift. In the default configuration, we want the s3 links to be publicly available via anonymous read-only access with the link, but not listable. For now we use the aws cli client to upload this policy manually post-install.
oc -n mastodon port-forward svc/my-fediverse-minio 9000:9000
cat << 'EOF' > /tmp/mastodon-policy.json
{
  "Version": "2012-10-17",
  "Statement": [
    {
      "Action": [
        "s3:GetObject"
      ],
      "Effect": "Allow",
      "Principal": {
        "AWS": [
          "*"
        ]
      },
      "Resource": [
        "arn:aws:s3:::mastodon/*"
      ],
      "Sid": ""
    }
  ]
}
EOF

export AWS_PROFILE=minio
aws --endpoint-url http://localhost:9000 s3api put-bucket-policy --bucket mastodon --policy file:///tmp/mastodon-policy.json
Logging In, Adding users
By default users can self register to your mastodon instance. The user on boarding workflow uses email, so you can deploy using SMTP services. For example a popular service like mailgun with your credentials would look something like this:
helm upgrade --install my-fediverse . \
--set mastodon.smtp_server=smtp.mailgun.org \
--set mastodon.smtp_login=postmaster@example.com \
--set mastodon.smtp_password=123456 \
--set mastodon.smtp_from_address=mastodon@example.com. \
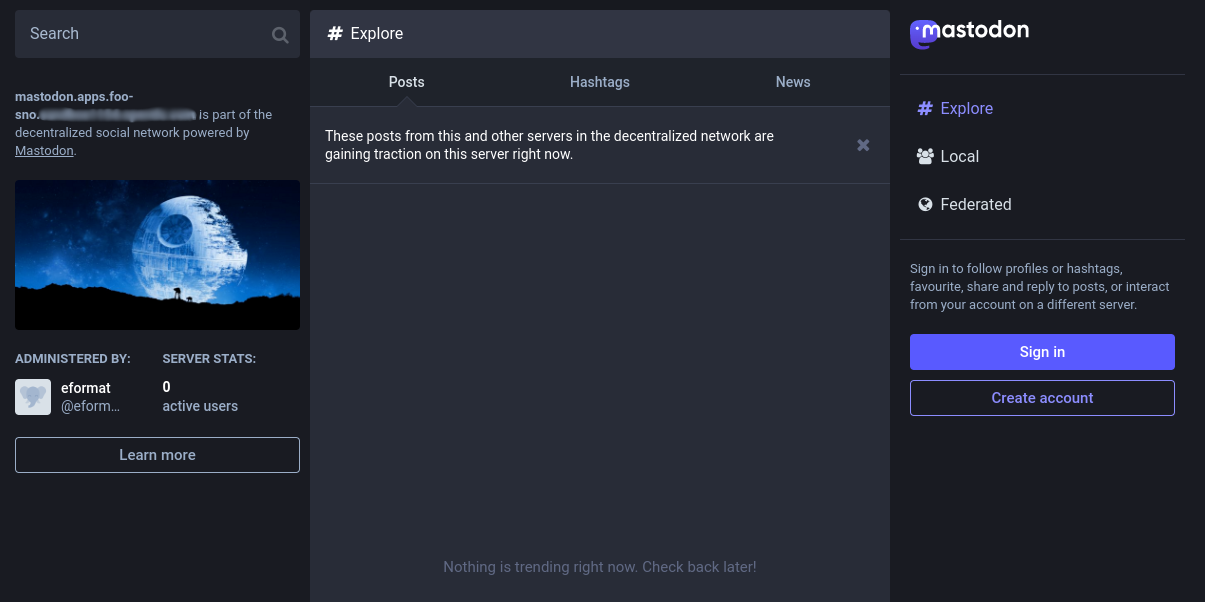
--create-namespace --namespace mastodonIf you do not want to set up SMTP just yet, we can also use a manual method. Browse to your mastodon front page and select Create Account.
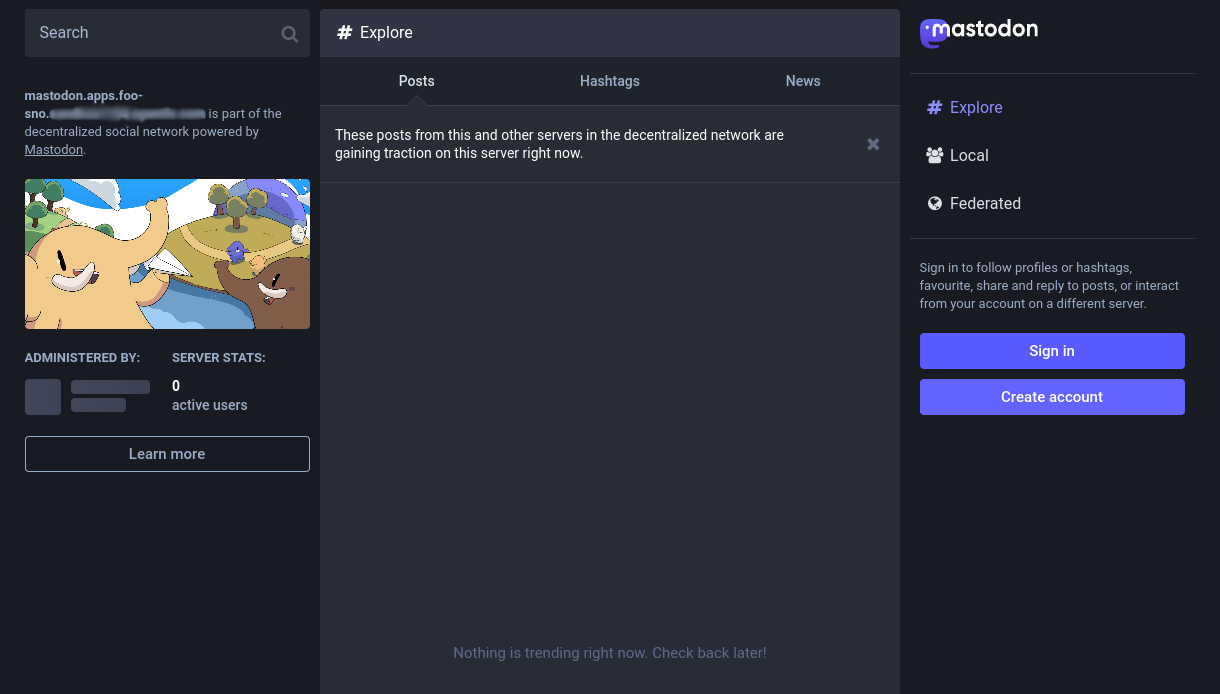
This will let you sign up. We can rsh into the mastodon pod to manually approve the user. I signed up as eformat and also gave myself the Admin role.
oc rsh $(oc get pods -l app.kubernetes.io/name=mastodon-streaming-mastodon -o name)

RAILS_ENV=production bin/tootctl accounts modify eformat --confirm
RAILS_ENV=production bin/tootctl accounts modify eformat --role Admin
You should see OK printed out when running these commands. Now log back in to mastodon and you should be able to right-click Preferences to administer the server.
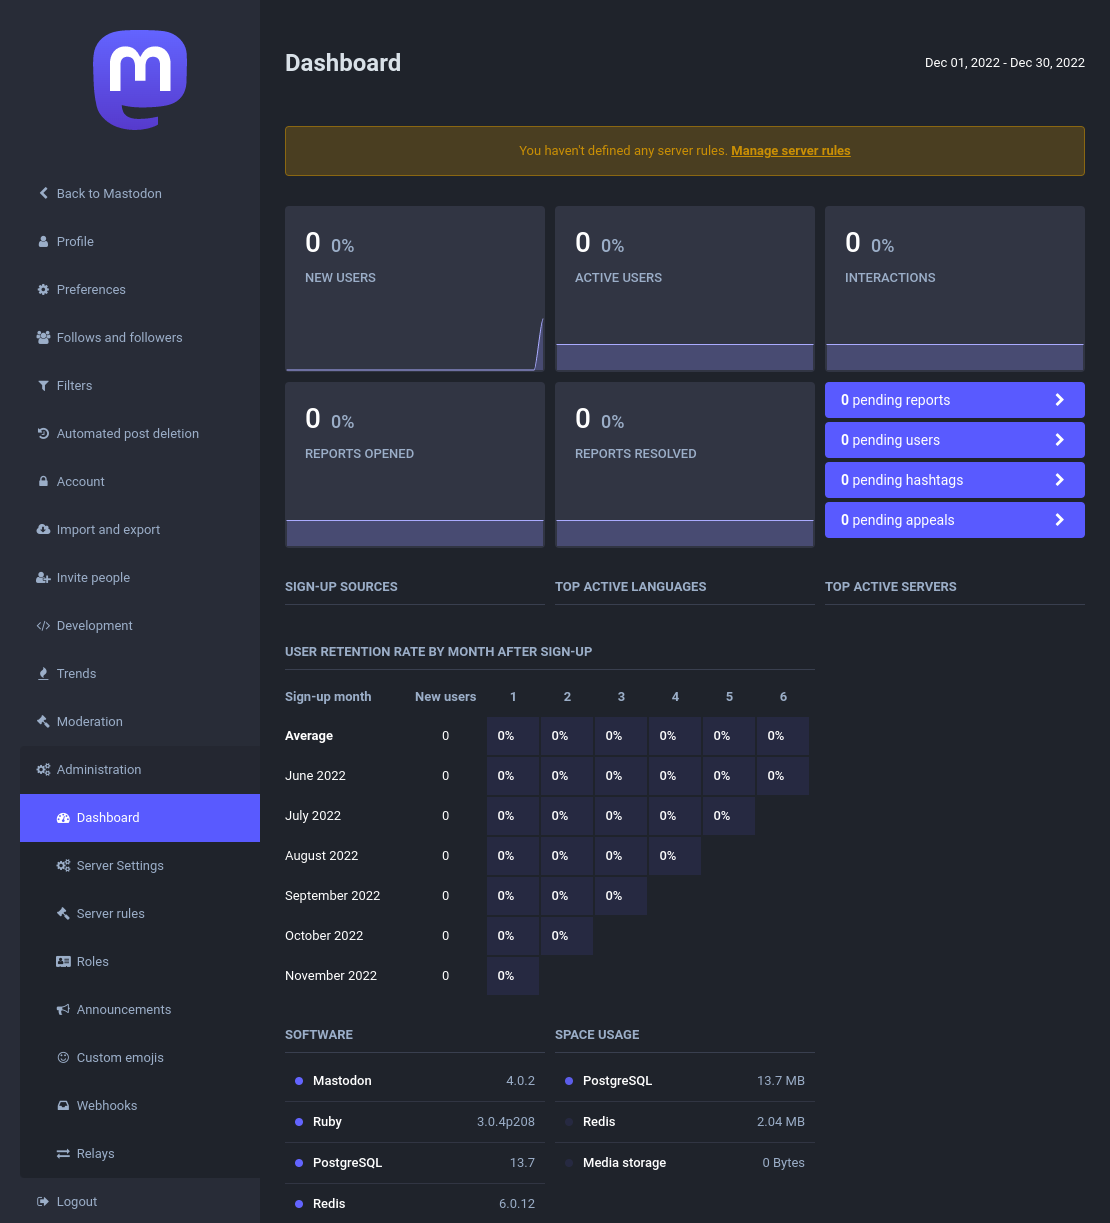
I updated the server thumbnail which is stored in your minio s3.
🏅That’s it !! you can find all of the docs and configuration guides online for mastodon.
Stable Diffusion on OpenShift with GPU Sharing
13 December 2022
Tags : openshift, gpu, aiml, stable diffusion
Stable Diffusion on OpenShift with GPU Sharing
So the intuitive follow on from the last blog post Stable Diffusion for Fedora Core is of course to see if we can get the app running on OpenShift in a lab environment!
There are a couple of challenges. In my case, i actually wanted to demo the app in a lab that contains some older Nvidia-Tesla-T4 GPU’s, a bare metal SNO instance along with a bunch of other GPU enabled apps. This raises some interesting questions, in particular how do we configure and deploy applications so they can share the GPU’s in this environment?
One of the best article i found describing GPU Sharing and the various mechanisms involved, highlights the different options available.
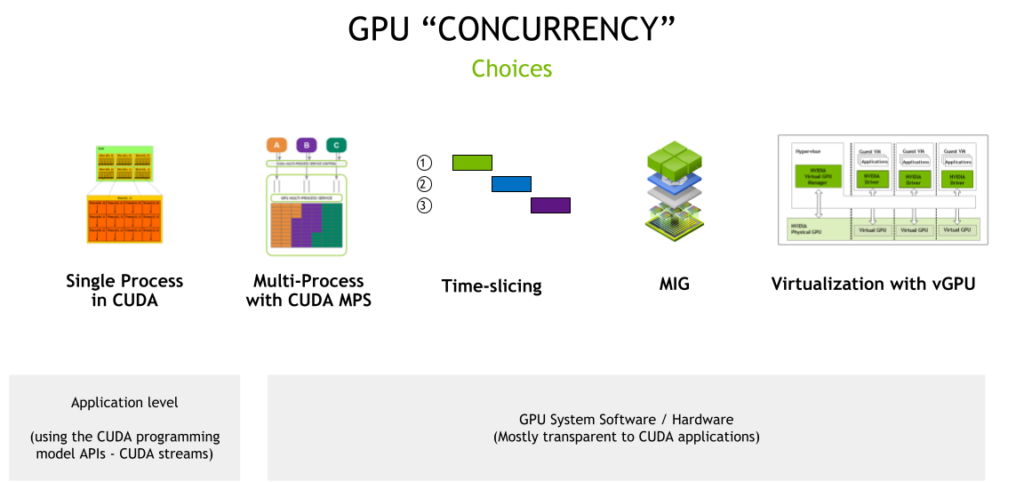
We are interested primarily in the system software and hardware part of this picture (CUDA and MPS-CUDA are more at the application level). Although, Stable Diffusion does require working CUDA for python torch as well.
MIG (which stands for multi instance GPU) is the newest technology and only supported on a small number of cards (not the T4') like vGPU (A100 and A30). There are some great OpenShift blogs describing MIG usage. vGPU is a technology that is only available if OpenShift is running in a VM/hypervisor. vGPUs are created/configured at the hypervisor level independently of OpenShift.
So, that leaves us with Time-slicing. The best place to read about it is on the Nvidia site. Unlike MIG, there is no memory or fault-isolation between replicas, but for some workloads this is better than not being able to share the GPU at all. There is a lot of documentation to read, so i’m going to summarize the steps to get OpenShift Bare Metal SNO working using time-slicing.
Installing the Node Feature Discovery (NFD) Operator
The first step after installing OpenShift SNO bare-metal, was to configure the NFD operator as cluster-admin. The default configuration for the operator is fine. All going well, your GPU’s should now be visible to OpenShift, and you can check by doing:
$ oc debug node/<node name>
$ chroot /host
$ lspci | grep -i nvidia
17:00.0 3D controller: NVIDIA Corporation TU104GL [Tesla T4] (rev a1)
65:00.0 3D controller: NVIDIA Corporation TU104GL [Tesla T4] (rev a1)
We can see our two physical GPU’s OK. Another check is the node labels and description:
$ oc describe node | egrep 'Roles|pci' | grep -v master
   feature.node.kubernetes.io/pci-10de.present=true
If you see the pci-10de device, that is the code for Nvidia GPU’s, all good so far.
Installing the NVIDIA GPU Operator
Next step is to install the Nvidia GPU Operator. By default you should not need to install any license as OpenShift 4.9.9+ is entitlement free. There are several pods that install with this operator. If you install the default Cluster Policy the nvidia driver is downloaded and compiled for your OpenShift and inserted as dynamic kmods. This may take a little bit of time to complete.
In our case, we only have one node (SNO) so the dameon set compiles and installs the driver on our node. If you follow the documentation above you should be able to verify the drivers are loaded.
$ oc debug node/<node name>
$ chroot /host
$ lsmod | grep nvidia
nvidia_modeset       1142784  0
nvidia_uvm           1310720  2
nvidia              40796160  363 nvidia_uvm,nvidia_modeset
drm                   589824  4 drm_kms_helper,nvidia,mgag200
Its worth noting that if you were using vGPU, you would also get the nvidia_vgpu_vfio module, but because we are bare metal, the driver dameon set recognizes passthrough mode and does not compile it.
The second part of the puzzle is you need to now configure the GPU for time-slicing. To do this we need create a ConfigMap that specifies how many slices we want, for example 8 in our case.
kind: ConfigMap
apiVersion: v1
metadata:
  name: time-slicing-config
  namespace: nvidia-gpu-operator
data:
  tesla-t4: |-
    version: v1
    sharing:
      timeSlicing:
        resources:
        - name: nvidia.com/gpu
          replicas: 8
Next, we add this ConfigMap name into the nvidia.com ClusterPolicy.
devicePlugin:
config:
default: "tesla-t4"
name: "time-slicing-config"
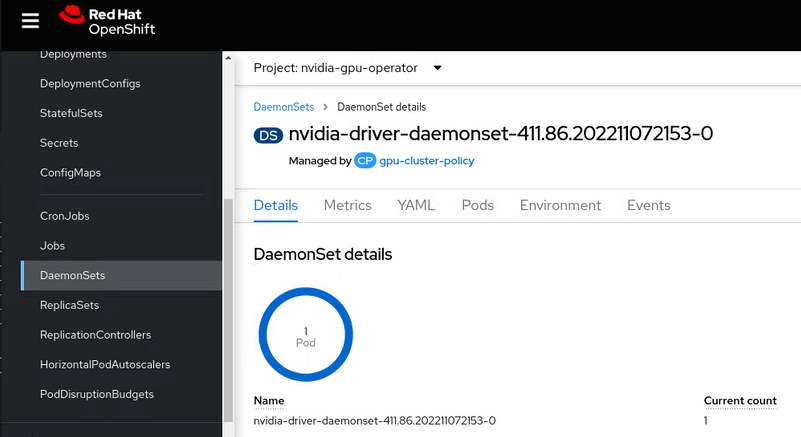
enabled: trueBy enabling the devicePlugin you should see the device plugin DaemonSet spin up.
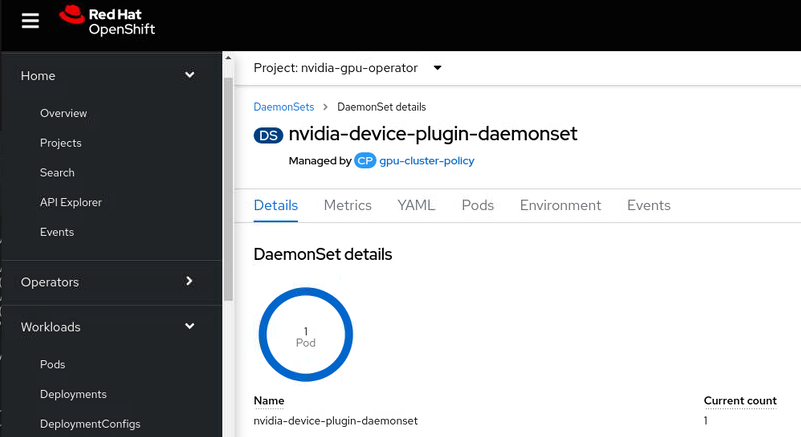
We are nearly there ! If we now look at the OpenShift node description, we should see how many GPU’s OpenShift now thinks it has.
$ oc describe node| sed '/Capacity/,/System/!d;/System/d'

Capacity:
  ...
  nvidia.com/gpu:                 16
Allocatable:
  ...
  nvidia.com/gpu:                 16
So great ! that is 8x2=16 time-sliced GPU’s available.
Deploy Stable Diffusion
I have created a simple Kustomize folder in the git repo and split out the two part needed to get the app running.
First create a data download job (this is 6 GB of downloads), which creates a PVC using he default Storage Class to download the required Stable Diffusion model data.
oc apply -f create-data/app.yamlThen run the deployment.
oc apply -f create-app/app.yamlHere’s an example of a run on the lab, showing the nvidia-smi pmon on the shell for the running python process and an output text to image.

In our Deployment we only requested one GPU, so we get one time-sliced gpu.
resources:
limits:
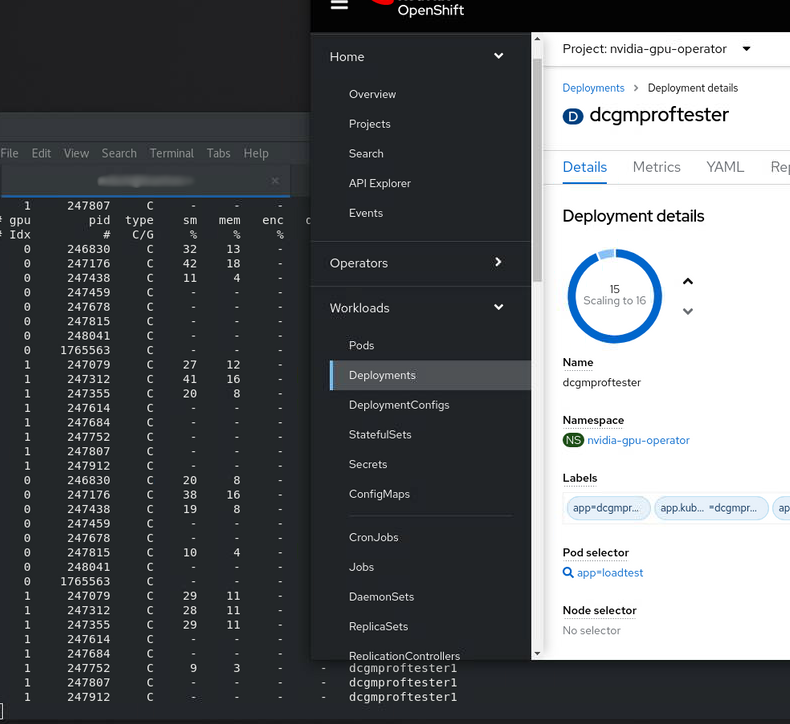
nvidia.com/gpu: 1You can scale this up, or use the nvidia sample image to test out time-slicing and sharing e.g. Create a Deployment using this image.
        replicas: 16
        image: nvidia/samples:dcgmproftester-2.0.10-cuda11.0-ubuntu18.04
        resources:
          limits:
            nvidia.com/gpu: "1"
And hey presto ! we now see 15/16 app replicas spinning up and running on our 2 physical GPU’s. You can see them easily using nvidia-smi pmon. We don’t quite get to 16 as Stable Diffusion is still running on the GPU as well!
SNO in AWS for $150/mo
10 November 2022
Tags : openshift, aws, sno, cost
So you want to demo OpenShift like a boss …

What is the cheapest way to run OpenShift in the public cloud ?
Behold .. the awesomeness-ness of SNO (Single Node OpenShift) on persistent spot in AWS. A Spot Instance is an instance that uses spare EC2 capacity that is available for a lot less than the On-Demand price. How much less ? well.. you can check it out here but normally 70% less ec2 cost. Just get used to some interruptions 😶🌫️.
For installing and demoing anything in OpenShift you will normally need a bare minimum of 8vCPU and 32 GB RAM for SNO which may get you close to under the $100 mark 😲.
| Price | ||
|---|---|---|
m6a.2xlarge |
|
$120 |
GP3 volumes |
|
$10 |
ELB+EIP |
|
$20 |
Total: |
$150 |
|
But others could suit your need better:
-
c5n.4xlarge - 16 vCPU, 42 GB RAM
-
m6a.2xlarge - 8 vCPU, 32 GB RAM
-
r6i.2xlarge - 8 vCPU, 64 GB RAM
Prices will vary over time ! it is spot after all. The rate of instance interruption also varies by region and instance type, so I pick and choose based on latency to where I work from.
So, how do we get there ?
💥 UPDATE - Checkout the automation here - https://github.com/eformat/sno-for-100 💥
Configuring and Installing OpenShift
You can check the docs for configuring the install.
$ openshift-install create install-configYou want to install SNO, so your config should look similar to this:
apiVersion: v1
baseDomain: <your base domain>
compute:
- name: worker
  replicas: 0
controlPlane:
  name: master
  replicas: 1
  architecture: amd64
  hyperthreading: Enabled
  platform:
    aws:
      type: c5n.4xlarge
      rootVolume:
        size: 250
        type: gp3
metadata:
  name: sno
platform:
  aws:
    region: <your region>
You want a single master, choose how big you want your root volume and instance size and which region to install to. Personally I use Hive and ClusterPools from an SNO instance in my home lab to install all my public cloud clusters, that way I can easily control then via configuration and hibernate them when I want ! You can also just install via the cli of course:
$ openshift-install create clusterAdjusting SNO to remove all the costly networking bits!
When you install SNO, it installs a bunch of stuff you may not want in a demo/lab environment. With a single node, the load balancers and the private routing are usually not necessary at all. It’s always possible to put the private routing and subnets back if you need to add workers later or just reinstall.
I am going to include the aws cli commands as guidance, they need a bit more polish to make them fully scriptable, but we’re working on it ! This saves you approx~ $120/mo for the 3 NAT gateways, $40/mo for 2 API load balancers and $10/mo for 2 EIP’s. I will keep the router ELB.
-
Update Master Security Group: Allow 6443 (TCP)
region=<your aws region> instance_id=<your instance id> master_sg_name=<your cluster>-sno-master-sg sg_master=$(aws ec2 describe-security-groups \ --region=${region} \ --query "SecurityGroups[].GroupId" \ --filters "Name=vpc-id,Values=${vpc}" \ --filters "Name=tag-value,Values=${master_sg_name}" | jq -r .[0]) aws ec2 authorize-security-group-ingress \ --region=${region} \ --group-id ${sg_master} \ --ip-permissions '[{"IpProtocol": "tcp", "FromPort": 6443, "ToPort":6443, "IpRanges": [{"CidrIp": "0.0.0.0/0"}]}]' -
Update Master Security Group: Allow 30000 to 32767 (TCP & UDP) from 0.0.0.0/0 for NodePort services
aws ec2 authorize-security-group-ingress \ --region=${region} \ --group-id ${sg_master} \ --ip-permissions '[{"IpProtocol": "tcp", "FromPort": 30000, "ToPort":32767, "IpRanges": [{"CidrIp": "0.0.0.0/0"}]},{"IpProtocol": "udp", "FromPort": 30000, "ToPort":32767, "IpRanges": [{"CidrIp": "0.0.0.0/0"}]}] -
Add Security Groups that were attached to Routing ELB to master
aws ec2 authorize-security-group-ingress \ --region=${region} \ --group-id ${sg_master} \ --ip-permissions '[{"IpProtocol": "tcp", "FromPort": 443, "ToPort":443, "IpRanges": [{"CidrIp": "0.0.0.0/0"}]},{"IpProtocol": "tcp", "FromPort": 80, "ToPort":80, "IpRanges": [{"CidrIp": "0.0.0.0/0"}]},{"IpProtocol": "icmp", "FromPort": 8, "ToPort": -1,"IpRanges": [{"CidrIp": "0.0.0.0/0"}]}]' -
Attach a new public elastic IP address
eip=$(aws ec2 allocate-address --domain vpc --region=${region}) aws ec2 associate-address \ --region=${region} \ --allocation-id $(echo ${eip} | jq -r '.AllocationId') \ --instance-id ${instance_id} -
Update all subnets to route through IGW (using public route table)
# update public route table and add private subnets to route through igw (using public route table), public subnets already route that way aws ec2 describe-route-tables --filters "Name=vpc-id,Values=${vpc}" --region=${region} > /tmp/baz # inspect /tmp/baz to get the right id's, update them individually aws ec2 replace-route-table-association \ --association-id rtbassoc-<id> \ --route-table-id rtb-<id for igw> \ --region=${region} -
Route53: Change API, APPS - A record to elastic IP address
-
Route53: Change internal API, APPS - A records to private IP address of instance
I’m just going to list the generic command here, rinse and repeat for each of the zone records (four times, [int, ext] - for [*.apps and api]):
aws route53 list-hosted-zones # get your hosted zone id's hosted_zone=/hostedzone/<zone id> # use the private ip address for the internal zone cat << EOF > /tmp/route53_policy1 { "Changes": [ { "Action": "UPSERT", "ResourceRecordSet": { "Name": "api.<your cluster domain>", "Type": "A", "TTL": 300, "ResourceRecords": [ { "Value": "$(echo $eip | jq -r '.PublicIp')" } ] } } ] } EOF aws route53 change-resource-record-sets \ --region=${region} \ --hosted-zone-id $(echo ${hosted_zone} | sed 's/\/hostedzone\///g') \ --change-batch file:///tmp/route53_policy1 -
Delete NAT gateways
This will delete all your nat gateways, adjust to suit
for i in `aws ec2 describe-nat-gateways --region=${region} --query="NatGateways[].NatGatewayId" --output text | tr '\n' ' '`; do aws ec2 delete-nat-gateway --nat-gateway-id ${i} --region=${region}; done -
Release public IP addresses (from NAT gateways)
There will be two public EIP’s you can now release:
aws ec2 release-address \ --region=${region} \ --public-ip <public ip address> -
Delete API load balancers (ext, int)
This will delete all your api load balancers, adjust to suit
for i in `aws elb describe-load-balancers --region=${region} --query="LoadBalancerDescriptions[].LoadBalancerName" --output text | tr '\n' ' '`; do aws elb delete-load-balancer --region=${region} --load-balancer-name ${i}; done -
Delete API load balancer target groups
FIXME - need to look these up
aws elbv2 delete-target-group \ --target-group-arn arn:aws:elasticloadbalancing:us-west-2:123456789012:targetgroup/my-targets/73e2d6bc24d8a067 -
Use Host Network for ingress
FIXME - extra step
oc -n openshift-ingress-operator patch ingresscontrollers/default --type=merge --patch='{"spec":{"endpointPublishingStrategy":{"type":"HostNetwork","hostNetwork":{"httpPort": 80, "httpsPort": 443, "protocol": "TCP", "statsPort": 1936}}}}' oc -n openshift-ingress delete services/router-default -
Restart SNO to ensure it still works !
Convert SNO to SPOT
This has the effect of creating a spot request which will be permanent and only stop the instance should the price or capacity not be met temporarily. We’re using this script to convert the SNO instance:
$ ./ec2-spot-converter --stop-instance --review-conversion-result --instance-id <your instance id>This will take a bit of time to run and gives good debugging info. You can delete any temporary ami’s and snapshots it creates.
A little work in progress …
The conversion script changes your instance id to a new one during the conversion. This stops the instance from registering in the router ELB properly. So we need to update the instance id in a few places in SNO - for now we need to do the following steps.
-
Update the machine api object
oc edit machine -n openshift-machine-api
# change your .spec.providerID to <your new converted instance id>-
To make this survive a restart, we need to change the aws service provider id by hand on disk.
oc debug node/<your node name>
chroot /host
cat /etc/systemd/system/kubelet.service.d/20-aws-providerid.conf

# the file will look like this with your region and instance
[Service]
Environment="KUBELET_PROVIDERID=aws:///<region>/<your original instance id>"

# edit this file using vi and change <your original instance id> -> <your new converted instance id>-
Delete the node ! the kubelet will re-register itself on reboot # restart the service
oc delete node <your node name>-
Restart SNO
You can check the instance is correctly registered to the ELB.
aws elb describe-load-balancers \
--region=${region} \
--query="LoadBalancerDescriptions[].Instances" \
--output text
I will update this blog if we get a better way to manage this instance id thing over time 🤞🤞🤞
Profit !
💸💸💸 You should now be off to the races 🏇🏻 with your cheap-as SNO running on Spot.
The next steps - normally I would add a Lets Encrypt Cert, add users and configure the LVM Operator for thin-lvm based storage class. That i will leave those steps for another blog. Enjoy. 🤑
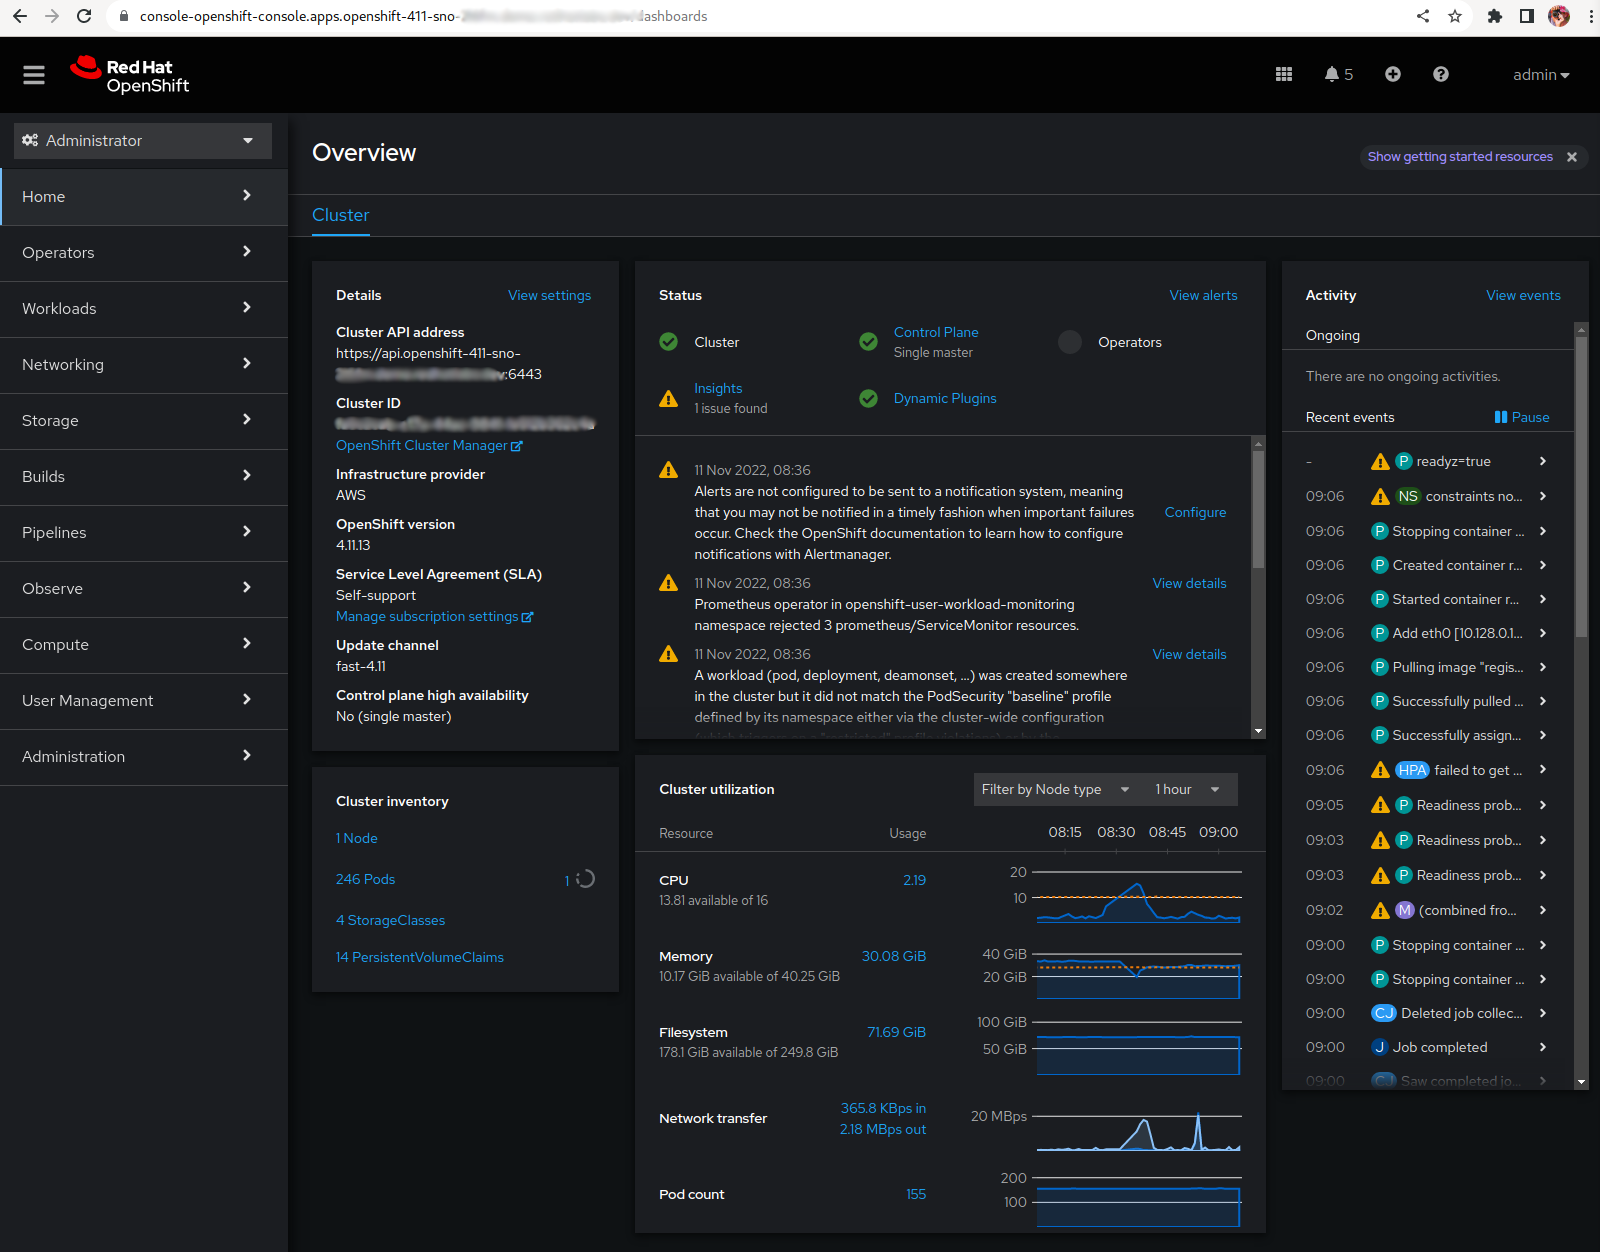
SNO for $150/mo in AWS on c5n.4xlarge
DevOps with OpenShift Introduction
03 November 2022
5 Years!
It’s been five years since we wrote the inaugural DevOps with OpenShift book. I re-read the introduction recently, and thought "It hasn’t aged that badly !"
Figure 1. DevOps with OpenShift
Introduction to DevOps with OpenShift
This book provides a practical guide for using OpenShift as an enablement technology for DevOps. OpenShift’s combination of container management platform with natively container-aware automation can bring those Developer and Operations constituencies together in ways not previously possible. This enables software work products to present themselves in a standardized form to your preferred continuous integration and delivery tool chains.
Container awareness makes it possible to leverage deployment strategies and quality of service characteristics honored by the container management platform and underlying orchestration engine. We can start thinking in terms of containers-as-code rather than infrastructure-as-code.
So to get started, let’s review some key DevOps concepts as interpreted with a container-centric viewpoint.
DevOps
DevOps is concerned with aligning the constituents in the software delivery process to a common goal of value delivery—and it’s not just Developers and Operators, but InfoSec and Quality Assurance functions and more. Recognize that wealth is created when the work product is valued by actors external to the production system. Value delivery outcomes are measured by metrics tied to production delivery velocity, quality, and waste. DevOps emphasizes behavioral- or cultural-related changes such as those which encourage teaming, inclusion, feedback, and experimentation. Technological interventions such as automation are central as they can reinforce such target behaviors. DevOps does not necessarily imply functional roles in software delivery such as development, quality assurance, or operations are merged or seconded. More important is that a professional respect and shared sensibility is formed across the delivery team.
Containers
Containers are the runtime representation of a packaging format based on a lightweight, immutable image. Runtime dependencies are resolved within the image which facilitates portability. This makes possible the agreement on a standardized software work product. Management and runtime tooling that is container aware can then be applied consistently no matter what the underlying technology stack. Container-based workloads are suitable for multi-tenancy on a single compute instance and when implemented securely can realize significant operation efficiencies. An important corollary is that launching a new workload does not incur the cost of provisioning new compute infrastructure. This enables a true on-demand, self-service experience for users.
Container Orchestration
Container orchestration involves the lifecycle management of container workloads, including functions such as to schedule, stop, start, and replicate across a cluster of machines. Compute resources for running workloads are abstracted, allowing the host infrastructure to be treated as a single logical deployment target. Kubernetes is an open source community project addressing container orchestration. It groups containers that make up an application into logical units for easy management and discovery, and features self-healing, service discovery, load balancing, and storage services among its rich feature set. Orchestration plays a critical role in our design goal of application-centricity as quality of service attributes and deployment patterns are executed by invoking Kubernetes API primitives.
Continuous Integration
Continuous integration (CI) concerns the integration of code from potentially multiple authors into a shared source code management (SCM) repository. Such check-ins could occur many times a day, and automation steps in such a process could include gates or controls to expose any issues as early as possible. SCMs such as Git include workflow support to commit to trunk, push, and merge code pull requests from multiple developers. With containers, a Git push event could be configured to then trigger an image build event via the webhooks mechanism.
Continuous Delivery
Once a CI strategy is in place, consideration can then move to achieving continuous delivery (CD). This involves automating the steps required to promote the work product from one environment to the next within the defined software development lifecycle (SDLC). Such steps could include automated testing, smoke, unit, functional, and static code analysis and static dependency checks for known security vulnerabilities. With containers, promotion in later stages of the SLC may merely involve the tagging of the (immutable) image to mark acceptance. Binary promotions are also possible such that only the image is pushed (to the target registry of the new environment), leaving source code in situ.
Continuous Deployment
By convention, we can denote the special case of automated continuous delivery to production as continuous deployment (CD). We make such a distinction because such deployments may be subject to additional governance processes and gates—for example, deliberate human intervention to manage risk and complete sign-off procedures. We make such a distinction because such deployments may be subject to additional governance processes. As per Continuous delivery versus deployment, there may be scenarios for deliberate human intervention to manage risk and complete sign-off procedures.
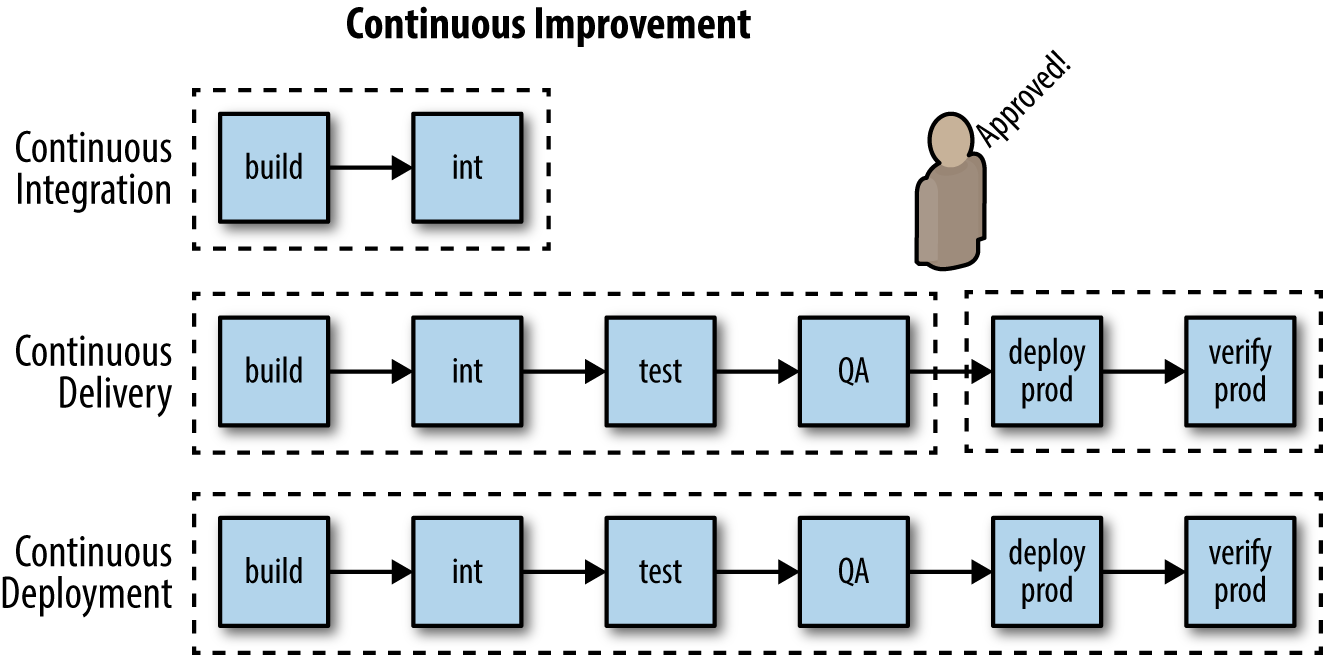
Figure 2. Continuous delivery versus deployment
Pipelines
Pipelines are a representation of the flow/automation in a CI/CD process. Typically a pipeline might call out discrete steps in the software delivery process and present them visually or via a high-level scripting language so the flow can be manipulated. The steps might include build, unit tests, acceptance tests, packaging, documentation, reporting, and deployment and verification phases. Well-designed pipelines help deliver better quality code faster by enabling participants in the software delivery process to more easily diagnose and respond to feedback. As illustrated in Smaller releases, release often, faster feedback, diagnosis and response turnaround can be accelerated by organizing releases into smaller and more frequent release bundles.

Figure 3. Smaller releases, release often, faster feedback
Software Configuration Management
For our purposes we will take a narrower view of software configuration management (CM) and focus on the recommended software engineering practice of separating dynamic configuration from static runtime software. Doing so allows developers and operations engineers to change the configuration without having to rebuild the runtime such as might occur when deploying to different environments. Containers, based as they are on immutable images, amplify this behavior as the alternative would be configuration layered across multiple images for each deployment scenario.
Deployment Patterns
Aligned with the goal of automation across all steps in the software delivery lifecycle are patterns for deployment. We look here for strategies that can balance across criteria including safety, testability, reversibility, and downtime minimization in cloud-scale scenarios. Some deployment patterns also offer opportunities for capturing and responding to feedback. An A/B deployment allows for testing a user-defined hypothesis such as whether application version A is more effective than B. Usage results can then drive weighted load balancing across the alternatives. Automation of deployment strategies in this DevOps world are implemented by driving the orchestration APIs.
Continuous Improvement
Let’s conclude this chapter by covering continuous improvement (Continuous improvement), which should be the thread that connects all of the process improvement–related practices summarized. The environment changes and so must we. These practices make it easy and inexpensive to experiment, formulate, and test hypotheses, as well as capture, act on, and experiment with the feedback received. This way we can continue to inject energy into the system and so maintain a state of dynamic stability—a balance of adaptive/agile versus fixed/stable.
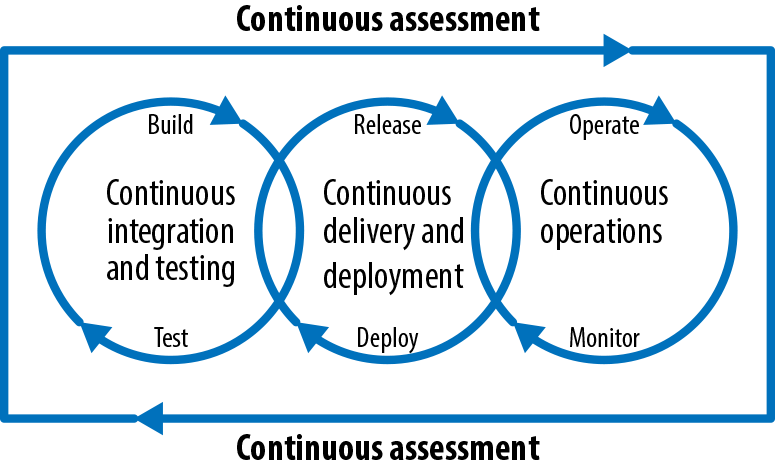
Figure 4. Continuous improvement
Summary
We covered here some of what is unique and nuanced about DevOps with OpenShift and why it matters. Realizing these DevOps concepts using natively container-aware automation can bring cloud deployment power to all the people, from 10x programmer to citizen developer. The following chapters will show you how.
The Compelling Platform
01 November 2022
Tags : platform, platform as product, openshift
The Compelling Platform
“Build it and they will come !” - 1989 movie Field of Dreams.
A key ingredient for success when building a platform is that it must be compelling to use. What makes a platform compelling ?
- The platform is self-service for the overwhelming majority of use cases.
- The platform is composable, containing discrete services that can be used independently.
- The platform does not force an inflexible way of working upon the delivery team.
- The platform is quick and cheap to start using, with an easy on-ramp (e.g. Quick start guides, documentation, code samples)
- The platform has a rich internal user community for sharing
- The platform is secure and compliant by default
- The platform is up to date
- The platform is the thinnest viable
A platform should also be more than just software and APIs - it is documentation, and consulting, and support and evangelism, and templates and guidelines.
You must also move away from project as the primary mechanism for funding and staffing delivery of technology. Platform is a product, and needs a long-lived and stable team tasked with both build and run.
Define Platform
“A platform is a curated experience for the customer of the platform (engineers)” - Matthew Skelton.
“A digital platform is a foundation of self-service APIs, tools, services, knowledge and support which are arranged as a compelling internal product. Autonomous delivery teams can make use of the platform to deliver product features at a higher pace, with reduced co-ordination.” - Evan Botcher.
What it is NOT:
- It is not the limited virtualised hosting and locked-down centrally-managed tooling that you already have.
- It is not just OpenShift, Ansible or RHEL by themselves.
- The fattest platform in the world.
The starting point is to “Use these N services in these ways …” - this is a curated experience.
The Thinnest Viable Platform is a small, curated set of complementary services or patterns used together to simplify and accelerate delivery.
The platform will evolve and its design should meet common team interaction modes.
